Showing posts with label long exposure. Show all posts

Thursday, August 6, 2020

Creative Use of Shutter Speed and Long-Exposures

There are a couple camera settings that can be creatively manipulated to make your photos more interesting.  The lens aperture (the opening that lets light in) controls how much of the scene is in focus or the Depth of Field (DOF). The shutter speed (how long the lens is open letting light in) controls how moving subjects are captured.  Playing around with the shutter speed when photographing lakes, ocean shores, etc. can be fun and produce some very different looks.

To illustrate I have taken the same photo and different shutter speeds.  Take a look at these two.
f/7.1, ISO 3200, 1/17 second
f/22, ISO 160, 14 seconds

The first photo had a shutter speed of 1/17 of a second, which captured the light chop on the surface.  The second photo had a long shutter speed of 14 seconds and turned that light chop into a milky surface.  Everything else in the photo was not moving and looks pretty much the same.

Here's another example.
f/8, ISO 1250, 1/55 second
f/22, ISO 160, 1 second


You may have noticed that the ISO and aperture are also different in each photo.  I changed these settings to get the shutter speed I wanted.  The lower the ISO number, the longer the shutter speed to get the same exposure.  The higher the f-stop number, the longer the shutter speed.  If I want t long shutter speed I will start by setting the ISO as low as it can go (160 on my camera).  I will then change the aperture until I have a shutter speed I think will give the effect I'm wanting.  Because the aperture controls the DOF, I will make sure it is such that I have the DOF I want.

It's hard to see in the example above but the clouds in the 1-second exposure are slightly blurred because they are moving. When the shutter speed is very long and the clouds are moving across the sky you can blur them as well in your photo.

f/20, ISO 200, 120 seconds

f/22, ISO 200, 120 seconds

In both photos, you can see the clouds were moving from left to right.  You can make a very dramatic photo if you can position yourself so that the clouds are moving toward your camera.

Anything that is not moving in these long exposure photos will be captured sharp with no motion blur.  Sometimes even water is still enough that the reflections are crystal clear.
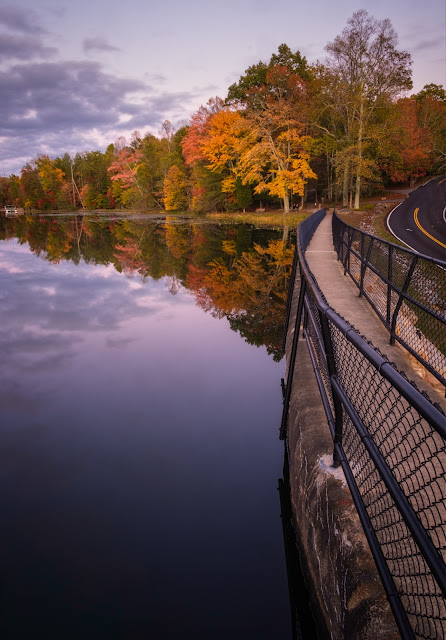
f
/22, ISO 250, 7 seconds

Long exposure photography can be a lot of fun.  Grab your camera, put it on the tripod, and give it a try.  Then let me know how it comes out.

Sunday, August 10, 2014

Scouting For Ideas

I'll be leading a photo outing to South Holston Dam near Bristol Tennessee on August 16 for the Eastman Camera Club.   Anyone is welcome to join us.   Trip details are available at http://eastmancameraclub.blogspot.com/2014/07/next-camera-club-outing-saturday-august.html   Send me an email if you have questions - r.siggins@charter.net

It's been a couple years since I was up there and I decided I had better do a little scouting before next Saturday.   I need to have some suggestions for photography to offer.  Here's what I found.

The wildflowers are not the primary photo opportunity in mid-August.  The Cut Leaf Coneflowers that bloom along the river banks have seen better days.   There were a few Jewelweed or Touch-Me-Not still in bloom, but they were not growing where they were easy to get to.

TVA was generating so the water flow was pretty high over the Weir Dam and after a couple cloudy rainy days the sun was out making it difficult to take long exposure shots of the flowing water.

What I found was some really cool reflections and patterns.

Hanging On

Golden Reflections

Cut Leaf Coneflowers
Golden Flow

Stump - Long Exposure

Reflections

Repeating Patterns

Weir Dam Patterns

If you join us Saturday, here's some suggestions:

Stuff to bring:

  • A picnic dinner.  We will eat and have some social time at the picnic area before starting our photographic journey.
  • A tripod.  You will want to try some long exposures of the water flow.
  • A polarizing filter.  It can make a tremendous difference with the reflections and the fog that rises off the river in the evenings.
  • A long lens.   I found I wanted something longer than 200mm for many of my shots.   Except from the top of the dam, there are not many wide angle shots.
  • A neutral density filter if you have one.  It will cut the light and allow you to get longer exposures and blur flowing water.
  • A hat or something to shade the front of your lens.   Late afternoon sun can cause flares in your pictures if it shines on the front of the lens.
  • Comfortable shoes.  There is a nice 1.8 mile trail around Osceola Island.  This is where we will spend most of our time.
  • Bug spray.  There were a few pesky bugs but nothing bad.
Things to look for:
  • Reflections in the surface of the water.  The greens will give way to golden reflections as the sun gets lower.
  • People fishing, canoeing, etc.  People can add interest to your photos.
  • Patterns
  • The little details
  • Light - no telling what the light will be like when we get there.  We'll work with what we get.  If we're lucky there will be some clouds, but enough light to give the warm light of sunset. 
  • Fog - sometimes the fog off the river is very thick.   This creates perfect soft light.  Watch for sunbeams in the fog.
  • Wildlife.  I haven't seen any wildlife there, but it should be a good place for herons and other birds.
If you are interested in joining us meet me at the Colonial Heights location or up at the Weir Dam.   If you have questions just email me at r.siggins@charter.net

Monday, August 12, 2013

Learning All The Time

Seems like every time I go out shooting I learn something new, even without trying.

I wanted to capture the misty effect you can get with long exposures of several seconds or more with waves on the beach.   When I took this shot it was still too bright for a long exposures.  In order to get the longest shutter speed possible I set my ISO as low as possible (100), my aperture as small as possible (f/22), and added a neutral density filter to the front of my lens to cut the light even more.   I further slowed my shutter by making sure I exposed for the sky and not the sea stack.   I was able to get a 15 second exposure even shooting into the sunset.

Sea Stack Sunset

When I looked at the LCD display on the back of my camera I thought I had captured what I was after.  The waves on the beach blurred into a smooth misty surface that reflected the colors of sunset.  Good for me!

When I was working on this photo just now I realized my mistake, the results of which you can see in this close crop of the trees on top of the sea stack.

See the ghost image of the tree tops?  Obviously the camera moved during that 15 seconds when the shutter was open.   Then I remembered.  To get the shot I wanted without the sandy beach I had to set my camera out near the water.  I had my camera on my tripod, which I set down in the sand and composed the shot.  I waited for the waves to be where I wanted them and started the exposure.   What happened next was comical.  The waves did not stop just below my tripod but continued up the beach and around the tripod legs.  Anyone who has stood at the edge of the surf knows what happens.  The wave washed the sand out from under the tripod legs, which then settled into the sand.  The comical part was me with my hiking boots running from the waves while leaving my camera and tripod in the surf.   Some of my photo buddies who were there with me chuckled at my antics.

Lesson learned - make sure the camera is on a solid surface and is not going to move during the exposure.  Beach sand and waves do not make a solid surface to shoot from.

I had fun trying the long exposures and will try again when I get a chance.  I'm sure I'll learn another lesson in the process.