Tuesday, June 25, 2019

Fun With Panning

Panning photography can be fun and frustrating.  Fun because you can make some fantastic photos that really grab a viewers attention.  Frustrating because it is not easy and takes some practice.  The good news is you can do this with most any camera that allows you to set the shutter speed.

A panning example. 1/15 sec, f/13 at 27mm (full frame equivalent)

Panning is a technique where the photographer pans the camera along with the moving subject keeping the subject close to the same position in the frame.  When done correctly, and with a bit of luck, you end up getting a relatively sharp subject but a blurred background, like the photo of the red Mustang.

Recently June and I were exploring downtown Knoxville, Tennessee around the Market Square.  It's a fun place to practice street photography, which is candid unposed photography of people, typically in an urban setting.  There are plenty of interesting people in downtown Knoxville on a Friday night, doing many different things.  One thing we saw lots of were people zipping around on e-scooters.  People on scooters make great subjects for panning because:

  • They are slow moving
  • They are on predictable paths
  • The main subject is people

You can do panning with other subjects but faster subjects moving erratically are more difficult to photograph.
Too slow.  1/10 sec, f/14 at 53mm
Setting up the camera - You will want to be in Shutter Priority or Manual Mode.  For a slower moving subject, such as scooters and bicyclists, you will want a shutter speed between 1/15 and 1/30 of a second.  Using a  shutter speed slower than 1/15 will make it difficult to avoid motion blur in the subject, as in the motorcyclist above. You may need a faster shutter speed when photographing a faster moving subject.

Set the camera to continuous focus tracking so that it will adjust focus as the distance to the subject changes.  Using burst mode or continuous shooting mode will allow you to take many shots as the subject moves by you. 

1/18 sec, f/11 at 53mm
Setting up the shot -  you want to position yourself so your view of the subject is perpendicular to the direction of motion, as seen in these example photos. This will minimize the change in camera to subject distance and improve the odds that the camera will be able to keep the subject in focus.

Be aware of the background.  Just like any photograph, you don't want a bright colorful background to distract from the subject.  Also, watch out for objects in front of the subject as you pan.

I like to zoom out a bit and crop later to get a better composition.  As the subject approaches center them in the photo and press the shutter.  In burst mode, the camera will keep taking photos as long as you keep your finger on the shutter or the memory buffer fills up.  The key is to keep the subject in the same position within the frame.  It's not as easy as it sounds and this is the part that takes practice and a bit of luck.  Keep shooting while the subject moves past you.

1/15 sec, f/11 at 53mm
Go out and give this a try.  It will take a lot of practice so be patient. You can practice by heading to most any downtown area where there are cars or people passing by.  Add your comments to this post to let me know how you're doing.

Sunday, June 16, 2019

Let's Get Rid of The Noise

I don't usually do software reviews but sometimes I run across a tool that is so much better than what I have to work with that I have to tell others about it.  This time it's DeNoise AI from Topaz Labs

I have plenty of photo editing tools, including Lightroom Classic, Photoshop, and On1 Photo RAW 2019.  Until recently I have resisted the siren call of the latest greatest piece of software that will make all my photos look fantastic.  I find it's better to be proficient in a few than to have a toolbox of expensive packages that I rarely use.  About a month ago I saw a review of the DeNoise AI package and thought I would give it a try.  Several friends use Topaz Labs software but I had not gone down that path.  They offered a free trial so I decided to give it a try.  I'm glad I gave it a try.  I'm now the proud owner of another piece of software for photo editing.

The reason I decided to put the $79.99 down and buy a copy is the quality of the images that come out of the software.  I like to photograph birds, which means I'm shooting at shutter speeds of 1/1000 - 1/2000 second.  My long lens that I use for bird photography works best at f/6.4.  That means I am often shooting at high ISO values that result in noisy photos like the one below.

1/1000 sec at f/6.4 ISO 12800
This photo is cropped down to about 25% of the original size of the RAW file out of my Fuji X-T3.  You can see the noise in the background.  That's more noise than I like.  I used the Lightroom Noise Reduction tools and was able to remove some of the noise, but lost some of the details in the bird.

Lightroom Noise Reduction Applied

The last version was editing using DeNoise AI.
Topaz DeNoise AI


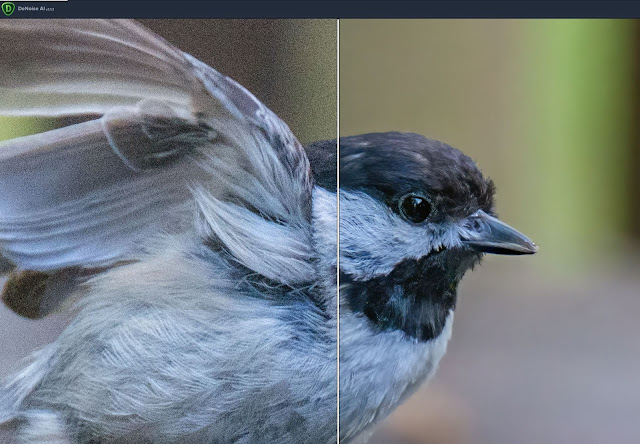
The Topaz software was better at removing the noise and did a much better job at retaining the details in the feathers, eye, and claws.  If you want to compare each version, click on one and then use your arrow keys to flip through each one on your screen.

The DeNoise package is easily called from within Lightroom or Photoshop.  You can also open and edit files outside these packages.  It an take a few seconds to process the image.  On my desktop system it makes good use of the graphics card processing power to speed up the process.  This is something Adobe has yet to get working correctly. You experience may vary, especially if you are using a laptop.

Here is another example showing before on the left and after on the right.


This is not a tool I will use all the time.  A properly exposed image with ISO values of 800-1600 may not need to be run through DeNoise AI.  However, I will be using it on any high ISO images where that nasty grain shows up.

Now, the team at Topaz Labs is not perfect.  Their website has many broken links and I know of one photographer who had trouble getting their copy activated after purchasing.  He had some difficulty with their tech support but in the end, he got it working and is happy with the product.

I suggest you give the free trail a test drive and decide for yourself.  Use this coupon code for 15% off any Topaz product.  http://topazlabs.refr.cc/richards