Showing posts with label photography. Show all posts

Sunday, August 2, 2020

Breaking Out The Creative Juices


June and I have been in a dry spell where we didn't get out to photograph much at all beyond what can be found in our yard.  Last night we tossed the cameras and tripods in the car and headed to the mountains to see what we could find to photograph around sunset.  It was a great evening where the juices started to flow again.

When we drove through Johnson City and the way to Unicoi the temperature was 88 degrees.  By the time we reached Beauty Spot on Unaka Mountain, the temps had dropped to 73!  Much nicer!!  When we arrived we discovered more cars than I had ever seen up there.  There were many people enjoying the cool mountain air and spectacular mountain views.  Most appeared to be college-age and I think we were the oldest by about 30+ years.  No worries.  We picked our spot and waited for the show to begin.

June's Sunset Photo
When we think about sunsets we hope for a beautiful scene like June's photo above.  I'm proud of her photo.  It was the first one I posted after getting home around 10:30.  But there are many ways to photograph a sunset.

One way to change it up is to shoot wider.
Wide-angle 14mm (21mm full-frame equivalent)

Maybe use that same wide-angle lens to emphasize the foreground while including the sunset in the background.

Maybe swapping out the lens for a telephoto zoom to include just part of the sunset.

46mm (69mm)

66mm (100mm)

104mm (156mm)

By swapping to a longer telephoto zoom lens I can zoom in on just parts of the sunset.
177mm (266mm)


400mm (600mm)

400mm (600mm)

Too often we shoot from the same spot using the same lens and the same focal length.  Don't let this habit squash your creativity. These photos are just an example of how changing the lens and focal length can result in vastly different photos of the same subject. 


Friday, March 20, 2020

More Time On My Hands = More Photo Tips

We are all living under conditions that are extremely different from just a few weeks ago. Half the sessions in my Photography Class were canceled, and places I frequent on a regular basis, such as the gym, are closed.  I'm spending more time walking but today it's raining so I'm spending my day indoors.  That means I have time to invest in things I've been neglecting, such as blogging, updating my website, and editing photos in my archive.

I feel bad that I wasn't able to finish my last photography class.  I promised to finish it when things return to normal, but I'm not sure when that will be.  So instead, I'm going to share much of what is in my class here in my blog.  Here's the first installment...
Bluebird on a yard decoration
Yesterday was the first day of spring.  Flowers are coming up and the birds are busy.  Lately, we have noticed a pair of Bluebirds in our front yard each morning.  Today I opened the window and got my camera and long zoom lens out to see if I could get a shot or two.  They didn't cooperate as much as I hoped, but they did give me material for today's photo tip.

When composing a photo it is important to pay attention to the background.  Watch out for things that will take away some of the beauty of the photo.  In this case, our neighbor's camper was in the background behind the male Bluebird.

Bluebird With Camper

I was shooting at a wider aperture (f/5.6) and zoomed in to 400mm, which blurred the background a little.  You can still see the white of the camper.  It looks unnatural and not exactly what I wanted. 

By getting a little lower I was able to shoot over the camper and include the green yard instead.  All I had to do was do a few deep knee bends.


No Camper!
This is a simple little example to illustrate the tip:

  1. Check the background when composing your shot
  2. If there is something that will distract from your photo try to remove it by moving to a different spot, either side to side or up and down. 
  3. This tip applies to all styles of photography.
  4. Now, make this a habit by shooting as much as possible.
Outdoor nature and wildlife photography can be fun and is a great way to destress.  Look for opportunities to make some photos, while staying "socially distant".

Sunday, January 5, 2020

Spring 2020 Basic Photography Class in Kingsport

My Spring 2020 Basic Photography Class has been scheduled for March 5, 10, 12, and 17.   The class will start out with learning the basics of photography - light, shutter speed, aperture and how to use them on your camera.  From there we will get into color, composition, lighting, techniques and photographic gear selection.  We'll talk about some common photography challenges and how to overcome them. We will go over different photo editing packages, organizing photos, printing, and sharing online.   The class will be a combination of classroom teaching, practicing our new photography skills, and reviews of photography assignments.


The class is designed for photographers of all ages who have a DSLR, mirrorless camera, or advanced compact camera. 

Classroom sessions are March 5, 10, 12 and 17 from 6:00 PM– 8:00 PM in the Eastman Employee Center.   There will be one field trip on Saturday, March 14 to practice what we have learned.  The Saturday time will depend on what works best for the majority of the students.

In every class we will have time for:
Review of Homework – yes, we are in school again.
Problem Solving - Bring your camera and problem photos to class
Question and Answer

The class is open to Eastman Camera Club members.  The good news is anyone can join the club by going to https://eastmancameraclub.net/ and clicking on About near the upper left of the page.

Cost - $45/person.   Maximum of 14 people per class.  Please sign-up at the Toy F. Reid Eastman Employee Center (229-3771)

Contact – rcsiggins@gmail.com
423-416-1258

Sunday, October 13, 2019

A Useful Weather Page For Outdoor Photographer

In my opinion, the most important part of photography is light.  Sure composition and a sharp technique are key elements to making a good photo, but if you follow the light you can find the composition and use your photographic skills to make a great photo.   As outdoor photographers, we are at the mercy of the weather to give us the light we want. 

I have used an App called The Photographers Ephemeris or TPE for years.  It will tell me where the sun and moon will be for any given time and place anywhere in the world.  This is more than just knowing when the sun comes up or goes down.  It will tell me the direction and angle of elevation, which will tell me how the sunlight will affect the scene.  You can use TPE for free on the web https://www.photoephemeris.com/tpe-for-desktop or buy a smartphone version for a few bucks.  Check it out.

Besides the sun, other major factors include clouds, wind, dew, and rain,  There are many weather apps and websites available.  One website I find useful is Weather Underground https://www.wunderground.com/ because of the useful information on the 10-day forecast.
Some key pieces of information available on this single page.

  • General forecast - Partly Cloudy for today.
  • Forecasted temperature and dew point.  When the temperature falls below the dew point you get dew on the grass, flowers, etc. making for great macro photos.
  • Cloud cover - sometimes you want lots of cloud cover to give nice soft light.  Other times you want scattered clouds for photos that include the sky.  The example above shows cloudy in the morning and burning off around noon.
  • Wind speed - this is important if you are wanting to minimize plant movement in the image.  In this example, the wind is forecast to pick up around noon.
Using this example I can see that the morning is best for macro photos of flowers and the afternoon might be better for big landscape shots.

As photographers, we have a wealth of information that can help us plan our outings and improve out odds of making great photos.  Now, go out and make some.

Sunday, July 28, 2019

Use Limitations To Unleash Your Creativity

Over the years I have gathered quite a collection of cameras and lenses.  So much so that when June decided to try her hand with an interchangeable lens camera I was able to give her a mirrorless camera and three lenses.  This is my backup camera and three lenses that I no longer use but never got around to selling.  Not counting the three lenses I gave June, I have six lenses covering focal lengths from 12mm to 400mm (18-600mm in full-frame terms).  Because I use a cropped sensor mirrorless camera system I can easily carry all those lenses in a single backpack.  I pretty much have unlimited flexibility with which to create my photos.  I found this flexibility was putting me into a creative rut. I was relying on my collection of lenses to come up with a good composition. 

Don't misunderstand -- each of those lenses serves a different purpose, from fast wide 12mm lens for night sky photos to the 100-400mm zoom for wildlife photography.  Sometimes I would use a lens that is typically not used for a given style of photography, such as using the 100-400mm zoom for landscapes, but most of the time I was relying on a zoom lens to compose the photo without making other efforts to be creative.

Recently we took a couple trips to Knoxville Tennessee, Michigan, and Indiana.  For a couple outings on those trips, I took only one lens - a 35mm f/2 prime (no zooming) lens for my Fuji XT-3 mirrorless camera.    I recently added this lens to my collection because the 35mm focal length is close what our eyes see (normal lens) and the wide f/2 maximum aperture allows me to shoot in low light conditions and to blur the background in my photos.  It's a tiny little lightweight lens on a small mirrorless camera that doesn't attract much attention or weigh much at all.  I can carry it all day long and no one pays much attention to the little camera and lens.
f/2 at 1/50 sec, ISO 800
By limiting myself to a single focal length I had to compensate by moving around to get a good composition.  The wide f/2 aperture allowed me to shoot in dark places I couldn't with other lenses, such as the bar, but at the same time, I had to think about creatively using the depth of field.

f/4, 1/1600 sec, ISO 4000
f/2, 1/10 sec, ISO 400

I found myself having to look around and find new perspectives.  While waiting outside a gift shop, I found a whirlygig that had some cool shapes.  I could use the f/2 aperture to blur out any distracting elements in the background.  I focused on water dripping from a pipe.  I found a single yellow petal from a Sunflower in a bed of red leaves (I didn't put it there, this time.)

f 5.6, 1/90 sec, ISO 320

f/2.8, 1/2000 sec, ISO 200
Sometimes the 35mm focal length worked out, such as the bridge photo.  Other times I had to work to create a pleasing composition because of physical barriers that kept me from being able to stand where I wanted, such as the boat and lily pad flower and the red/orange flowers where I had to cut off the left petal.
f/7.1, 1/100 sec, ISO 200


f/16, 1/120 sec, ISO 640
I found that I enjoyed my single-lens outings and found some creative photos that I might have missed if I had relied on my arsenal of lenses.  My new photos don't look like the thousands I have already taken.  By restricting one area, I have opened up my creativity and made photography fun.

Give this a try.  You don't have to restrict yourself to a single fixed focal length lens.  Restrict yourself in other ways -- only make photos that contain a specific color.  Only do portrait orientation photos.  Limit yourself to a specific aperture or shutter speed setting.  You might find you have more fun while learning to be more creative.

Here are a few more photos from those single-lens days.
f/5.6, 1/105 sec, ISO 400

f/5, 1/150 sec, ISO 200

f/2, 1/125 sec, ISO 160

f/2, 1/50 sec, ISO 1000

f/4, 1/45 sec, ISO 160


Tuesday, June 25, 2019

Fun With Panning

Panning photography can be fun and frustrating.  Fun because you can make some fantastic photos that really grab a viewers attention.  Frustrating because it is not easy and takes some practice.  The good news is you can do this with most any camera that allows you to set the shutter speed.

A panning example. 1/15 sec, f/13 at 27mm (full frame equivalent)

Panning is a technique where the photographer pans the camera along with the moving subject keeping the subject close to the same position in the frame.  When done correctly, and with a bit of luck, you end up getting a relatively sharp subject but a blurred background, like the photo of the red Mustang.

Recently June and I were exploring downtown Knoxville, Tennessee around the Market Square.  It's a fun place to practice street photography, which is candid unposed photography of people, typically in an urban setting.  There are plenty of interesting people in downtown Knoxville on a Friday night, doing many different things.  One thing we saw lots of were people zipping around on e-scooters.  People on scooters make great subjects for panning because:

  • They are slow moving
  • They are on predictable paths
  • The main subject is people

You can do panning with other subjects but faster subjects moving erratically are more difficult to photograph.
Too slow.  1/10 sec, f/14 at 53mm
Setting up the camera - You will want to be in Shutter Priority or Manual Mode.  For a slower moving subject, such as scooters and bicyclists, you will want a shutter speed between 1/15 and 1/30 of a second.  Using a  shutter speed slower than 1/15 will make it difficult to avoid motion blur in the subject, as in the motorcyclist above. You may need a faster shutter speed when photographing a faster moving subject.

Set the camera to continuous focus tracking so that it will adjust focus as the distance to the subject changes.  Using burst mode or continuous shooting mode will allow you to take many shots as the subject moves by you. 

1/18 sec, f/11 at 53mm
Setting up the shot -  you want to position yourself so your view of the subject is perpendicular to the direction of motion, as seen in these example photos. This will minimize the change in camera to subject distance and improve the odds that the camera will be able to keep the subject in focus.

Be aware of the background.  Just like any photograph, you don't want a bright colorful background to distract from the subject.  Also, watch out for objects in front of the subject as you pan.

I like to zoom out a bit and crop later to get a better composition.  As the subject approaches center them in the photo and press the shutter.  In burst mode, the camera will keep taking photos as long as you keep your finger on the shutter or the memory buffer fills up.  The key is to keep the subject in the same position within the frame.  It's not as easy as it sounds and this is the part that takes practice and a bit of luck.  Keep shooting while the subject moves past you.

1/15 sec, f/11 at 53mm
Go out and give this a try.  It will take a lot of practice so be patient. You can practice by heading to most any downtown area where there are cars or people passing by.  Add your comments to this post to let me know how you're doing.

Sunday, May 19, 2019

Using Exposure Compensation

“Each day brings new opportunities, allowing you to constantly live with love—be there for others—bring a little light into someone's day. Be grateful and live each day to the fullest.
― Roy T. Bennett, The Light in the Heart

Light is the most important part of photography.  Without it, there would be no image, no memories, no joy in a photograph.  But, too much or too little light can be detrimental to our photos.  Understanding light is key to making better photos. 

Our cameras don't understand light.  They have powerful computer processors that measure all the light coming in through the lens and hitting the sensor, but they don't know anything about the subject, what is important in the photo, or what is unimportant.  The software developers who program those processors write algorithms to take all the inputs and make a decision on the three factors that make up the exposure triangle - shutter speed, aperture, and ISO.  Depending on your camera settings one, two or all three of these are constantly being adjusted depending on the light the camera sees at that instant.  Without knowing your composition your camera can sometimes make bad decisions.

Take this photo as an example.  The conditions were harsh.  It was a bright sunny day with harsh direct light.  The breeze was blowing and the Columbine flowers were in constant motion.
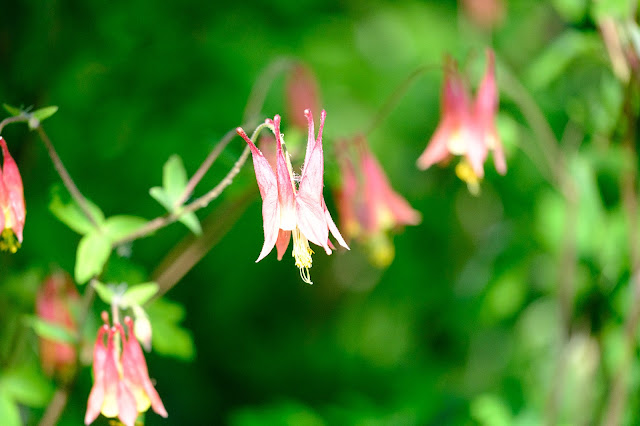
1/4000 sec, f/2.8, ISO 1600

I was shooting with an aperture of f/2.8 to create a shallow depth of field making the center flower stand out from the background.  The high ISO was to get a very fast shutter speed to freeze the motion of the flowers.  The camera saw all the light and decided on a shutter speed of 1/4000 of a second.  Even with that fast shutter speed, there was too much light.  Although the overall exposure was not bad, the main subject was overexposed and the photo was ruined.

There are a number of ways to fix this, and none involve post-processing (editing) on a computer later.  If you are comfortable shooting in full manual mode, you set the aperture, shutter speed, and ISO while keeping an eye on the histogram.  My personal preference is to stay in aperture priority mode, where I spend most of my time, set the ISO, and let that advanced processor in the camera figure the shutter speed at that instant.  Remember I said the flowers were constantly blowing around.  That made the light constantly changing.  Instead of setting the shutter speed myself I gave the camera a hint that the exposure needed to be turned down. 

Almost every camera (even some cell phones) has a setting called exposure compensation.  It is often a button on the top or back of the camera that has a +/- symbol.  Some cameras have this setting buried down in a menu.  This typically only works when the camera is in Program, Aperture Priority, or Shutter Priority mode.  By using exposure compensation I was able to tell the camera to alter the calculated exposure by a given number of stops.  In this case, I dialed in a -2 EV exposure compensation and shot again.  I also lowered the ISO to 400 because I didn't need it that high to get the shutter speed I was wanting.
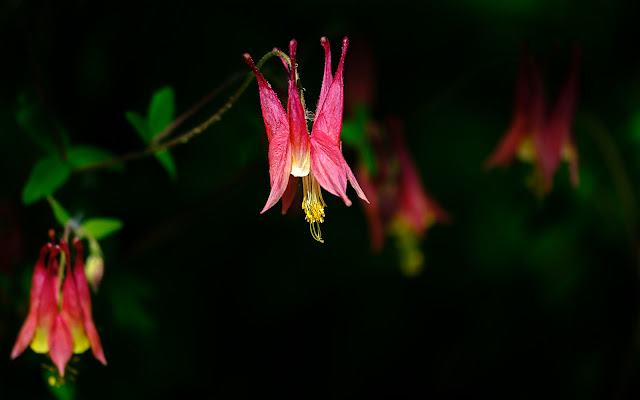
1/6000, f/2.8, ISO 400
Now, the subject of my photo is properly exposed.  The background is now almost black.  That works great because the background is unimportant and making it dark it makes the red flower jump out.

A common exposure problem occurs when the background is brighter than the subject.  By default, the camera will expose so the subject is dark and the background is correct, like in this photo.


By dialing in a +1 2/3 EV exposure compensation I am able to brighten the bird so that details in the feathers and eyes can be seen.  By making this adjustment the sky becomes overexposed.  This is fine because the subject is the bird, not the sky.

The key to knowing when to adjust the exposure compensation is knowing what the subject is and if it is properly exposed.  If the subject is too bright or too dark, throw in some exposure compensation to properly expose the most important part of the photo.

You may be tempted to assume you can correct the exposure later in post-processing.  Don't be fooled.  Parts of your photo that are overexposed often cannot be brought back and brightening underexposed photos can introduce digital noise.  It's much better to get the exposure right when you make the photo than to try to correct it later.

If you find this tip useful please subscribe to my blog to get future tips emailed to you.  If you have questions, feel free to contact me and I'll do my best to answer them.

Thursday, April 19, 2018

Don't Be Satisfied With The First

Many landscape photographers, including myself, have a bad habit of shooting the first obvious composition.  That's fine, but the problem comes when we stop there and don't take the time to look for other different less-obvious compositions.

1/4 sec, f/22, ISO 200, 41mm (cropped sensor)
Here's an example from a recent trip to Charleston Falls Preserve in Ohio.  The falls are billed as a miniature Niagra Falls because of the rock strata.  When we were there the water flow was low and the falls were nothing like Niagra, miniature or not.  There is a nice footbridge that crosses the creek below the falls.  This bridge is the obvious place to shoot from and I made all these photos from that bridge.  The best thing I can say about this first photo is it accurately depicts the falls.  It's what I call a documentary photo - accurate, but uninteresting.

The nice footbridge was also a barrier to getting to where I would like to have shot the falls - standing in the water about 20 feet from the base of the falls.  I could have positioned my camera low near the surface of the water and used the flowing water as a nice leading line up to the falls.  The day was cold, rainy and muddy - not worth climbing over the railing.

When the water falls vertically, a portrait (tall) aspect composition will often work best when shooting waterfalls.  That's how I shot the first example.  It shows the entire falls and the pool below.   Another option is to zoom in to capture some of the details in the scene.   In the second photo, I stood closer and used a horizontal crop to emphasize the three places where the water hits the rocks.

1/3 sec, f/11, ISO 200, 28mm
There is still a lot more rocks than water in the second photo.  I think the water hitting the rocks is the much more interesting than the rocks.   By zooming in even more I can emphasize the white water on the rocks. I also put a polarizer filter on my lens for this third photo.  The polarizer cut some of the glare off the wet rocks.
1/4 sec, f/11, ISO 200 66mm
My favorite part of this third photo is the flowing white water contrasting with the hard dark rocks.  The splashing water throws up a mist where it hits the rocks making it appear to glow.  Personally, I think this is a better composition than either of the first two.

When a photo is about contrast and shapes it can be a good candidate for black and white.  When you take away the color it can draw the viewers attention to other parts of the photo.  In this case that is the misty glowing water, the shapes or the water and rocks, and the contrast between the white water and the dark rocks.
The third photo converted to B&W
All of these photos were taken from the short footbridge.  By moving to different positions on the bridge and trying different compositions I was able to find multiple compositions I would have missed if I had stopped with the first.  When you arrive at a photo location, take time to look around.  You might try leaving your tripod and walking around with just your camera looking for interesting shots.  You can always go back for the tripod when you find a composition you like.  Just don't be satisfied with the first.

Sunday, July 16, 2017

Working A Scene

One of my favorite waterfalls can be found in Western North Carolina near Rosman. It's not in a National Park, National Forest or even a State Park. In fact, it's not on public lands at all.  It is in the back yard of a private residence! The owners are nice enough to allow, and even encourage, visitors to their own private waterfall on Shoal Creek.

After parking behind the house and walking about 200 yards the trail climbs a very short distance and then descends a set of stairs to the base of the falls. This is the first view of the falls taken next to the small pool below the 60-foot falls.

1/2 sec at f/16

I've been here twice and neither time was there a lot of water flowing over the falls. I think this level of water is just about perfect. It allows individuals streams to separate when falling over the rocky bluff. There is a lot of interesting details and patterns in these falls. While you can easily see the entire waterfall from this vantage point, there is much more to see and photograph.

Landscape photographers need to move around and "work the scene".  Avoid the temptation to place your tripod in the first place you find.  Move closer or farther back.  Use your zoom lens, which can give a different view from moving closer.  Get lower.  If possible, get higher and shoot down. We didn't stay long enough because standing in water with thunder storms near by is not a good way to live long and prosper.

1/2 sec at f/16

Hoping across the rocks to the center of the stream gives you a slightly different perspective with the rocks in the foreground. The first and second shots include the lush green foliage and thick moss on the sides of the waterfall. It was an overcast day and the soft indirect light really made these greens pop.
1.8 sec at f/16

The pool below the falls is not very interesting and does not add much to the composition. Wading through the pool I got closer to the falls and made the shot above, cropping out most of the pool and the gray skies. You'll notice I also cropped off the top of the falls. I did this to emphasize the shapes and patterns in the lower falls, which I found to be very interesting.

2.0 sec at f/16

I think the triangular shape of the bottom of the falls with the water flowing down the stair step to makes an interesting composition. I was able to include just enough of the water flowing in from the left and the greens in the upper right.  

Tall waterfalls like this typically work best as vertical portrait orientation shots. However, the horizontal ledges in the falls made an interesting landscape orientation composition when I zoomed in closer.

0.9 sec at f/16
I zoomed in closer to emphasize the hard geometric lines and shapes of the rocks and the soft flowing water. I always like green plants or moss showing through behind a waterfall.  
4.3 sec at f/16
All these photos were shot at ISO 200 and f/16. The shutter speed varied due to the changing light conditions. By the time I made this last photo the skies had turned dark from the returning thunderstorms. It was time to head for the safety of the car again.

Making Photos With Flowing Water

To make photos with the soft flowing water you should start with a shutter speed of 1/2 second and vary it to get different effects. You might need to adjust your exposure compensation or use manual mode to not let the white water become over exposed in the long exposures. Of course, your camera must be steady through the long exposure so a tripod is pretty much essential to keep the rocks solid and sharp. If you place your tripod in a stream be aware that the water will introduce some movement and potentially blur your long exposure photos. I  place my hand on the tripod and press down during the shot to control as much of the movement as possible.

The other thing I find to be essential for these shots is a polarizer filter. This will reduce the glare off the wet rocks and foliage.  Be sure to turn the filter to adjust how much glare you want to remove.

Finally, if you have read this far you probably want to know where these falls are so you can visit them yourself.  These are Eastatoe Falls near Roseman North Carolina.

Directions to Eastatoe Falls:

  1. From Rosman NC, drive south on U.S. 178 for approximately 3.4 miles to a private drive on the right.
  2. There is a sign for Mountain Meadow here, and the driveway leads back to a house, and what used to be a craftshop on the left.
  3. The home owners have made a small parking area behind the house labeled with "Park Here" signs. The trail leads across the lawn into the woods and to the falls.
Please be courteous and respectful when visiting these falls. There are many beautiful falls on private property, but very few of them are accessible to the public because the land owners do not allow access.  


Thursday, April 13, 2017

Know Someone Interested In Nature Photography?

Are you interested in nature photography?  Do you know someone who might be interested in taking photos like these?  Read on...
All photos from 2016 walk
Each year I do a one hour program on nature photography followed by a casual walk/stroll through the woods at Warriors Path photographing nature.  These free programs are part of the 38th Annual Spring Nature Festival at Warriors Path State Park in Kingsport April 21 - 23, 2017.  My talk is Saturday, April 22 from 9 - 10 AM in the Recreation Building on Duck Island.  The walk is 10 - 11:30 in the park.  

The program is suitable for beginner photographers with any kind of camera, including a cell phone. The walk is along a stream where we will find wildflowers and other things to photograph.

No need to register.  Just show up.

Be sure to check out the other programs Friday - Sunday.

Pass this along.  Spread the word.

Saturday, January 16, 2016

Wait For It - Timing The Light

Here's a quick post to illustrate the power of timing in landscape photography.  

Normally timing a photo is not all that important for landscape photographers.  We can take our time to set up a shot and shoot when ready. Unless it's a wildlife shot the subject is not moving and timing is not the most important thing to be concerned with.

Sometimes timing a landscape shot can make the difference between a ho-hum photo and one that really grabs your attention.  This morning was just such a time.   June and I were walking at our local state park and I was lucky enough to have my camera with me.   It was a typical winter morning.  The wind was calm, the sky was overcast, and occasionally the sun would break through the clouds for a minute or two. The moving clouds and constantly changing light was what made the difference today.

Here are three shots taken in a span of  less than two minutes.

8:54:32
8:55:17

8:56:20
In the second photo, the sun was hitting the bank and bare maple trees but not the hillside behind.  At that brief moment, the bright trees were standing out against the darker background.  The high contrast causes your eyes to be drawn right to the trees.  These conditions lasted less than a minute.

I was able to get this shot because I was watching for interesting light and paying attention to the interplay between the cloud shadows and the trees.   When you're out looking for interesting subjects to photography be sure to pay attention to the light.  It can make all the difference in the world.