Monday, March 30, 2020

"How do you know that?" Characteristics of light in photography

The depth of field (what's in focus) in this photo is pretty small.  About all you can read is the one line - "How do you know that?" 

I don't consider myself an expert photographer but I do enjoy sharing what I have learned, often the hard way, over the years.  Most things I've learned from experience and that's how I "know that." One of the best ways to share what I've learned is by example, which I try to do when blogging.

Being at home more has led me to experiment photographing things around the house.  In this case, an old non-fiction book and a pair of antique eyeglasses my dad gave to me.  They belonged to a relative but no one remembers who.  I'm not great at still life photography.  I do better at making photos of things that have been arranged for me, like wildflowers and mountains than things that I have to arrange.  However, we grow by working on things we are not good at.

The very first topic in my photography class is what I consider the most important.  It is not camera settings, the latest gear, or posing beautiful subjects.  I consider light the most important element in photography.  The right light can make a photo but even the most beautiful subjects can be poor photos in the wrong light.  Photographers love to talk about good light and bad light.  Light is not good or bad, but different kinds of light work better in different situations.

Light has three characteristics

  1. Direction
  2. Color
  3. Hard (direct) or soft (diffused)
Color Under LED Lights
I want to show you a little example of hard vs. soft light using a couple examples of photos I made with the book sitting on our kitchen table.  Above the table is a hanging lamp with 5 LED bulbs.  To the right is a set of French Doors that lead out to a covered deck area.  Those two light sources have different characteristics.


The lens aperture and focal length in these two photos are the same. The LED lights made the paper very yellow when using the auto white balance setting.  I corrected the white balance (light color) in each photo to be as realistic as possible. 


Direct Overhead Light


Indirect Side Light


Notice the shadows in the first photo.  They come from the overhead lights.  In the second photo what shadows can be seen are faint and soft.  The overhead lights also made the tabletop brighter.  The indirect light from the right made the book in the background brighter.

Indirect Light
Direct Overhead Light

In the second example, you can see how the direction of the light creates different shadows.  The photo with the indirect light coming from the right created a shadow in the crease of the book.  The direct light also overpowered the indirect light and minimized the reflections from the door in the lens.  The indirect light highlighted the brass hinge and the color of the eyeglass arms.

“There are no rules for good photographs, there are only good photographs.”
–Ansel Adams

Neither photo is right or wrong, just different.  As the photographer, it is up to us to use the light in our composition to emphasize what we want and de-emphasize what we don't want.  

Before making your next photo think about the light.  Where is it coming from?  Is it creating hard shadows?  Is it warm and pleasing or blue and cold?  How can you use that light to make a better photo?

Monday, March 23, 2020

Using The Depth of Field When Photographing Small Subjects

The world outside our homes seems to be getting worse and worse.  As I write this at 3:30 PM on March 23, the US now has the third-highest total cases, adding over 8,000 today.  A couple more days and we may pass Italy.  By the time you read this, the world will have changed again one way or another.  

The dichotomy of worrying breaking virus news and the world of nature is extreme.  Walk outside
Aperture = f/5.6
and check out what's blooming.  We have a flower garden where we have been planting native wildflowers for several years.  Yesterday June and I took a hike and saw wildflowers bursting forth everywhere.  The world of nature marches on just as it has since the beginning of the world.  

Photographing flowers is a perfect thing to do now.  We can do it while keeping socially distant and being surrounded by nature will improve our outlook and health.  June and I took our cameras on our hike yesterday.  We didn't have tripods, which would have made a big difference in the quality of our photos but we were there first to get exercise.

This is all leading up to my photographic tip for today -- the importance of the aperture setting when making macro (close-up) photos of small objects, such as flowers.  Those of you who have taken my class should remember I refer to the lens aperture as the depth-of-field (DOF) control.  By adjusting the aperture (opening in the lens that lets light in) we control how much light is captured by the camera and how much of the scene is in focus.  The depth of fields is the distance between the camera and the nearest and the furthest objects that render the image to be in sharp focus.  By adjusting the aperture we control the size of the DOF - more or less in focus.  Understanding this is critical to making good macro photos, where the DOF is tiny.

I am including some examples in this blog to illustrate my point.  With one exception, these were all taken on our hike yesterday with my Fuji X-T3 mirrorless camera, an 80mm macro lens, and without a tripod.  It was an overcast day with little breeze to move the flowers.  

You can click on any of the images to get a larger view and then use the left and right arrow keys to flip through all the images.

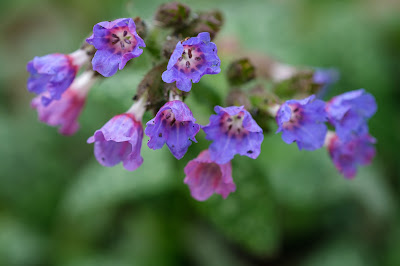
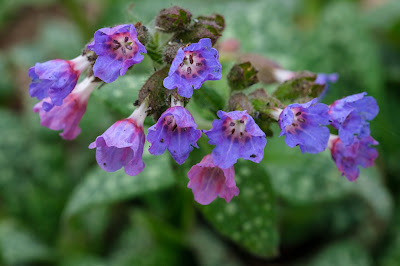
The first example was actually taken in our flower bed before our hike.  This Lungwort plant is a volunteer that just showed up a year or so ago.  It looks a little like Virginia Bluebells but the leaves are mottled.
Aperture = f/5.6

Aperture = f/13
The first thing you notice is the background in each photo.  At f/5.6 it is blurry and at f/13 it is more in-focus, but still not sharp.  I think the background in the first is less distracting, however, some of the flowers are clearly out of focus in the first one.  Which is better is a matter of personal taste.  There are many different aperture settings that I could have used.

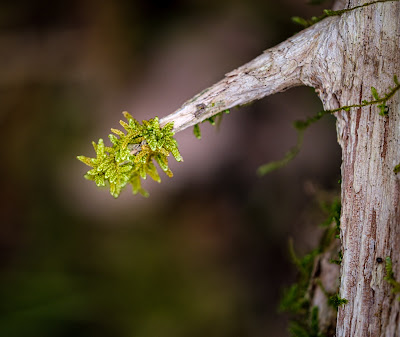
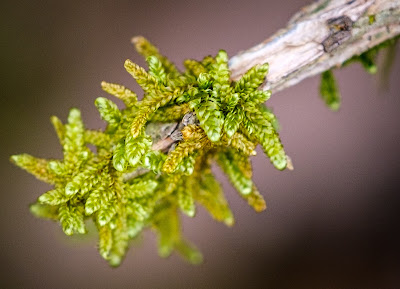
Moss Brush, uncropped, aperture = f/2.8

Cropped, aperture = f/2.8
This next example is the same photo.  I cropped it down so you can see how small the depth of field is at f/2.8 using a macro lens.  The depth of field is maybe 1/8 inch in this example.  The important thing to understand here is focusing on the right spot is critical in macro photography.  Not only do you need to think about how much to keep in focus, but you also need to think about what is in focus.  The "in focus" range is 1/3 in front of the focus point and 2/3 behind it.    With DSLR cameras, the aperture is wide open before you make the shot.  Most cameras have a DOF preview button, which will allow you to see what the photo will look like at the set aperture.  

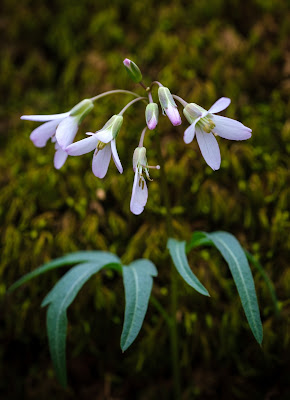
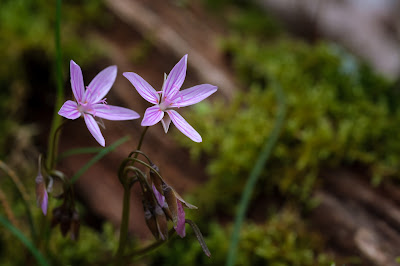
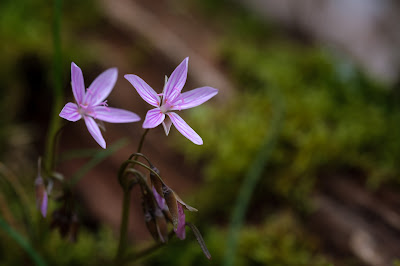
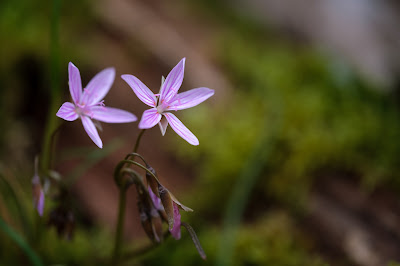
I shot this pair of Spring Beauties at three different settings

Aperture = f/8

Aperture = f/5

Aperture = f/3.6
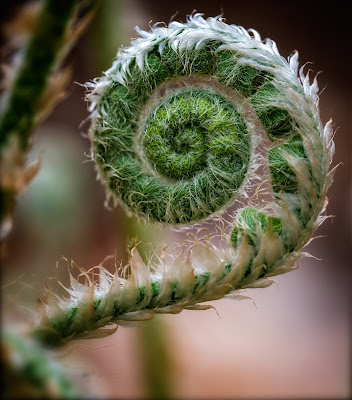
Notice how the depth of field changes at different settings. The most noticeable difference is how blurry the background is.  Even at f/8, both flowers were not completely in focus, which brings up my final tip for macro photography.  Because the DOF is so shallow, the position of the subject(s) in the composition can make a big difference.  The Spring Beauties were at slightly different distances from the camera.  If I had moved the camera so the two flowers were the same distance away I could have gotten more of them in focus.  In the final example below, I positioned the camera so I was shooting perpendicular to the spiral of this Christmas Fern.
Aperture = f/5.6
Although I had a relatively wide aperture (f/5.6) and a shallow DOF, most of the curl is in focus.   If you look closely the front of the curl is in focus, but the back edge is not.

With these examples, I hoped to illustrate the importance of controlling the DOF in order to create a more pleasing photograph.   The best way to really understand this is to go out and try it for yourself.  Set your camera in Aperture Priority mode and make the same shot at different aperture settings.  The camera will adjust the shutter speed accordingly.  If you have the ISO set on automatic it will adjust that as well. Then take a look at each shot and see how things change.  You'll find you like some better than others.  Then remember to try multiple settings on all your macro photos.

Now, grab your camera and go out in nature.  Just be sure to stay 6 feet away from those other photographers and hikers.

Friday, March 20, 2020

More Time On My Hands = More Photo Tips

We are all living under conditions that are extremely different from just a few weeks ago. Half the sessions in my Photography Class were canceled, and places I frequent on a regular basis, such as the gym, are closed.  I'm spending more time walking but today it's raining so I'm spending my day indoors.  That means I have time to invest in things I've been neglecting, such as blogging, updating my website, and editing photos in my archive.

I feel bad that I wasn't able to finish my last photography class.  I promised to finish it when things return to normal, but I'm not sure when that will be.  So instead, I'm going to share much of what is in my class here in my blog.  Here's the first installment...
Bluebird on a yard decoration
Yesterday was the first day of spring.  Flowers are coming up and the birds are busy.  Lately, we have noticed a pair of Bluebirds in our front yard each morning.  Today I opened the window and got my camera and long zoom lens out to see if I could get a shot or two.  They didn't cooperate as much as I hoped, but they did give me material for today's photo tip.

When composing a photo it is important to pay attention to the background.  Watch out for things that will take away some of the beauty of the photo.  In this case, our neighbor's camper was in the background behind the male Bluebird.

Bluebird With Camper

I was shooting at a wider aperture (f/5.6) and zoomed in to 400mm, which blurred the background a little.  You can still see the white of the camper.  It looks unnatural and not exactly what I wanted. 

By getting a little lower I was able to shoot over the camper and include the green yard instead.  All I had to do was do a few deep knee bends.


No Camper!
This is a simple little example to illustrate the tip:

  1. Check the background when composing your shot
  2. If there is something that will distract from your photo try to remove it by moving to a different spot, either side to side or up and down. 
  3. This tip applies to all styles of photography.
  4. Now, make this a habit by shooting as much as possible.
Outdoor nature and wildlife photography can be fun and is a great way to destress.  Look for opportunities to make some photos, while staying "socially distant".