Wednesday, June 27, 2018

Focus Stacking With Fuji X-T2 Camera

One of the things I like about my Fuji camera is the company provides free software updates after you buy the camera.  So far I've gotten several updates, which included some very nice new features as well as performance improvements and bug fixes.   I never got that with my Canon cameras.

The latest v4.10 release of the X-T2 software includes a new feature to do focus stacking. Focus stacking is an advanced photography technique where images are captured with different focus points and later combined in software to create a sharp image with more depth of field (DOF) than would be possible with a single exposure.

First a bit of review:

  • Depth of Field or DOF is the distance between the closest and farthest objects in a photo that appears acceptably sharp.  
  • The size of the DOF is determined by the lens focal length, the distance to the subject, and the aperture.  The closer to the subject and the wider the aperture, the smaller the DOF.
  • The DOF can be almost infinite when photographing a landscape using a wide angle lens with a small aperture.  It can be small fractions of an inch when doing close up photography with a macro lens. 
  • It's not always possible to get all the subject within the DOF in a single shot.


Here's an example of a shallow DOF.
60mm macro lens, f/2.4 about 20 inches  from the subject
In the above example, I was focused on the right edge of the glass face of the watch.  
Zoomed in single image

You can see that the scratches on the right edge of the glass are in focus but the blue dial face is not.

I really wanted to learn how to use this new feature on my camera but it's so new there is little information available on how to do focus stacking on the X-T2 camera.  I decided to do some experiments on my own to see if I could figure this out.

There are four settings you must make to use focus stacking on the X-T2 with version 4.10:
  1. Turn on focus bracketing using the menu
    Shooting Setting > Drive Setting > Bkt Setting > Bkt Select > Focus Bkt
  2. Set the focus bracketing settings
    Shooting Setting > Drive Setting > Bkt Setting > Focus Bkt
    This is where the guesswork comes in.  You have to set the number of frames to shoot, how much to move the focus point between frames, and the time between frames.  More on that below.
  3. Turn the shooting dial on the top left of the camera to Bkt
Doing focus stacking requires the camera and subject to not move while shooting.  A sturdy tripod and conditions where the subject does not move are essential.

I picked my old beat up wrist watch as my test subject. It's picked up a lot of additional texture over the years.  I used the Fuji 60mm macro lens set at f/2.4 for my tests.  I could have gotten better results with an aperture around f/5.6 that can produce sharper images, but I wanted to work with a small DOF for my experiments.

With the camera about 20 inches from the subject I tried different variations of starting focus point, number of frames and step size.  I chose a 1-second interval.  This can be set between 0 and 10 seconds.  A 2 - 3-second interval would minimize any camera movement caused by the shutter.

It took several attempts before I found the right combination for this shot.  
  • Starting focus point - the right edge of the glass face.  Plenty of scratches to focus on here.
  • 30 frames
  • A step size of 4.
If I used fewer frames or a smaller step size the DOF wasn't big enough to cover the watch.  It took 30 frames at a step size of 4 to generate a DOF that covered the part of the watch that was visible.  The DOF didn't extend past the back edge of the watch.

30 images stacked into one
It's not easy to see the sharpness in the above image.


Zoomed in focus stacked image
Here's the right edge of the stacked image.  Compare it to the cropped image above and you can see the difference in focus sharpness.

You can see from the second crop that the stacked image is sharp across the entire subject.
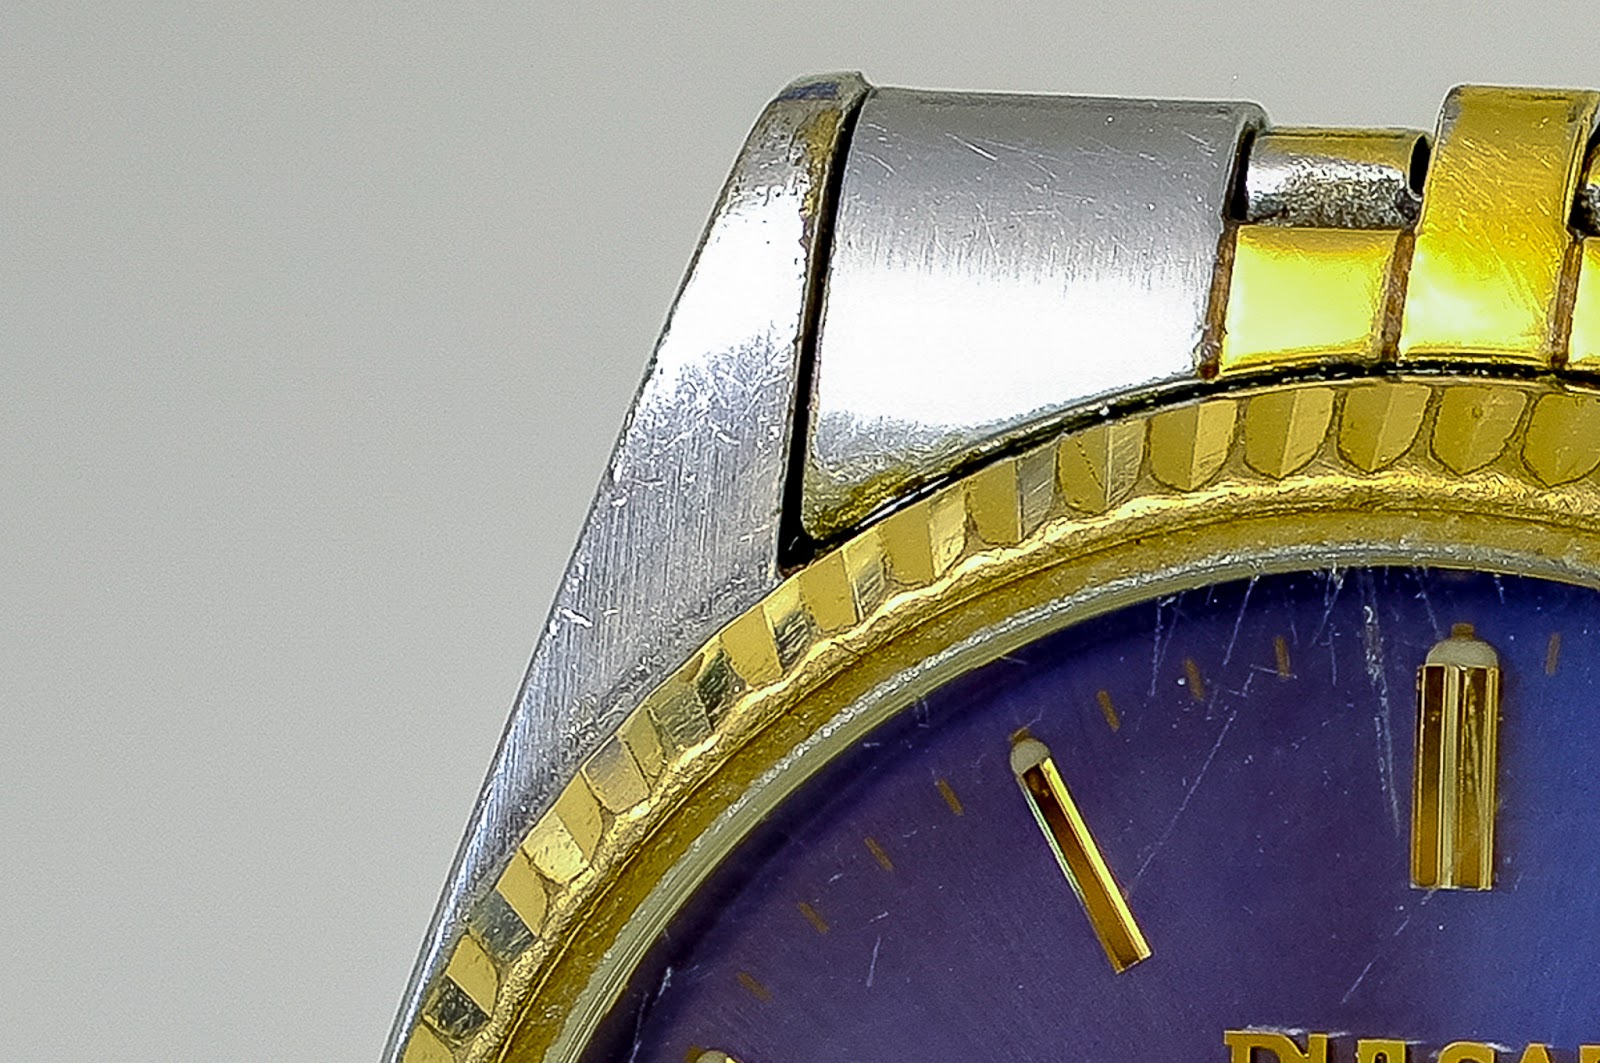
Part of watch farthest from the camera
I used Photoshop to combine the 30 images into a stacked image. Others have written about how to do this so I won't get into that here.  Here's the tutorial I used.   In the past, I've used Helicon Focus software for stacking.  It's a much more powerful tool, but it costs $30/year or $115 for life.  If I do more focus stacking I'll probably get a copy again.

This was just an experiment to get a handle on the process and settings.  I'm going to do some more experiments with different subjects, conditions, lenses, etc.  I've added a few other examples below.


30 steps, step size 6, f/4.0, 60mm macro
30 steps, step size 9, f/5.6

Sunday, June 24, 2018

What Were They Thinking?

Glass Beach is the well-known southern beach of MacKerricher State Park in Fort Bragg California. Glass Beach gets its name from the smooth colorful glass pieces that you can find in the pebbly beach. Sounds pretty cool, huh?
Glass and Pebbles
From 1906 to 1967, everything from cars to batteries to bottles, cans, and appliances were unceremoniously pushed over the cliffs into the ocean — a common practice of seaside cities for centuries. Locals referred to it as "The Dumps." Fires were often lit to reduce the size of the trash pile. What were they thinking? When the original dump site filled in 1943, they created another dump down the beach, followed by a third, which remained an active dump site until 1967 when it was closed by the State Water Resources Control Board.  Over several decades the metal was removed and the biodegradable stuff simply degraded and washed into the sea.  Not all items were removed and in this case, were embedded in the rock on the beach.

Spark Plug and Insulator

What was left was mostly pottery and glass from bottles and autos.  The constant waves of the Pacific broke and ground down this trash into small colored pebbles.  Today the most popular thing to do in Fort Bragg is to go to Glass Beach and collect colored glass.  Officially the glass is not to be removed, but when we were there we saw dozens of people collecting it.  Some have made it a cottage industry with glass jewelry shops in town.

In the first half of the 20th century, people dumped their garbage into the ocean.  Why not?  After all, the ocean is huge and will wash all that unwanted stuff away.  The same thought process meant factories dumped toxic waste into waterways and lakes.   We have made great progress in cleaning up our fresh water in developed nations around the world.

We are now filling the oceans with waste plastic that lasts from 450 years to forever. Over 18 billion pounds of plastic ends up in the oceans every year.  Over 1 million plastic bottles are sold around the world every day.  Much of the plastic is used for packaging and single-use purposes.  Water bottles, straws, plastic trays for your salad at a fast food restaurant are used once and discarded. 


Recycling helps.  June and I try to recycle all our household plastic, glass, cardboard, and aluminum.  Globally, the US lags behind Europe in recycling in general and we are doing a terrible job recycling plastics.

What else can we do?   One simple thing is to limit the use of single-use plastics, such as water bottles, straws, and food packaged in plastic.  Instead, we can take our own insulated tumbler, use paper straws or no straws, and not buy food packaged in plastic.

Fifty years from now our children and grandchildren will look at the oceans and ask "What were they thinking?" Let's start thinking about reducing the plastics in our landfills and oceans.


Tuesday, April 24, 2018

Basic Photography Class

Moving from Beginner to an Accomplished Photographer


I don't normally teach the Basic Photography class in the summer but there are enough people on the waiting list to schedule an additional class.  The class will start out with learning the basics of photography - light, shutter speed, aperture and how to use them on your camera.  From there we will get into color, composition, lighting, techniques and photographic gear selection.  We'll talk about some common photography challenges and how to overcome them. We will go over different photo editing packages, organizing photos, printing, and sharing online.   The class will be a combination of classroom teaching, practicing our new photography skills, and reviews of photography assignments.

The class is designed for a photographer who has a DSLR, mirrorless camera, or advanced compact camera. 

Classroom sessions are May 1, June 5, 7 and 12 from 6:00 PM– 8:00 PM in the Eastman Employee Center.   There will be one field trip on Saturday, June 9 to practice what we have learned.  The Saturday time will depend on what works best for the majority of the students. 

In every Class we will have time for:

  • Review of Homework – yes, we are in school again.
  • Problem Solving - Bring your camera and problem photos to class
  • Question and Answer
 

The class is open to Eastman Camera Club members.  The good news is anyone can join the club by going to http://eastmancameraclub.com/ and clicking on About near the upper left of the page.

Cost - $40/person.   Maximum of 14 people per class.  Call Eastman Recreation Office at 423-229-3771 to sign up.   Contact me if you have any questions.

Thursday, April 19, 2018

Don't Be Satisfied With The First

Many landscape photographers, including myself, have a bad habit of shooting the first obvious composition.  That's fine, but the problem comes when we stop there and don't take the time to look for other different less-obvious compositions.

1/4 sec, f/22, ISO 200, 41mm (cropped sensor)
Here's an example from a recent trip to Charleston Falls Preserve in Ohio.  The falls are billed as a miniature Niagra Falls because of the rock strata.  When we were there the water flow was low and the falls were nothing like Niagra, miniature or not.  There is a nice footbridge that crosses the creek below the falls.  This bridge is the obvious place to shoot from and I made all these photos from that bridge.  The best thing I can say about this first photo is it accurately depicts the falls.  It's what I call a documentary photo - accurate, but uninteresting.

The nice footbridge was also a barrier to getting to where I would like to have shot the falls - standing in the water about 20 feet from the base of the falls.  I could have positioned my camera low near the surface of the water and used the flowing water as a nice leading line up to the falls.  The day was cold, rainy and muddy - not worth climbing over the railing.

When the water falls vertically, a portrait (tall) aspect composition will often work best when shooting waterfalls.  That's how I shot the first example.  It shows the entire falls and the pool below.   Another option is to zoom in to capture some of the details in the scene.   In the second photo, I stood closer and used a horizontal crop to emphasize the three places where the water hits the rocks.

1/3 sec, f/11, ISO 200, 28mm
There is still a lot more rocks than water in the second photo.  I think the water hitting the rocks is the much more interesting than the rocks.   By zooming in even more I can emphasize the white water on the rocks. I also put a polarizer filter on my lens for this third photo.  The polarizer cut some of the glare off the wet rocks.
1/4 sec, f/11, ISO 200 66mm
My favorite part of this third photo is the flowing white water contrasting with the hard dark rocks.  The splashing water throws up a mist where it hits the rocks making it appear to glow.  Personally, I think this is a better composition than either of the first two.

When a photo is about contrast and shapes it can be a good candidate for black and white.  When you take away the color it can draw the viewers attention to other parts of the photo.  In this case that is the misty glowing water, the shapes or the water and rocks, and the contrast between the white water and the dark rocks.
The third photo converted to B&W
All of these photos were taken from the short footbridge.  By moving to different positions on the bridge and trying different compositions I was able to find multiple compositions I would have missed if I had stopped with the first.  When you arrive at a photo location, take time to look around.  You might try leaving your tripod and walking around with just your camera looking for interesting shots.  You can always go back for the tripod when you find a composition you like.  Just don't be satisfied with the first.

Wednesday, February 21, 2018

New Lightroom Classic Feature Makes Culling Photos Faster

By the time we finished breakfast this morning the temperatures were in the sixties, the sun was shining and there was a soft breeze blowing.  A perfect morning to photograph birds in the yard.  I got my camera, filled my large coffee cup to the top and went out back to spend some time with the birds that visit our yard.  Retirement is really hard.

Between 8:30 and 10:00 I shot 739 photos.  It's easy to do when your camera can shoot 8 frames a second.
Bluebird

In the first round, I culled out (deleted) 412 or 55% of my shots.  These were the easy ones to delete.  They were out of focus, over/under exposed, the bird was behind a branch or facing the wrong way.  I didn't have to look close to see that they needed to be sent to the bit-bucket.

This initial culling process used to be painfully slow.  Lightroom took a long time to build previews of the RAW photos to display on the screen.  Depending on how many photos you imported, it could take a while to build the previews. The best thing to do was to go get a cup of coffee and relax. A new Lightroom Classic feature added in version 7.2 makes this process a significantly faster than before.  

When importing the photos from the memory card, I choose the “Embedded and Sidecar” option in the preview generation dropdown.  Lightroom will use the embedded jpeg preview out of the raw file that your camera generated.  I can immediately start the culling step using these embedded previews without having to wait on Lightroom.

Lightroom will display "Embedded Preview" in the lower right of an image so you can tell that you are viewing the preview from the camera.  

At some point in your Lightroom process, you will want to work with true 1:1 previews.  When you are to the point where you need to zoom in to pick the best photos, go to the Library module, grid view, select all the remaining photos and click the Library menu.  Select Previews and Build 1:1 Previews.  It will take less time because you are building fewer previews. 


Monday, February 19, 2018

Basic Photography Class in March

I am offering my Basic Photography Class this March.


The class will start out with learning the basics of photography - light, shutter speed, aperture and how to use them on your camera.  From there we will get into color, composition, lighting, techniques and photographic gear selection.  We'll talk about some common photography challenges and how to overcome them. We will go over different photo editing packages, organizing photos, printing, and sharing online.   The class will be a combination of classroom teaching, practicing our new photography skills, and reviews of photography assignments.

The class is designed for a photographer who has a DSLR, mirrorless camera, or advanced compact camera.

Classroom sessions are March 22, 27, 29 and April 3 from 6:00 PM– 8:00 PM in the Eastman Employee Center.   There will be one field trip on Saturday March 31 to practice what we have learned.  The Saturday time will depend on what works best for the majority of the students.  This is Easter weekend so we may move the field trip date to accommodate student’s schedules.

In every Class we will have time for:

  • Review of Homework – yes, we are in school again.
  • Problem Solving - Bring your camera and problem photos to class
  • Question and Answer

The class is open to Eastman Camera Club members.  The good news is anyone can join the club by going to http://eastmancameraclub.com/ and clicking on About near the upper left of the page.

Cost - $40/person.   Maximum of 14 people per class.  Call Eastman Recreation Office at 423-229-3771 to sign up. 

Contact –rcsiggins@gmail.com


Wednesday, January 17, 2018

Telling A Story - The Prehistoric Birds

Art is more enjoyable if it tells a story and photography is no different.  If we can tell a story with our photos then people will be more interested and may find the photo(s) more compelling.

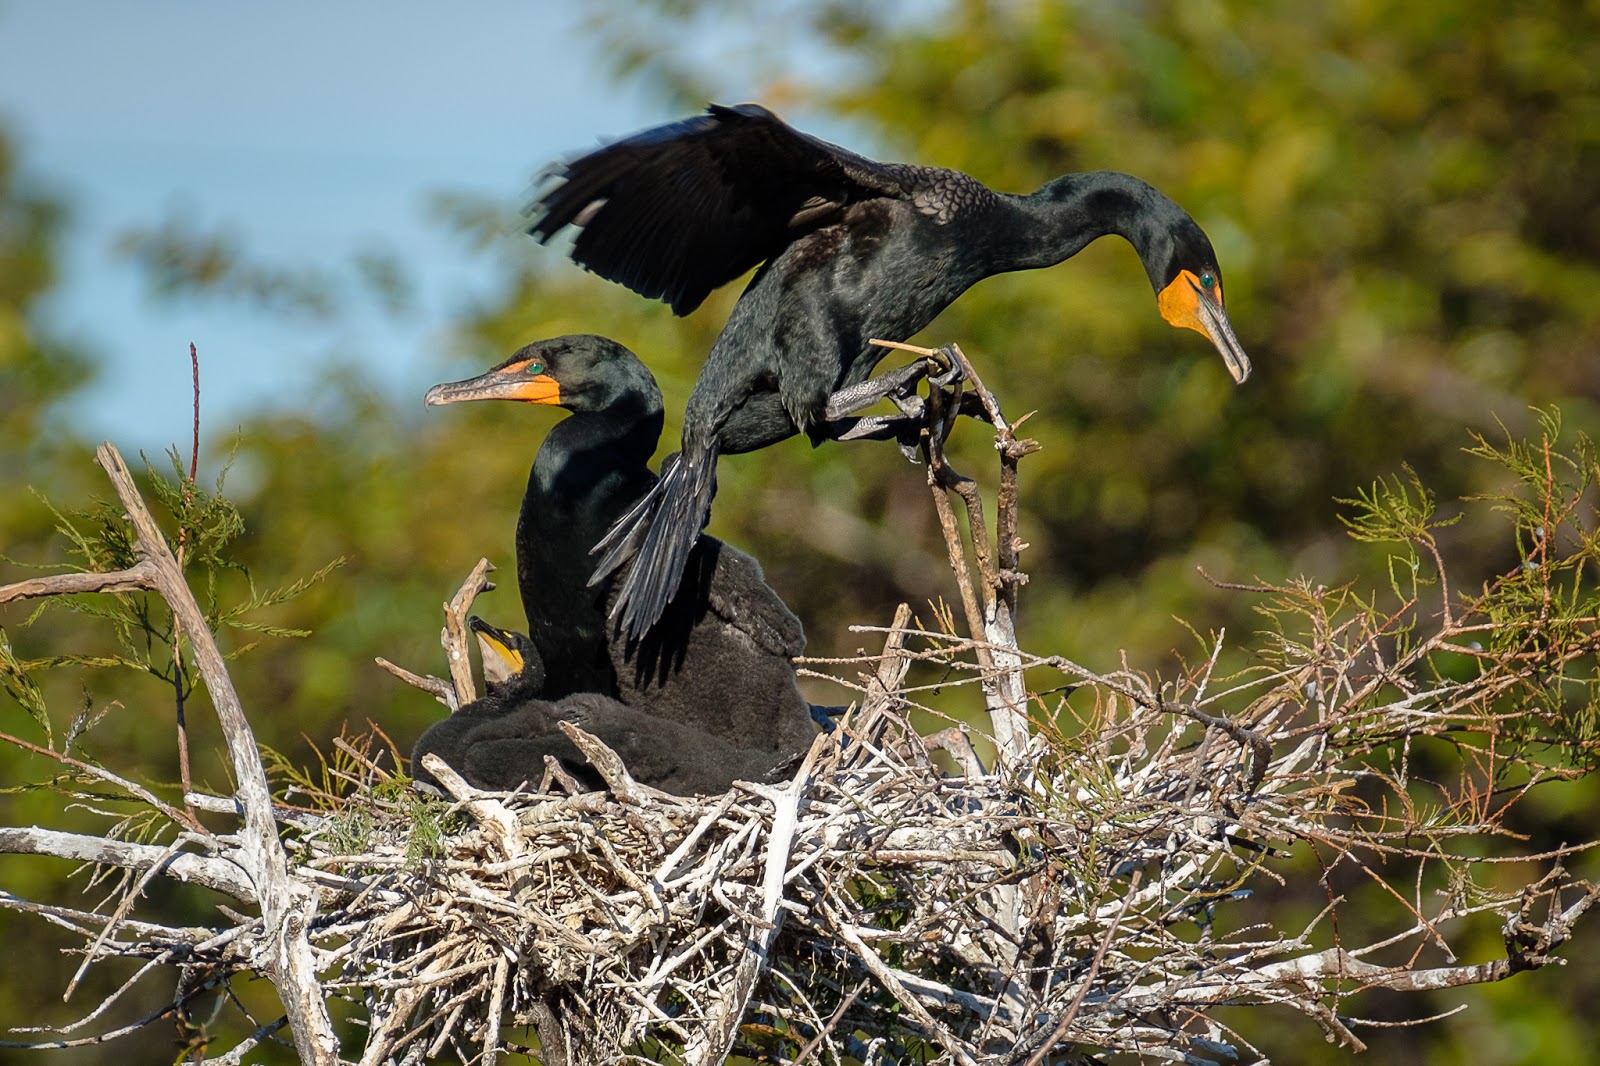
Sometimes the story is best told using a sequence of photos to show action or behavior of the subject.  I recently caught a family of Double-crested Cormorants in South Florida and was able to capture them doing what all families do - eat together.

A Cormorant is a common bird in Florida with some birds staying year long. The gangly Double-crested Cormorant is a prehistoric-looking black bird with green eyes and yellow-orange on its beak and face. They have been described as a strange combination of a goose and a loon.  The Cormorants are related to the exotic frigatebirds and boobies found in the Galapagos Islands. You have probably spotted one with its wings spread out to dry in the sun. They dive underwater and are excellent swimmers, using their feet and wings to propel themselves after fish.

This pair of adults had gotten an early start on the rest of the birds and already had two juveniles in the nest.  The parents seemed to be holding their heads high signaling they were proud of their little ones.
The Happy Family At Home
Like any home, repairs are required to be performed constantly.  They were adding nesting material to their nest.
There is always work to be done to maintain a home
Just like human youth, these juveniles were constantly hungry.
Mom! Dad! We're Hungry! 
No fast food for these kids.  The parents had to catch and prepare the meals.  This involved eating, partially digesting and regurgitating fish for the young'uns.
Yum Yum Yum

Wait, I know there is more fish down there.
Finished!
This adult may be leaving the nest in search of more food or may have had enough of junior climbing down his throat.

I hope you found this little photographic sequence educational, entertaining, or at least funny.  My intent was to tell more of the story than what can be conveyed in just one photo.

All the photos were taken at the Wakodahatchee Wetlands in Delray Beach, Florida.  They were shot with a Fuji X-T2 mirrorless camera and a 100-400mm zoom at 400mm.  The photos were cropped by about 1/3.