Monday, October 31, 2016
Iceland Photo Adventure - I can highly recommend this trip.
This past March, June and I spent a little over a week in Iceland with a group of photographer friends. The trip was put together by John "Snake" Barrett. John and Jim Begley are putting this trip on again as an official workshop. If you ever thought about going on an Iceland photography adventure, this is a trip I can highly recommend.
John is a great organizer and will make sure your trip is as fantastic as possible. We stayed in some fun eclectic places, including a dairy farm, an old school, and a hotel at the base of a volcano. We hit the spots at the best times and John was always looking for quick adjustments to improve our chances of making some great photos. Here's his website http://www.johnbarrettphotography.com/
Jim is one of the best photographers and teachers I know. Check out his website http://www.wowphotoshdr.com/
Don't just take my word for it. You can see the results of my trip in my Iceland Gallery.
http://www.thesiggins.com/My-Gallery/Travel-1/Iceland-
If you're interested, contact John and Jim at Info@JBPhotoTours.com.
Sunday, October 23, 2016
Product Review - Sleeklens Presets and Brushes for Lightroom
I was recently given an opportunity to review a set of develop presets and adjustment brushes designed for use in Adobe Lightroom. The folks at sleeklens package their presets and brushes into what they call workflows. The workflow I reviewed was "Through The Woods".
Sleeklens provides a series of video tutorials on how to use the Through The Woods workflow. You can view those here - https://sleeklens.com/product/landscape-lightroom-presets/
What makes these different from the million and one other presets available? The biggest difference is these are designed to be used in a workflow. Presets are applied from global to more targeted changes. Then the brushes are used for changes to specific areas of an image. These all work together in a consistent fashion.
They are also stackable - each preset only changes specific settings for the named effect without changing other develop settings. This allows you to apply multiple presets to a photo.
To evaluate the presets and brushes I picked a few images from a recent trip and edited them. Here are the results.
Step 1 - Unedited RAW image from a Canon 5D Mark II, 24-105mm @105mm, f/14, 0.5 second, ISO 100.
Step 2 - All In One - Shine Into the Sunset preset applied.
In one click this preset changed contrast, highlights, shadows, whites, blacks, clarity, vibrance, overall saturation, orange saturation, shadows toning, sharpening, and noise reduction. This is definitely a nice improvement applied in just one click.
This brings up one issue I have with presets in general. This preset made these detail changes
That's more sharpening than I typically use. I applied the preset to multiple photos from different cameras at high and low ISO settings. In each case, the sharpening and noise reduction were the same, which may not be appropriate for all photos. When I applied the preset to an image taken on a Fuji XT-1 at ISO 1000 the level of noise introduced was not acceptable for me. I would have to reduce the sharpening and increase the noise reduction on that image. You have to be careful with any presets to make sure they aren't making changes you don't want.
Step 3 - Base - Autumn Colors. This preset made changes to the Hue, Saturation, and Luminance sliders to emphasize the warm colors. It also changed the Split Toning, overwriting those changes that were done in step 2.
I really didn't care for the color in this step. I hit control-z to undo that preset.
Step 4 - Because the All In One and Base presets were changing too many things at once, I stepped into the Exposure presets. Applying the Exposure - Less Highlights changed the Tone Curve to reduce the Highlights and Lights. I like what this did for the brighter areas at the top of the image.
Step 5 - Making it Pop! I wanted to bring out the autumn colors and make them really pop. Clicking the Warm It Up preset didn't do what I expected. Instead, it changed the Split Toning and made the image less warm. I backed this change out.
I then tried Polish - Punch It Up, which bumped up the Vibrance and Saturation. It also reduced the Clarity, which I didn't expect. I did like the effect and decided to keep it.
Step 6 - Vignette. I almost always apply a gentle dark vignette to my photos. I tried the Vignette - Medium Black and Vignette - Subtle Black presets and decided on something in between. I manually adjusted the Amount on the Post-Crop Vignetting to split the difference.
At this point, I decided the image looked pretty good and was where I wanted the image as far as presets. Time to try out the adjustment brushes.
Step 7 - Adjustment Brushes. Adjustment Brushes are one of the most powerful tools in Lightroom and one I use often. Lightroom comes with a handful. Sleeklens adds several more. I applied the following brushes:
There are many other brushes that I tried, but these three were all that I felt I needed on this image. Here's the final result.
That's just one example. Here are some before/after images
OK, if you have read this far you are looking for the bottom line. Everything that I did with the sleeklens presets and brushes could have been done manually. As a long time Lightroom user I can zip through post processing pretty fast and typically don't use presets. I do use brushes and having the sleeklens brushes will improve my productivity and creativity.
If I was new to Lightroom and didn't know how to manipulate all the myriad of adjustments to get a particular desired effect then the presets would be useful. They are short-cuts. Short-cuts will get you to somewhere faster, but may not get you what you want in the end. Even beginners should not rely on presets entirely.
All the sleeklens workflows, including Through The Woods, sell for $39 each. They also offer money saving bundles. Is it worth it? That's a tough call for me. An experienced Lightroom user may not find the workflows save them much time. Casual and beginner Lightroom users will probably find the workflows to be a great boost to their productivity and creativity.
There are many free presets that can be downloaded and installed at no cost. Just google "free lightroom presets" or "free lightroom brushes" and you will be presented with more options than you know what to do with. Why would you pay $39 for a set when you can find others for free? By purchasing the sleeklens presets you get a set of tools that work together well. The free stuff, maybe not so much.
Finally, I want to say that sleeklens provided a free copy of the Through The Woods workflow in return for an honest review. I have not been influenced by sleeklens and have given my honest opinion here.
I welcome questions. Just drop me a note on the Contact Me page on my main gallery - http://www.thesiggins.com/
Sleeklens provides a series of video tutorials on how to use the Through The Woods workflow. You can view those here - https://sleeklens.com/product/landscape-lightroom-presets/
What makes these different from the million and one other presets available? The biggest difference is these are designed to be used in a workflow. Presets are applied from global to more targeted changes. Then the brushes are used for changes to specific areas of an image. These all work together in a consistent fashion.
They are also stackable - each preset only changes specific settings for the named effect without changing other develop settings. This allows you to apply multiple presets to a photo.
To evaluate the presets and brushes I picked a few images from a recent trip and edited them. Here are the results.
If you click an image you will be able to view it larger and use the arrow keys to walk through each step.
Step 1 - Unedited RAW image from a Canon 5D Mark II, 24-105mm @105mm, f/14, 0.5 second, ISO 100.
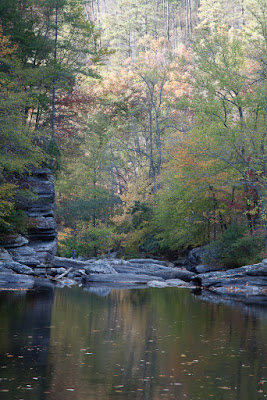 |
| Unedited Raw Image |
Step 2 - All In One - Shine Into the Sunset preset applied.
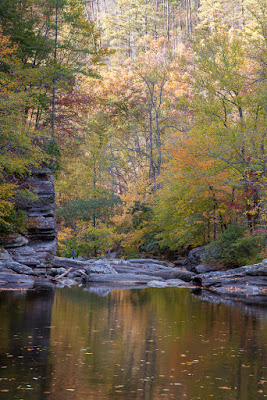 |
| Shine Into the Sunset Preset |
This brings up one issue I have with presets in general. This preset made these detail changes
That's more sharpening than I typically use. I applied the preset to multiple photos from different cameras at high and low ISO settings. In each case, the sharpening and noise reduction were the same, which may not be appropriate for all photos. When I applied the preset to an image taken on a Fuji XT-1 at ISO 1000 the level of noise introduced was not acceptable for me. I would have to reduce the sharpening and increase the noise reduction on that image. You have to be careful with any presets to make sure they aren't making changes you don't want.
Step 3 - Base - Autumn Colors. This preset made changes to the Hue, Saturation, and Luminance sliders to emphasize the warm colors. It also changed the Split Toning, overwriting those changes that were done in step 2.
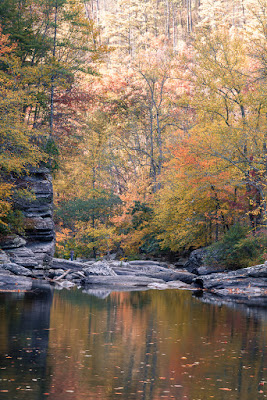 |
| Base - Color - Autumn Colors Preset |
Step 4 - Because the All In One and Base presets were changing too many things at once, I stepped into the Exposure presets. Applying the Exposure - Less Highlights changed the Tone Curve to reduce the Highlights and Lights. I like what this did for the brighter areas at the top of the image.
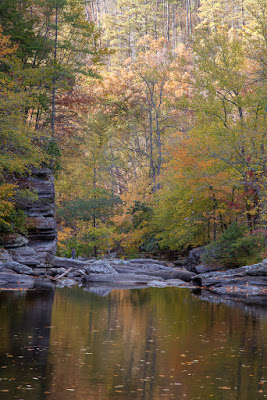 |
| Exposure - Less Highlights |
I then tried Polish - Punch It Up, which bumped up the Vibrance and Saturation. It also reduced the Clarity, which I didn't expect. I did like the effect and decided to keep it.
Step 6 - Vignette. I almost always apply a gentle dark vignette to my photos. I tried the Vignette - Medium Black and Vignette - Subtle Black presets and decided on something in between. I manually adjusted the Amount on the Post-Crop Vignetting to split the difference.
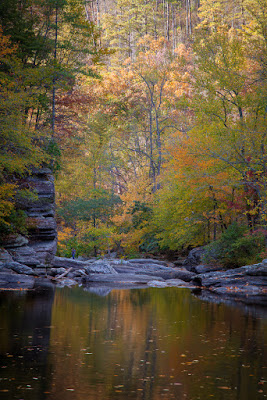 |
| Punch It Up and Dark Vignette Applied |
Step 7 - Adjustment Brushes. Adjustment Brushes are one of the most powerful tools in Lightroom and one I use often. Lightroom comes with a handful. Sleeklens adds several more. I applied the following brushes:
- Reduce Highlights to the upper center where the forest was still a little bright. This didn't go far enough so I dropped the exposure setting on the brush a little.
- Intense Sunlight to some of the trees where the leaves had started turning golden. This brush warmed the color (temp), brightened the highlights, bumped the saturation and applied an orange color. This was a bit too intense for me so I reduced the saturation of the orange color.
- Subtle Sunset Haze - I applied this to some of the trees to reduce the contrast, bump up the highlights, shadows, clarity, and saturation, and apply a light orange color. This is a more appropriate brush for this image.
There are many other brushes that I tried, but these three were all that I felt I needed on this image. Here's the final result.
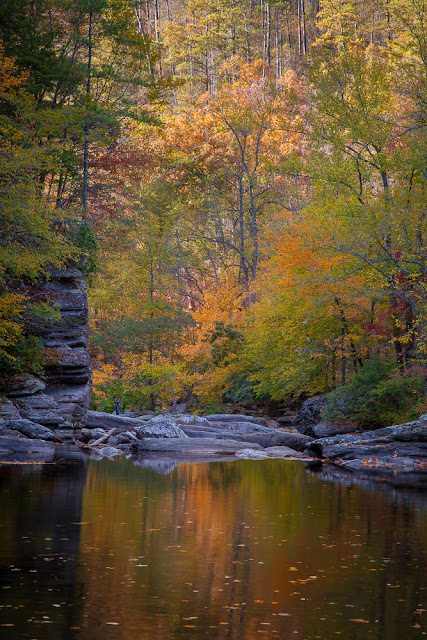 |
| Final |
That's just one example. Here are some before/after images
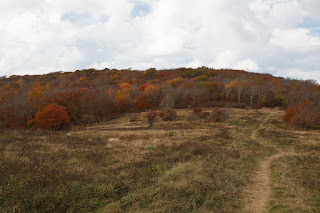 |
| Before |
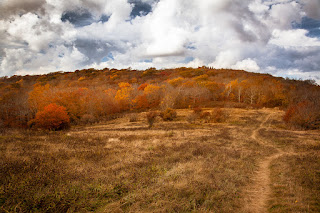 |
| After |
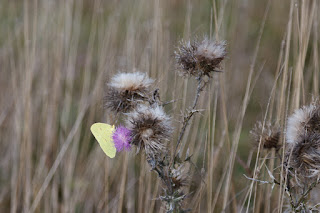 |
| Before |
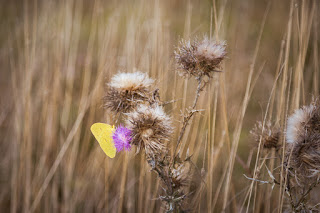 |
| After |
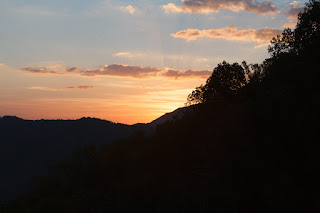 |
| Before |
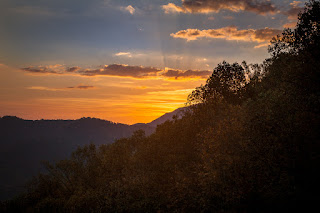 |
| After |
OK, if you have read this far you are looking for the bottom line. Everything that I did with the sleeklens presets and brushes could have been done manually. As a long time Lightroom user I can zip through post processing pretty fast and typically don't use presets. I do use brushes and having the sleeklens brushes will improve my productivity and creativity.
If I was new to Lightroom and didn't know how to manipulate all the myriad of adjustments to get a particular desired effect then the presets would be useful. They are short-cuts. Short-cuts will get you to somewhere faster, but may not get you what you want in the end. Even beginners should not rely on presets entirely.
All the sleeklens workflows, including Through The Woods, sell for $39 each. They also offer money saving bundles. Is it worth it? That's a tough call for me. An experienced Lightroom user may not find the workflows save them much time. Casual and beginner Lightroom users will probably find the workflows to be a great boost to their productivity and creativity.
There are many free presets that can be downloaded and installed at no cost. Just google "free lightroom presets" or "free lightroom brushes" and you will be presented with more options than you know what to do with. Why would you pay $39 for a set when you can find others for free? By purchasing the sleeklens presets you get a set of tools that work together well. The free stuff, maybe not so much.
Finally, I want to say that sleeklens provided a free copy of the Through The Woods workflow in return for an honest review. I have not been influenced by sleeklens and have given my honest opinion here.
I welcome questions. Just drop me a note on the Contact Me page on my main gallery - http://www.thesiggins.com/
Sunday, October 2, 2016
The People Have Spoken! Finalists For My 2017 Calendar
The results are in. I can now tell you which 14 photos made the cut and will be on the 2017 calendar.
 |
| First Place - Northern Lights |
The Winners - Top 14
| Place | Title | Votes |
| 1 | Northern Lights | 34 |
| 2 | Milky Way | 32 |
| 3 | Sunset and Layers | 30 |
| 4 | America! | 27 |
| 5 | Beam Me Up | 26 |
| 6 | Crabtree Falls | 25 |
| 6 | Red | 25 |
| 6 | Snow Covered Reflections | 25 |
| 6 | Sunset on Fort Patrick Henry Lake | 25 |
| 10 | View from Roan Mountain | 24 |
| 11 | Fall In The Smokies | 23 |
| 12 | Little Church in The Cove | 22 |
| 12 | Rolling Fall Color | 22 |
| 14 | Appalachian Trail | 21 |
The Others
| Place | Title | Votes |
| 15 | Angry Seas | 19 |
| 16 | Bleeding Hearts | 18 |
| 16 | Tree Ornaments | 18 |
| 18 | Mountain Bluff Reflections | 17 |
| 19 | Standing Firm | 16 |
| 19 | String of Pearls | 16 |
| 21 | Cool Mountain Stream | 15 |
| 21 | Fall Sunset | 15 |
| 21 | Waves of Grass | 15 |
| 24 | Foggy Morning | 13 |
| 24 | Tennessee Barn | 13 |
| 26 | Fall Kayak Trip | 12 |
| 26 | Rhododendrons | 12 |
| 26 | Tulips | 12 |
| 29 | Bloom From The Backside | 10 |
| 29 | High Surf in Iceland | 10 |
| 29 | Ice Lagoon | 10 |
| 32 | Linville River, NC | 9 |
| 32 | Pink Dogwood Blooms | 9 |
| 34 | Clematis in Bloom | 8 |
| 34 | Wild Columbine | 8 |
| 36 | Fall Reflections | 7 |
| 37 | Focus | 6 |
You can view the photos in order by going to http://www.thesiggins.com/SpecialProjects/2017-Calendar-Candidates/
Every year I am surprised by which photos you like and the ones that fall to the bottom list. I really shouldn't be all that surprised because I learn the same things each year.
- This is the first year I have included night sky photos and they were very popular, placing first and second.
- Landscapes are the most popular.
- People don't want to see a flower photo on their calendar for an entire month. They really don't want to see a big bee on a flower.
- Photos that were taken in this region tend to do better than those taken elsewhere.
What surprises did you see in the results?
I've started the process of laying out the calendar. I'm going to change up the style just a little bit this year. I think you'll like the results.
I'll be ordering the calendars from the printer in a couple weeks. My goal is to run out just before Christmas and that has worked out every year so far. It helps if I have a good idea of how many will be needed.
If you would like to order one or more calendars:
Calendars make great Christmas gifts for the people on your list who have everything. They can be great gifts for your business clients as well. Buy from me, support a great ministry and avoid the crowds at the big box stores.
If you would like to order one or more calendars:
- Send me an email letting me know how many you want.
- I'll send you an email with info on how to pay for them. They are $15 each, plus $3 shipping if I mail them to you. Free personal delivery if you live in the Kingsport area.
- I'll be delivering the calendars during November and December.
Calendars make great Christmas gifts for the people on your list who have everything. They can be great gifts for your business clients as well. Buy from me, support a great ministry and avoid the crowds at the big box stores.
Thanks to the 47 people who voted this year. You really make my job easier and the calendar better. If I had picked you might have seen photos from the bottom of the list on the 2017 calendar.
Subscribe to:
Comments (Atom)


