Sunday, April 11, 2010

Beauty of Laurel Run Park

We are so blessed by the flowers in our world.  The same flowers that we hurry past without hardly noticing.  Rarely do we stop, bend down, and look at the tiny beauty God put into these gifts.   A passion for outdoor photography has caused me to notice and appreciate what we have, often right under our feet.   Stop and look up close and see God's glory!


Laurel Run is a small park just west of Church Hill, Tennessee is home to one of the most beautiful and varied wildflower displays around.  Each year around the first two weeks of April the hill sides, pathways, and creek sides come alive with color and beauty. 

The Eastman Camera Club took a Wildflower Hike and Photography trip to this park on April 10.  Since I was leading the trip, June and I did a little scouting trip on Good Friday.   On Good Friday the temperatures were in the upper eighties.  On the morning of April 10, they were mid the mid-thirties!  Quite a change in just eight days.

When we were there on Good Friday, several of the wildflowers had not bloomed or the blooms were not open.  We had several days of unusually warm weather and by the 10th many of these blooms were gone, but a whole new batch of wild flowers had bloomed to take their place.   We were blessed with two completely different wildflower outings.

I have posted severl photos from these two weekends at Laurel Run Park 2010.  I invite you to browse on over there and enjoy some of God's smaller creations.


"Flowers are the sweetest things God ever made, and forgot to put a soul into." ~Henry Beecher, Life Thoughts, 1858

Saturday, April 3, 2010

Flower Macros

Spring Time!  The flowers are blooming all around, in the garden, wildflowers in the park, and even weeds in the lawn!   This is a great time to enjoy God's creations.  Look closely at a flower or leaf.  Now look closer.  It's amazing what you can discover in the delicate details in these little plants.   

I enjoy getting out and taking close up or "macro" photos of flowers in the spring.  So far I've taken pictures of tulips, crocuses and mountain laurel growing in the yard.  On Good Friday I went to Laurel Run Park near Church Hill Tennessee and got pictures of wildflowers that had just opened.  This was a scouting run for a Camera Club outing on April 10.  Unless we have a freeze between now and then the wildflowers will be even more beautiful a week from now.

The photo on the right is a tulip leaf.  For years I've ignored the leaves waiting on the flowers.  Now that I've looked closer I see the beauty in all parts of the flower.   I call this one "A Cup of Light"  because it looks like the light is about to spill over the top of the leaf.

I've started a Macro Flower album on my website and will be adding pictures to it all spring.  You can go to it directly via this link -  Macro Flowers Album   Be sure to keep checking back every so often as I add more photos of the flowers of springtime.


The yellow and purple photo on the left is a purple crocus.   When you're taking photos that close up, the range of focus or depth of field is extremely small.   In this case only about 1/8" is in focus. 

The orange and while photo on the right is a white crocus.  

Finally, this is a red tulip petal.  It was taken in the morning when the sun was low and shining across the petal and through the water drops.

There are more photos in the Macro Flower album and I'll be adding more over the next several weeks.  I hope you enjoy these.

Saturday, March 27, 2010

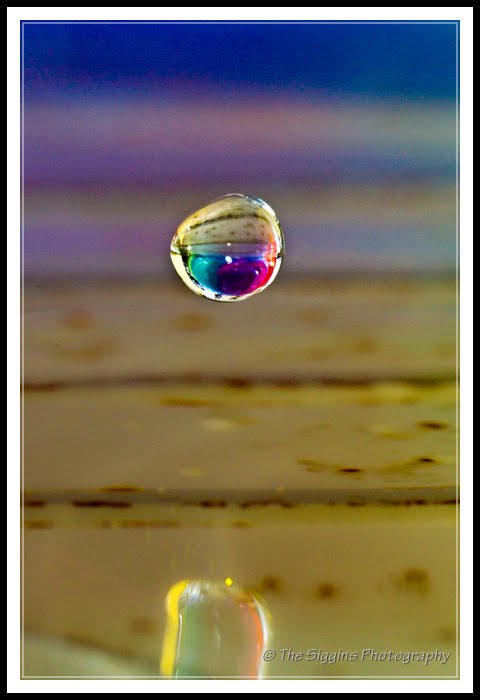
My Artsy Side - Water Drops

The weather was cold and damp Friday so I decided to take advantage of my time indoors and try something I had seen from other photographers.   Photographing water drops can create some very cool abstract kind of pictures, which is a departure from my normal landscape photography.

My set up included a paint pan in the kitchen sink and some brightly colored objects on the other side of the pan.  The objective is to get these objects refracted in the water drops.   I found some red, blue and green Tupperware lids to use as my props.  I set my camera up on a tripod so that it was just above the surface of the water in the pan.   I manually focused at the point where the drops hit the water.  The trick is to place an ink pen in the water so the drops hit it and then focus on the pen.  I set up an external flash off to the side pointed at the Tupperware and had my popup flash on as well.  I turned the flash power down to make the flash time as short as possible to freeze the drops.  The camera was set to manual mode, 1/250 sec, f/7.1 and I manipulated the ISO to get the exposure I wanted.  I had to crank the ISO up higher than I would have liked and as a result I got a lot of digital noise (grainy) in these shots.

When I looked at my first shots I noticed you can see the rust spots on the pan.  I then tried aluminum foil on the bottom of the pan, but that was too reflective.   I found colored printer paper worked best and orange paper gave the most dramatic images.

In the final photo I used white paper and then chaned the white balance in Lightroom to give it a blue tint.


You might wonder how I clicked the shutter at just the right moment to capture these.  The trick is to take several hundred and throw out 95% of them.   Random chance works best in this situation. 

Remember, you can click on these pictures to zoom in. 
There are a few more photos at http://www.thesiggins.com/Macros/Oddballs/

This was fun to do and I may try again when the weather is cold and damp.  I hope you enjoy these.

Saturday, January 30, 2010

Getting Out Of Your Comfort Zone

It snowed about half a foot here in Kingsport last night.  I got out and took a few pictures, but nothing much worth sharing.   It was cloudy and snowy all day so I couldn't take any examples of front and side lighting, so that post will have to wait.

I did get the macro lens out and tried taking some very non-landscape shots.  Taking pictures of things other than mountains, lakes, waterfalls, and wildlife is a little outside my photographic comfort zone.  I'm sure many photographers are like me, we have our favorite subjects and don't try shooting different subjects often enough.  Participating in a monthly photography challenge, a scavenger hunt, or other activity that makes us branch out is a great way to learn new things and develop some new styles of photography. 

The Eastman Camera Club is running a monthly challenge and the theme for February is "Sweet Tooth".  I had to come up with something to show for this month's challenge so I looked around home to see what I could come up with.  We had four Hersey Kisses left.   Add a mirror, some Rain-X and some water drops, and you come out with something like this.

You can click on any of these thumbnails for a larger view.

I used Rain-X on the mirror to make the water bead up.  The biggest challenge was finding a place to shoot where I didn't get distracting things in the background.  It was surprisingly difficult with the mirror.  I eventually had to take some pictures off the wall.

With the "Sweet Tooth" challenge out of the way, I decided to try something else I had seen done before.  I got a piece of glass from an old picture frame and put Rain-X on it.  I then laid it between two chairs and put some artificial flowers on the floor below it.  I carefully put drops of water on the glass like I had done with the mirror.  I then set up my tripod so I could shoot straight down through the water drops to the flowers below.  The trick is to focus on the water drops and let the flowers go out of focus.  By focusing on the water drops you can see the flowers in focus like they are inside the drops!    I held a LED flashlight below the glass and shined it on the flowers.  Putting the flashlight below the glass eliminates glare.  This is another very cool effect!

I was using a 100mm macro lens and shooting from about 10 inches above the drops.  When I moved closer to the drops the depth of field became so small that it was almost impossible to keep the entire drop in focus. 

If it wasn't for the monthly challenge I would probably not taken these photos.   I encourage you to participate in one of the challenges, or anything that forces you out of your photographic comfort zone.

Wednesday, January 20, 2010

Lighting Series - Backlighting


Note - larger copies of the photos in this post are available by clicking on the photo.

I've decided to write a series of three posts on backlighting, frontlighting, and sidelighting in nature photography.  As you might have guessed, this is all about the direction of light.  When taking a photo, you should always be thinking about the direction of the light that is illuminating the subject.  Is it coming from behind you, from the side, from behind the subject or somewhere in between?  Different subjects and situations call for different lighting direction.   By setting lights and placing a subject, a studio photographer has a great deal of control over the direction of his light.  A nature photographer has some control over sunlighting by planning ahead before going to a location.  Often we just have to take what mother nature dishes out. 

Backlighting is when the light in a photo comes from behind an object.  This can be a tricky situation to handle, but when done right can produce some very dramatic photographic compositions.  With a back lit subject you must pay attention to the exposure.  Manipulating the exposure can dramatically change the photo.


In this first backlight example the rising sun is behind the boat and I have set my exposure for the light of the sunrise in the clouds and on the ocean.   Because of the brightness of the sunrise and clouds, the boat and the bird are dramatically underexposed.  In fact, they are silhouettes with almost no detail.  If I exposed to see the details in the boat, the sky would be very over exposed or blown out with no details.  This is one of those situations where you're not going to capture the entire range of light without an advanced technique, such as HDR.


Sometimes when shooting into the sun you can create a sunburst or star effect by stopping down your aperture to a small opening such as f16 or f22.  In the photo of Crabtree Falls I used the leaves in the trees to block some of the sunlight so that it didn't overpower and cause the falls, rocks and trees to be under exposed.  The trees were blowing in the wind and I took several shots to get one with the star effect but not too much light.

You have to be careful when shooting into the sun. If the sun shines directly on the front of the lens you can get lens flare which will show up as spots or circles on your image. Use a lens hood or other object to shade the front of the lens to avoid flare.


The lightsource is not always going to be visible in a backlit situation.   This can make the dynamic range of light smaller and the photograph easier to expose correctly.  The subject is still backlit which can give you a very cool photo.

In the first example with the Great Blue Heron (I am calling this one "Fire Beak"), the sunlight is on the back side of the bird and is not lighting the side of the bird facing the camera.  Where the light shines through the feathers and beak it makes them appear to glow.  Photographing a person in these conditions can make their hair glow, almost like a halo.


In the second example, the sun is shining through the tulip, making the entire flower glow like a lightbulb.  Because the flower is very bright with the sunlight shining though, the background is dark making the flower stand out even more. 

Finally, you may be able to use your flash to compensate for a backlit situation.  In the photo of June and I, I intentionally positioned the camera to create a backlit situation so that the sun was shining through the leaves making the most of the fall colors.   Without a flash, either June and I would be underexposed or the leaves would be overexposed and I would have lost all those beautiful fall colors.   I used my flash to add some fill light to us in the foreground so that the photo was more evenly lit.   You might need to experiment a little with different flash settings.  I turned the flash down 1/3 EV so that we weren't too light compared to the background leaves.


I hope this short explanation of backlighting has been useful to you.   If you have any questions, please drop me a note or give me a call.  If you know of others who might enjoy these posts, please let them know about the blog.

I'll be talking about front lighting and sidelighting in future posts.


Monday, January 4, 2010

My Favorite 18 From 2009


Since the new year rolled around I've been noticing that a lot of people like to share their best or favorite photos from the past year.  This sounded like something I'd like to try so I pulled up my library of "keepers" from 2009 and found I had 4,300!  Considering I delete 2/3 of what I take, that means I took about 13,000 photos last year.   Sounds like a lot, until I consider what some others take.

Going through 4,300 photos sounds like a monumental task.  The good news is I've used Adobe Lightroom's catalog feature to tag my top picks as I processed them.  That means I only had to go through a few hundred to pick out my favorites.  My goal was to get down to an even dozen, but I just couldn't do it. 

These are my personal favorites.  They may not be the best and you may not care for them, but they are the ones I like best.  Here are my favorite 18.  You can get a full sized image by clicking on the thumbnails.


Dawn of Affection - Great Blue Herons at Wakodahatchee Wetlands in Florida. 


 Little Pigeon River, Great Smoky Mountains


Sunset from Clingman's Dome, Smoky Mountains


  Swirl


Jenny Lake, Grand Teton National Park


Great Grey Owl, Grand Teton National Park


Yellowstone Lake


Trout Lake, Yellowstone NP


Busy Bee, Abingdon, VA


Lilly Pads, Atlanta


North GA Waterfall and Crabtree Falls, North Carolina


Bays Mountain, Kingsport


Warrior's Path State Park, Kingsport


Acuff's Chapel, Blountville, TN


Hold Out


Sunrise, Singer Island, Florida


Fire Beak - Great Blue Heron, Wakodahatchee Wetlands in Florida


There you have it.  My favorites from 2009.  I hope you have enjoyed these photos.  Please contact me if you have any questions about these or any other photos on my site.

Friday, January 1, 2010

Wakodahatchee Wetlands December 2009


Seems like when ever we're on vacation, June and I will get up at completely unreasonable times to drive somewhere to take pictures at sunrise. Why would we do such crazy things on vacation? I do it because the golden hour just before and after sunrise is the best time for outdoor photography. The light is low making long interesting shadows. The light is also softer and has a warmer color. As long as the weather cooperates, it's the best time of the day to take photographs outside. I guess June gets up this early on vacation because she loves me :)

While visiting family in West Palm Beach, we got up early one morning to go to the Wakodahatchee Wetlands in Delray Beach, which is a great place to photograph birds. Wakodahatchee means "Created Waters" in Siminole Indian. The wetlands were created by pumping treated waste water into the wetlands. The birds naturally migrate and nest in the wetlands. We saw Great Blue Herons, Green Herons, Anhingas, Cooper's Hawks, Egrets, and many other birds. There were even a few gators lurking around. They have built a system of boardwalks that allow you to walk among the wetlands to get close up views of the wildlife.

My photos from this trip are available http://www.thesiggins.com/Earth-Sea-and-Sky-1/Florida/13630510_8hY5W#994658109_agyMd
More information about the wetlands is available at http://www.pbcgov.com/waterutilities/wakodahatchee/