Showing posts with label Lightroom Classic. Show all posts

Sunday, July 7, 2019

Don't Be A Digital Hoarder

Here are a few tips on dealing with something that can be difficult for some people to do - deleting photos.
Violets from a walk in a local park.


In the age of high-speed digital cameras and huge memory cards, it's easy to make several hundred photos in a day.  This is especially true when visiting a place rich with photo opportunities, such as a National Park.  It can be true when just going for a walk with your camera.  Sometimes when I load the photos on my computer I will have an overwhelming number to deal with.  Here's what I do to manage those.
Sandhill Cranes from Hiwassee, TN.


  1. I use Adobe Lightroom to manage all my photos on my home computer. First thing I do after loading the day's photos is to quickly go through and mark the obvious duds as rejects, then delete them.  There is nothing special about how Lightroom does this. Other software tools allow you to quickly get rid of the duds.  The important thing is to get rid of those bad photos.
  2. I find I want to pick a few photos to quickly edit and share online.  There is nothing wrong with this, as long as I don't stop there, leaving a lot of abandoned digital images on my computer.
  3. Wait a few days then go through the photos again, picking out some more favorites to edit and more importantly, deleting more.  I always have lots of photos that are just so-so that I will probably never touch.  My camera will shoot 11 frames a second on high-speed mode so I find I also have many images of the same thing.  I use the Lightroom compare feature to cull those down to one or two to keep.
  4. The final step is one I don't always do but can be the most important.  I will go back to the photos several months later and go through them again.  At this point, I will have several that I edited, and some of those are marked as my picks or favorites.  I want to be aggressive here, deleting the majority of those unedited photos.  Sometimes I'll find a photo that I hadn't edited that turns out to be a keeper, like the two in this post.  Most of the time I find I still have a lot of photos not worth keeping.  It is this final step where I do the most clean up.  When we come back from a photo outing we are excited about our photos and don't want to delete them.  It's amazing how much easier it is to get rid of them a few months later. This morning I went through just three photo outings and deleted 549 images.  
Like a closet or garage, it's easy to let digital images get cluttered on your computer.  Be aggressive and don't become a digital hoarder. 

Sunday, June 16, 2019

Let's Get Rid of The Noise

I don't usually do software reviews but sometimes I run across a tool that is so much better than what I have to work with that I have to tell others about it.  This time it's DeNoise AI from Topaz Labs

I have plenty of photo editing tools, including Lightroom Classic, Photoshop, and On1 Photo RAW 2019.  Until recently I have resisted the siren call of the latest greatest piece of software that will make all my photos look fantastic.  I find it's better to be proficient in a few than to have a toolbox of expensive packages that I rarely use.  About a month ago I saw a review of the DeNoise AI package and thought I would give it a try.  Several friends use Topaz Labs software but I had not gone down that path.  They offered a free trial so I decided to give it a try.  I'm glad I gave it a try.  I'm now the proud owner of another piece of software for photo editing.

The reason I decided to put the $79.99 down and buy a copy is the quality of the images that come out of the software.  I like to photograph birds, which means I'm shooting at shutter speeds of 1/1000 - 1/2000 second.  My long lens that I use for bird photography works best at f/6.4.  That means I am often shooting at high ISO values that result in noisy photos like the one below.

1/1000 sec at f/6.4 ISO 12800
This photo is cropped down to about 25% of the original size of the RAW file out of my Fuji X-T3.  You can see the noise in the background.  That's more noise than I like.  I used the Lightroom Noise Reduction tools and was able to remove some of the noise, but lost some of the details in the bird.

Lightroom Noise Reduction Applied

The last version was editing using DeNoise AI.
Topaz DeNoise AI


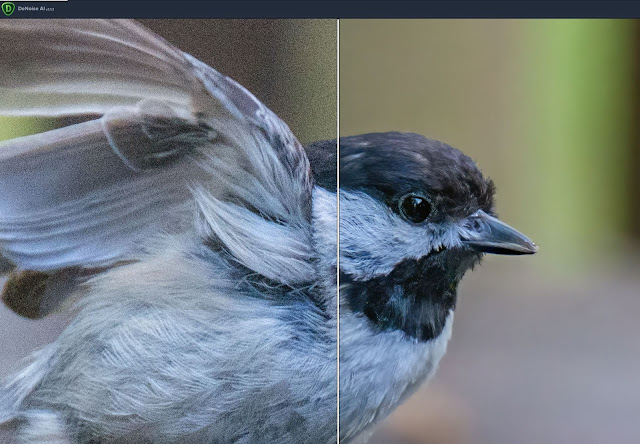
The Topaz software was better at removing the noise and did a much better job at retaining the details in the feathers, eye, and claws.  If you want to compare each version, click on one and then use your arrow keys to flip through each one on your screen.

The DeNoise package is easily called from within Lightroom or Photoshop.  You can also open and edit files outside these packages.  It an take a few seconds to process the image.  On my desktop system it makes good use of the graphics card processing power to speed up the process.  This is something Adobe has yet to get working correctly. You experience may vary, especially if you are using a laptop.

Here is another example showing before on the left and after on the right.


This is not a tool I will use all the time.  A properly exposed image with ISO values of 800-1600 may not need to be run through DeNoise AI.  However, I will be using it on any high ISO images where that nasty grain shows up.

Now, the team at Topaz Labs is not perfect.  Their website has many broken links and I know of one photographer who had trouble getting their copy activated after purchasing.  He had some difficulty with their tech support but in the end, he got it working and is happy with the product.

I suggest you give the free trail a test drive and decide for yourself.  Use this coupon code for 15% off any Topaz product.  http://topazlabs.refr.cc/richards

Wednesday, February 21, 2018

New Lightroom Classic Feature Makes Culling Photos Faster

By the time we finished breakfast this morning the temperatures were in the sixties, the sun was shining and there was a soft breeze blowing.  A perfect morning to photograph birds in the yard.  I got my camera, filled my large coffee cup to the top and went out back to spend some time with the birds that visit our yard.  Retirement is really hard.

Between 8:30 and 10:00 I shot 739 photos.  It's easy to do when your camera can shoot 8 frames a second.
Bluebird

In the first round, I culled out (deleted) 412 or 55% of my shots.  These were the easy ones to delete.  They were out of focus, over/under exposed, the bird was behind a branch or facing the wrong way.  I didn't have to look close to see that they needed to be sent to the bit-bucket.

This initial culling process used to be painfully slow.  Lightroom took a long time to build previews of the RAW photos to display on the screen.  Depending on how many photos you imported, it could take a while to build the previews. The best thing to do was to go get a cup of coffee and relax. A new Lightroom Classic feature added in version 7.2 makes this process a significantly faster than before.  

When importing the photos from the memory card, I choose the “Embedded and Sidecar” option in the preview generation dropdown.  Lightroom will use the embedded jpeg preview out of the raw file that your camera generated.  I can immediately start the culling step using these embedded previews without having to wait on Lightroom.

Lightroom will display "Embedded Preview" in the lower right of an image so you can tell that you are viewing the preview from the camera.  

At some point in your Lightroom process, you will want to work with true 1:1 previews.  When you are to the point where you need to zoom in to pick the best photos, go to the Library module, grid view, select all the remaining photos and click the Library menu.  Select Previews and Build 1:1 Previews.  It will take less time because you are building fewer previews.