Showing posts with label macro. Show all posts

Monday, March 23, 2020

Using The Depth of Field When Photographing Small Subjects

The world outside our homes seems to be getting worse and worse.  As I write this at 3:30 PM on March 23, the US now has the third-highest total cases, adding over 8,000 today.  A couple more days and we may pass Italy.  By the time you read this, the world will have changed again one way or another.  

The dichotomy of worrying breaking virus news and the world of nature is extreme.  Walk outside
Aperture = f/5.6
and check out what's blooming.  We have a flower garden where we have been planting native wildflowers for several years.  Yesterday June and I took a hike and saw wildflowers bursting forth everywhere.  The world of nature marches on just as it has since the beginning of the world.  
Photographing flowers is a perfect thing to do now.  We can do it while keeping socially distant and being surrounded by nature will improve our outlook and health.  June and I took our cameras on our hike yesterday.  We didn't have tripods, which would have made a big difference in the quality of our photos but we were there first to get exercise.

This is all leading up to my photographic tip for today -- the importance of the aperture setting when making macro (close-up) photos of small objects, such as flowers.  Those of you who have taken my class should remember I refer to the lens aperture as the depth-of-field (DOF) control.  By adjusting the aperture (opening in the lens that lets light in) we control how much light is captured by the camera and how much of the scene is in focus.  The depth of fields is the distance between the camera and the nearest and the furthest objects that render the image to be in sharp focus.  By adjusting the aperture we control the size of the DOF - more or less in focus.  Understanding this is critical to making good macro photos, where the DOF is tiny.

I am including some examples in this blog to illustrate my point.  With one exception, these were all taken on our hike yesterday with my Fuji X-T3 mirrorless camera, an 80mm macro lens, and without a tripod.  It was an overcast day with little breeze to move the flowers.  

You can click on any of the images to get a larger view and then use the left and right arrow keys to flip through all the images.

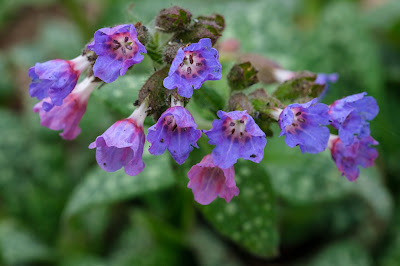
The first example was actually taken in our flower bed before our hike.  This Lungwort plant is a volunteer that just showed up a year or so ago.  It looks a little like Virginia Bluebells but the leaves are mottled.
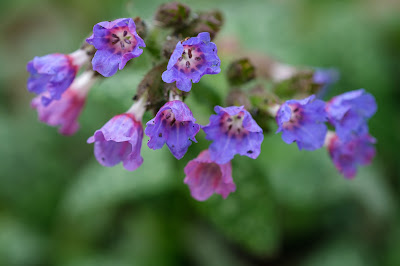
Aperture = f/5.6

Aperture = f/13
The first thing you notice is the background in each photo.  At f/5.6 it is blurry and at f/13 it is more in-focus, but still not sharp.  I think the background in the first is less distracting, however, some of the flowers are clearly out of focus in the first one.  Which is better is a matter of personal taste.  There are many different aperture settings that I could have used.
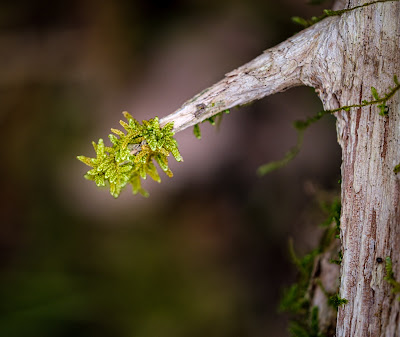
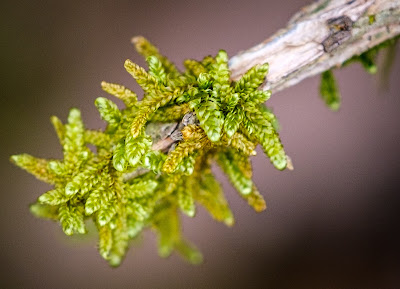
Moss Brush, uncropped, aperture = f/2.8

Cropped, aperture = f/2.8
This next example is the same photo.  I cropped it down so you can see how small the depth of field is at f/2.8 using a macro lens.  The depth of field is maybe 1/8 inch in this example.  The important thing to understand here is focusing on the right spot is critical in macro photography.  Not only do you need to think about how much to keep in focus, but you also need to think about what is in focus.  The "in focus" range is 1/3 in front of the focus point and 2/3 behind it.    With DSLR cameras, the aperture is wide open before you make the shot.  Most cameras have a DOF preview button, which will allow you to see what the photo will look like at the set aperture.  

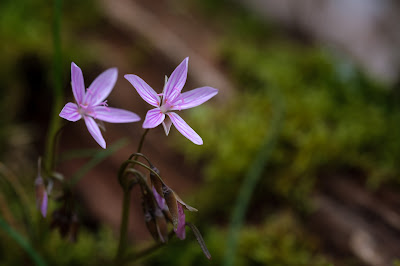
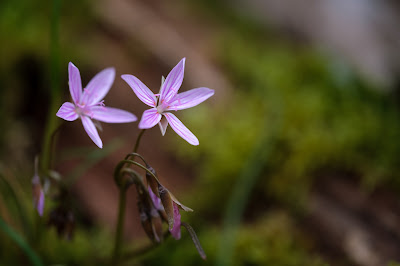
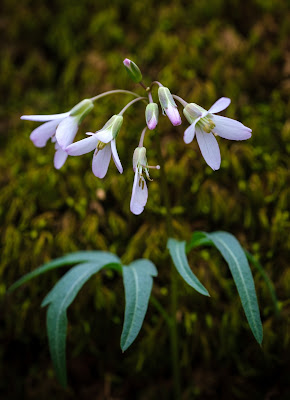
I shot this pair of Spring Beauties at three different settings
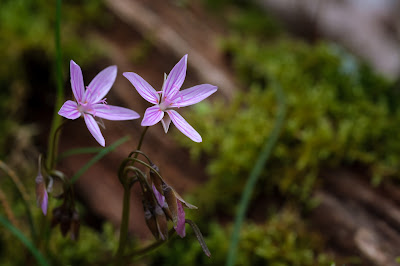
Aperture = f/8

Aperture = f/5

Aperture = f/3.6
Notice how the depth of field changes at different settings. The most noticeable difference is how blurry the background is.  Even at f/8, both flowers were not completely in focus, which brings up my final tip for macro photography.  Because the DOF is so shallow, the position of the subject(s) in the composition can make a big difference.  The Spring Beauties were at slightly different distances from the camera.  If I had moved the camera so the two flowers were the same distance away I could have gotten more of them in focus.  In the final example below, I positioned the camera so I was shooting perpendicular to the spiral of this Christmas Fern.
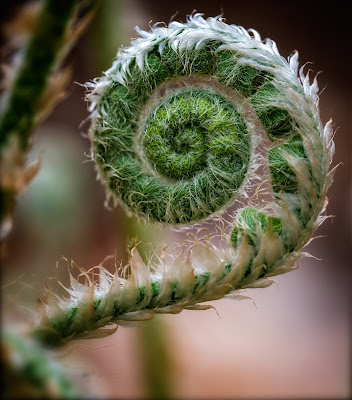
Aperture = f/5.6
Although I had a relatively wide aperture (f/5.6) and a shallow DOF, most of the curl is in focus.   If you look closely the front of the curl is in focus, but the back edge is not.

With these examples, I hoped to illustrate the importance of controlling the DOF in order to create a more pleasing photograph.   The best way to really understand this is to go out and try it for yourself.  Set your camera in Aperture Priority mode and make the same shot at different aperture settings.  The camera will adjust the shutter speed accordingly.  If you have the ISO set on automatic it will adjust that as well. Then take a look at each shot and see how things change.  You'll find you like some better than others.  Then remember to try multiple settings on all your macro photos.

Now, grab your camera and go out in nature.  Just be sure to stay 6 feet away from those other photographers and hikers.

Tuesday, January 3, 2017

Some More Favorites from 2016 - Nature

Yesterday, I shared six of my favorite photos from last year and why I choose them out of the 11,686 from 2016 I have on my computer.  Today, I'm sharing a five more that are photos of plants and animals in nature.   Unlike yesterday when most of the photos were taken on a single trip, these were taken from Spring to Fall in a variety of locations.

I enjoy taking macro (close-up) photos of flowers and Spring is the best time to capture these beauties.  The first photo below was taken on April 10 in an area of our front yard where we are growing a variety of wildflowers.  Most of our flowers are native to our area and can be found in the woods and fields near by, but these Bleeding Hearts will not be found in the wild.   They are much showier than the native variety.  That is what makes them great photo subjects.
Bleeding Hearts
I picked this photo because of the brilliant colors, cool flower shapes, and tiny water drops that cling to each one.   This is also special because it is one of the best samples of a technique I have been learning called focus stacking.  This technique allowed me to get the flowers and water drops in very sharp focus while leaving the background out of focus. Click on the photo to zoom in for a larger version to see all the details.

From the font yard we travel to the Smoky Mountains and a photo that was taken just 9 days later.   We had spent a couple days in the park photographing wildflowers while hiking some of the trails.   Driving down Newfound Gap Road toward the Sugarlands Visitor Center we came upon a bunch of cars and people on the side of the road.   This can only mean one thing, a Bear Jam!   Not wanting to miss out, we found a spot down the road, walked back and found there was a mother with a couple cubs about 50 yards off the road.

The bears were often hidden behind trees and this is not a great photo, but the our memories of this time are a funny story.  This particular cub was sleeping high in a tree, oblivious to the crowds of people below with cameras and cell phones positioning to get a better view. As we were watching the bears, a well meaning but confused lady walked up and explained to us that the cub in the tree must be in distress and someone should do something.  We couldn't convince her that cubs sleep high in the trees and was just fine.  Frustrated with our lack of concern she moved on to plead her case to the next person.   Eventually the cub realized mom was moving on and he better come on down or be left behind.

Bear Cub
This funny story could have had a sad ending. In the crowd on the side of the road was one man with a cell phone that felt he had to get close to the bears to get a photo. This idiot was fortunate that mom didn't think he was threatening her cubs. People need to understand the Smoky Mountains is not a petting zoo.

The next wildlife subject was also not in distress but was getting his fill of sugar water at our Hummingbird feeder.  
Hummer Sunset
 I was trying something new when I took this shot. I have some flashes, stands, flash umbrellas and wireless flash triggers I purchased to do Real Estate photography.  I decided to use some of this equipment to photograph the fast moving little birds. By the time I figured out all the different settings I needed, it was getting late and the sky was golden with sunset colors. This is one of my favorites because of the way the bird is in sharp focus and the warm background is out of focus. If I do this again, I will change the aperture from f/11 to something wider to make the background even more out of focus.

There is something about birds of prey that draws our interest in ways that other birds just can't. Hawks, Eagles, and in this case, Osprey, fascinate June and I.  

Osprey
This bird took up residence in Warriors Path State Park this past fall. Following it around gave us many photo opportunities, such as this one with dinner in it's talons. I enjoy photographing birds and catching them in flight is a fun challenge.   

The final photo in this set of favorites is not flowers in a perfect setting or wildlife in their habitats. I did not go out looking for this subject to photograph but instead found this literally right under my feet.

Fallen Leaves
I was at Cass Railroad State Park in West Virginia with my good friend Kent to photograph the historic steam engines that run up the mountains. It was fall and the colors on the trees were brilliant. However, this day it had been raining all day and everything was wet. I was walking back to our rental house along these raised wooden sidewalks or boardwalks when I came across these leaves that had fallen and stuck to the wet wood.  I had my camera with me and only had to point it straight down. Outdoor photographers are guilty of moving things like leaves around to improve a photo. The leaves in the photo are just where they dropped. Honest!

I like the simplicity of this photo.  The horizontal lines contrast with the randomness of the leaves. The wood is almost black, contrasting with the golden leaves. No brilliant sunset, expansive mountains, or wildlife here. Just simple fall leaves.

I've got 10 more favorites to share in the next couple days.   Come back to find out what others I like and why.

Sunday, November 1, 2015

Look Around

Thursday Colors
I just finished a five day landscape photography workshop in the Smokies.   I was lucky enough to be one of over 200 photographers who registered in the first few days and got in.   The instructors at this workshop were the Who's Who of landscape, nature and outdoor photography.  Best of all, I got to catch up with some great friends from around the country and make some new friends.

Fall is my favorite season, but the beautiful part doesn't last nearly long enough. The colors went from brilliant on Wednesday to just about gone by Sunday.
Thursday
After a couple days of rain most of the leaves were on the ground by Sunday.   The hill sides were no longer brilliant with the reds, yellows and oranges.   The only greens left were the evergreens.

When all the conference programs were over and the car packed up to drive home, I decided to take two more hours and make one more trip down the road past the Tremont Institute hoping to make some photos of the stream with fall colors.  After driving  a couple miles down the road I pulled off at a spot that looked promising for photos of the white water flowing around boulders in the stream.   What I found was I wasn't able to make any photos of the water that were worth posting.   The sky was overcast but bright, making a glare on the surface of the water that I was not able to work around.  It was looking like this last trip was a bust and I should head home.

After I gave up on the water photos I stood on the creek side for a few minutes and looked around.   It wasn't looking promising, until I looked down.

Morning Rain on Leaves

The ground was covered with fallen leaves.  Some of them still had water drops from last night's rain storm.   The same overcast sky that made photographing the stream difficult made perfect considiotns for photographing the fallen leaves.  I was so excited I started taking photos with my 70-200mm zoom lens, which is not really the right lens for close up photography but it certainly worked in this situation.

Maidenhair Fern and Maple Leaf


I walked back across the road to car to switch to my macro lens and discovered a spring wildflower blooming right next to the car!   What a treat to find this beauty this time of year.


Sweet White Violet

There were unlimited photo opportunities with the leaves, moss, and other objects covering the ground .  These last three photos were taken within 10 feet of the car.

Reds and Greens

What looked like a bust turned out to be filled with beautiful subjects that tell a story about the fall season.  I was blessed because I slowed down, stopped and looked around.   If I had only looked for what I expected to find I would have missed out.  

Life is like that.  We have expectations and when life doesn't meet our expectations we are disappointed, unhappy or even depressed or angry.   If we just open our eyes and look around we will find God has blessed us in ways we didn't even imagine before.   Stop and look around, even if it's just around your feet.

Tuesday, May 12, 2015

Make It Simple

Carrying on with my Simplicity theme I have recently tried to simplify some of my macros.   In this case, I was making photos of a plant growing in my parents yard.
Click any photo to zoom in
In this first photo, I tried to simplify by getting close and eliminating everything except the subject, which is this cool leaf with buds popping out around the edge.  Not much else here to distract the viewer's attention from the buds.

In the second photo, I simplified by eliminating color.   Everything is pretty much green but converting to a black and white removes the color element making is simpler.

Here I cropped down to just the buds with water drops.  Cropping eliminated everything I didn't want and left only the things I did.

Finally, I used a shallow depth of field to blur out the background and drawing attention to the water drops on the end of the leaf.   This is a pretty simple photo.

Four different techniques to simplify a photo.  These can be used alone or in combination to creatively remove complexity and create simplicity.

I'm going to continue to try and simplify where I can.


"How many undervalue the power of simplicity!  But it is the real key to the heart."

William Wordsworth.

Tuesday, January 6, 2015

Getting Out Of The Slump

Everyone has one from time to time.  That period where we are not doing our best and are having a hard time getting motivated to pull ourselves out of the slump.   Each year when winter rolls around I fall into a photographic slump.  I look outside and see brown and gray.   I don't see anything that makes me want to pack up my camera gear and head out looking for interesting photographs that might be waiting to be captured.   My camera can sit on the shelf for weeks at a time.

Today I have decided to do something about it.   I'm starting a weekly photo challenge put on by PhotoChallenge.org.  Each week the photo challenge authors will throw down a challenge in the form of a photographic theme.  The challenge is to go out and make a photo within the theme of the week.   The themes are designed to challenge photographers to try new things, get a bit out of the box, and best of all -- practice the art of photography.

I made my decision on day 6 of the first week so I had to move quickly.  The theme for this week is MACRO - KITCHEN.   I needed to quickly  make a close up or macro photo of something in our kitchen.   After spending about one minute looking around the kitchen this evening, I came across my subject for the week -- toothpicks.

Week 1 - MACRO KITCHEN - Toothpicks

These are in a little round plastic bottle designed so you can shake one out of the top at a time.  Taking the top off the bottle reveals a repeating pattern of miniture logs daid out in a spiral pattern.

I tried shooting this with my 100mm macro but the depth of field (DOF) was too small.  I couldn't get a photo with most of the toothpicks in focus.   I switched to a 70-200 zoom with a 36mm extension tube, which allowed me to focus closer to the subject.  This was taken at 200mm f/29 and then cropped down to a square image.

I'll learn what the next challenge is in the next few days.  I can hardly wait.   The slump is over!

Thursday, June 5, 2014

A mirror reflecting the Creator - June 2014 Calendar Page

I really like the writings of John Muir. I have found that things he said over 100 years ago are insightful and apply just as well today as they did in his time.

For those of you not familiar with Muir he was a Scottish naturalist and early (1838 - 1914) advocate of preservation of wilderness in the United States.   He was known as "The Father of The National Parks" because of his efforts to convince Congress to create the National Park Service,  Yosemite and Sequoia National Parks.  During his lifetime John Muir published over 300 articles and 12 books. Ten of his books are public domain and available as free downloads.  He co-founded the Sierra Club, which helped establish a number of national parks after he died.

I have often used Muir quotes on my calendars.  One of my favorites is

"Climb the mountains and get their good tidings. Nature's peace will flow into you as sunshine flows into trees. The winds will blow their own freshness into you, and the storms their energy, while cares will drop off like autumn leaves."

I chose the quote for the June calendar page because it so describes the flowers in the dew drops as a "mirror reflecting the Creator".  As June and I have become more interested in nature photography we have learned to look closely at everyday objects and see God's handiwork.   In this case this was a stem on a flower in the Centennial Park in Nashville.  It had rained the night before and there were water drops everywhere.   It was easy to get caught up in the reflecting pond, flowers, and buildings, but I found this dew drop covered stem to be the best thing there that morning.

This was taken with my camera on a tripod with a 100mm macro lens attached.   I manually focused to bring the refraction of the flowers into focus.  The macro lens created a shallow Depth of Field (DOF) and blurred the same flowers below the water drops.   This is not a particularly difficult shot if you have the right equipment, patience and an eye for these little details.

A 16 x 24 inch ThinWrap print of this photo is available in the Blowfish Emporium on State Street in Bristol, Virginia.   It is a lustre print that is coated with a soft Satin Laminate. The print is then mounted on Gatorboard with the print wrapping around the edges.  A block on the back makes the print float away from the wall when mounted.  I really like ThinWraps because they are a little different, look great and don't require expensive frames.

Sunday, January 26, 2014

Depth of Field in a Marco World

When shooting macro shots with a DSLR camera the depth of field or DOF can be extremely small.  The DOF is the distance between the nearest and farthest objects in a scene that appear sharp in an image.  

The DOF is influenced by several factors
  • The closer the object in focus the smaller the DOF gets.
  • The longer the focal length of the lens the small the DOF.
  • The wider the aperture (smaller f-stop numbers) the smaller the DOF.
  • The bigger the camera digital sensor the smaller the DOF.
To illustrate the impact of the aperture on the DOF I took the following series of photos keeping everything constant, except the aperture.  I was using a Canon 5D Mark ii (full frame sensor), 100mm macro lens, focused about 6 inches from the water drops.  Of course, the camera was on a tripod to eliminate any movement.

You can click on any of these photos to get a larger view and then flip though them using the right and left arrow keys.

f/22

f/11

f/7.1

f/4.5

f/2.8


You can see that even at a small f/22 aperture the depth of field is only about 2 inches.  At f/2.8 it is about the width of one small waterdrop.   Here's a crop of the f/2.8 shot where you can see just how small the DOF is.
f/2.8 cropped
Understanding the DOF is important in all photography and critical in macro photography.  In order to control the DOF you need to understand the factors that influence it and adjust those to create the composition you want.  Choose the camera and lens combination that will get you in the range you want then adjust your aperture and distance to get that really cool macro.

Saturday, May 11, 2013

Trying New Things

Last weekend I splurged on myself and bought a new lens.  I found a good deal on a refurbished Canon 300mm f/4 L telephoto.   This is the same model I rented when I went to Reelfoot Lake back in February.  I really liked that lens and have become tired of carrying around my heavy Sigma 80-400 zoom.  This is the lens I plan on taking with me when looking for wildlife shots.

Today was the first chance I had to try it out.  I went out exploring the yard planning to use it to get some bird shots.  I filled the feeders and waited.  While I was waiting I noticed our recent rainstorms had knocked the dogwood flowers down and there were several on a shrub in the back yard.  What the heck, I had my camera and 300 lens so I decided to see what I could get.   Now this is not how I would have taken this shot if I had planned it.  I would have had my tripod, macro lens, and cable release to get as sharp a picture as possible.   Being too lazy to go back in the house I shot the flower petals handheld about 9 feet away with a 300mm lens.


1/400 second, f/5.6, ISO 640 using Canon 7D

I'm pretty excited about the way this came out.  The best part is I tried something new.  

I've traveled great distances to many interesting places to photograph.  I've attended workshops and learned a great deal at each one.  One thing I have learned is you don't have to go to a workshop or travel to exotic places to improve your photography.  One of the best exercises is to limit yourself to a small area and only one lens.  It forces you to use your eye to look for interesting subjects and compositions right under your nose and to think differently when composing a shot.  It makes you move past the obvious and easy shots.   As with anything else, the only way to improve is to practice.  

It's starting to look like rain again.  I may be back out taking this shot again shortly with rain drops of the leaves and petal.

Monday, April 1, 2013

Nail the Focus with Live View

Well it looks like wildflower season may actually arrive here in East Tennessee before summer does.   The day time temps are forecast to be 50 - 60 this week with some sunny days.  I saw my first wildflowers last Friday.  With the wet winter-spring and extended cold weather we've had I expect the blooms to start popping out all over any day now. 

Wildflowers are great macro photography subjects.  I suspect many of you will be like me out in the field (literally) with your macro lens trying to get that great image that is perfectly focused on exactly the right spot to make your composition.  If you're like me, you'll struggle with the focusing.  Here's some tips to help you "nail the focus" on your macro shots.

First, put your lens on a good sturdy tripod.  Good macros can be made hand held, but they can be challenging.

Second, use a wired or wireless remote shutter release. If you don't have one, use your camera's shutter timer so you are not touching the camera when the shutter trips.

Third, turn off auto-focus and set your lens to manual focus.   When you're shooting a small intimate scene like a wildflower your depth of field where the subject is in focus will be extremely shallow.  It is important to compose your shot and manually focus so that the most important part of the composition is in focus.  The auto focus may be great, but it will often focus on the wrong thing, ruining the shot.

There are a lot of factors working against you being able to manually focus a macro shot.   The camera may be low to the ground, requiring you to either lay on the ground or get into a contorted position that makes yoga look easy in order to be able to look through the viewfinder.  I wear glasses with the "no-line bifocal" feature, which means the focus on the bottom of my glasses is different from the middle or top.  If I'm in a position where it's difficult to line up my glasses with the viewfinder then manually focusing through the viewfinder is frustrating because it never appears to be in focus.

Fourth, manually focusing a macro shot involves minute manual adjustments. It's hard to tell when you have the focus where you want it.  Any slight movement of the focus ring, camera or subject can ruin the focus.

The good news is most modern DSLRs have a Live View feature that can help over come the manual focus challenge.   In Live View mode you're seeing what will be in the image before you take the shot, but you're seeing it on the camera's LCD.  Live View enables you to view and compose the shot without fighting to get in position to look through the view finder.  You see the image while you manually focus so you are able to get the focus right and on the right spot.  If you have a camera with an articulating LCD display then you have even greater flexibility.

Both Canon and Nikon DSLRs have a digital zoom feature while in Live View mode which works like zooming in to the image in post processing.  What I do is pick a place where I want the focus to be as sharp as possible then use the Live View zoom to get down to where I can see the smallest details on the LCD while manually focusing.   You'll be able to see how just touching the focus ring on the lens can change the focus.

Of course, to make this possible your camera must be on a tripod.  Any camera or subject movement will make manual focus nearly impossible.  If you are hand holding and/or the subject is moving you might be better off in auto focus mode.

Live View manual focusing is not just for macro shots.  I've been using it to get more accurate manual focusing in my landscape shots.

The way Live View works varies by manufacturer and camera model.  You'll want to break down and actually read your owners manual and then practice a bit before heading out into the fields of flowers, bugs and other subjects in the intimate world of macro photography.

These and other macro flower photos are available online in the flower gallery on my website.

Like this blog post?  Share it with your friends.  Want to know when new posts are out?  Sign up in the Subscribe Via Email box on the blog website.

Tuesday, January 1, 2013

What to do on my day off? Water drop shots!

There's not much going on photographically outdoors right now.   It's rainy, overcast, and there is very little color.   Not enough to convince me to go out shooting in the rain.   Instead, I decided to make the best of an indoor day and try my hand at taking pictures of falling water drops.

I used common household items to build my "set".  A step ladder, clean oil pan, zip lock bag, and some colorful things for a back ground. 

I filled the bag with water and hung it from the top of the ladder over the oil pan full of water.  I attached my off camera flash to the side of the ladder and positioned a reflector on the opposite side.   Then it was a matter of poking a small hole in the bag and getting to work. 

I tried a variety of back drops.  The more colorful and bright the better the results.   You see in the photo on the right that  I was using one of June's old clown costumes and a red stadium chair.

The hardest thing is to focus in the right spot.  I held a pencil so the point was right where the  drops hit the surface of the water and manually focused on the pencil.

I found the following gave me the best results:
  • Camera in manual mode, lens in manual focus
  • 1/250 of a second (max sync speed)
  • f/7.1 - f/22 depending on how much I wanted to blur the background.
  • ISO appropriate to get a good exposure using these settings, usually 200 - 400.
  • flash output set to 1/10.  This results in a faster flash.
Then I just started firing away as fast as the flash would recycle.  There's no timing these shots so it's all chance.  I took 192 shots and quickly deleted 147.  Out of the 45 remaining I picked 26 to work on. I then narrowed them down to 14 that were worth sharing.  All 14 are available on my website.

Here's a few of those 14.


Notice the red from the stadium chair in these shots.


Look closely and you will see the clown suit in the water drops.  You can click on any photo to get a larger view.

Most of my shots were looking across the water and slightly down.   I also shot looking down at the surface of the water.   These came out almost black and white so I went ahead a converted them to true black and white.

I hope you like these.  They were fun to do.   Best of all, I didn't have any water disasters and only had to wipe up a little water off the kitchen floor.


Friday, September 14, 2012

Backing Up Photos On The Road

First day back from 12 days in Glacier National Park and Waterton Lakes National Park in Alberta.  I am in the process of moving all my Glacier NP photos from the laptop that I took with me to the desktop where I do all my editing and keep all my master files.   Lightroom provides a pretty good Export/Import tool for moving images from one PC to another and that's what I was doing this morning.

I exported all 2,383 images from the laptop Lightroom catalog to my portable pocket drive and when I plugged the pocket drive in the desktop computer I got the dreaded "click - click - click" sound from the pocket drive.   After 15 minutes the system gave up on that drive.  Good thing I wasn't depending on that copy.

Keeping multiple copies of images while traveling is always a good idea.  Here's my process:
Fuchsia Fireweed and Bee

  1. I never delete images from a memory card until I am sure they are safe on the desktop PC and have at least one good nightly backup.   I have enough cards to cover a two week trip.
  2. I don't have any cards bigger than 16 GB and most are 8 GB.   If a card gets corrupted then I don't lose too many images.
  3. I have a copy of  Image Rescue 4 that came free with my Lexar cards.   I've had to use it more than once to read files off a corrupted memory card.
  4. I download new images from the cards to the laptop at the end of each day. That gives me two copies.
  5. I copy the RAW image files from the laptop to the external pocket drive (yep - same one that just died).  I don't do this every night but probably should.   This gives me three copies.
  6. The external pocket drive goes in a separate bag from the computer and cameras.
  7. When I get home I export all the images from Lightroom on the laptop and then import them into Lightroom on the desktop PC.   
  8. I don't ease a memory card until I put it in the camera to reuse it.

No process is fool-proof but having some process that gives you multiple copies is critical.   I would hate to get back from a big vacation anticipating going through images from that great trip and find that I don't have them.

I hope you enjoy the Fuchsia Fireweed and Bee image.  It was the end of the season for Fireweed in Glacier but there were still a few blooms on the top of these tall plants. These were growing where the 2003 Roberts fire burned over 57,000 acres of the park.


Sunday, July 1, 2012

Book Review: Photographing Waterdrops

Recently I was given the opportunity to review the second Harold Davis photography book to be added to my library of photography books - Photographing Waterdrops.  Harold is a master in the art of macro photography and has written several books on the subject.  Each of his books are both instructive and a joy to look at and this latest book is no exception.

I enjoy shooting water drops.  Each one is a miniature world reflecting the world outside or refracting the world on the other side. They are always interesting to look at and almost always difficult to photograph .In this book, Harold instructs the reader the equipment and techniques for capturing these miniature worlds.

The book is organized into three sections - Waterdrop Worlds, Making Waterdrop Photos and Waterdrops in the Digital Darkroom.

After several pages on the importance of water to our world and the lifecycle of a waterdrop, he gets down to how to deal with extreme magnification of macro photography, the physics of a waterdrop, different kinds of waterdrops, and the difference between reflections and refractions.  He spends several pages on waterdrops on spiderwebs.  I've shot these before, but never like the extreme closeups he shows in the book.   I'm inspired to try it out next opportunity I get.  He also explains how to get the starburst effect in waterdrops.

In Making Waterdrop Photos he covers some basics of good exposures, the exposure triangle, and reading histograms.  A new photographer will appreciate this instruction and the more experienced may benefit from the review.   He spends several pages on equipment - lenses, extension tubes, close up filters, tripods, and flashes.   He also talks about some of the challenges of extreme macro photography and how to over come these challenges.

In the final section, Harold explains his techniques for post processing using Adobe Photoshop.   If you're an Aperture, Lightroom, or other software user you will benefit from the concepts, but not the technique.  

Harold includes many of his own photos as teaching examples in his books.   With each photo he explains the situation, how he approached the subject, and the technical specs on each photo.   The examples are great teaching tools and are a pleasure to look at.

This book retails from $29.95 (USD) and Amazon is selling it for $19.37.   If you have an interest in photographing waterdrops you'll find this a very worthwhile investment.

Now if it will only rain here in East Tennessee I'll get out and practice what I have learned.


Saturday, April 28, 2012

Appreciating My Backyard

This is what I see right now when standing in my backyard.   It looks a little different from the March 25 view I posted earlier.  The field is full of yellow buttercups.   Cattle graze here and I wondered why they didn't eat the buttercups.   I've learned that buttercups are poisonous and the acrid taste and the blistering of the mouth caused by their poison means the buttercups are left alone to grow and spread across the hills. 

I've been watching for dramatic skies at sunset but it does not happen very often and when it does it's usually gone by the time I can get out there.  I'll keep watching and trying to get out there in time.

This photo reminds me just how blessed I am.   Sometimes I focus too much on the material things and miss the blessings God has placed right in front of me.   This view is just one of those blessings.   My photography has made me appreciate God's gifts of beauty all around us.   June and I both notice that we are stopping and looking at things we would have passed right by without noticing a few years ago.   Canada Violets are pretty common around here in the spring.  They're not something that you would stop and take time to appreciate, especially in the rain.  But this one was taken last weekend in the Smokies in between rain storms.   If we hadn't taken the time to stop and been willing to risk the rain, we would have missed this wildflower decorated with jewels of rain.

What else has God placed before us?   The grand panoramas and the little jewels are all around us and say "Look what God has done here!".  A friend sent me an email this week with this verse that says it better than I can.

"God's invisible qualities and divine nature have been clearly seen in all creation, so that men are without excuse."  -  Romans 1:20

Let's slow down and appreciate God's invisible qualities and divine nature all around us.

Wednesday, September 7, 2011

Compromising With Pearls

Recently when biking around Cades Cove at sunrise I came across a field of tall grass, spiderwebs, and dew.   This combination can create some beautiful abstract artsy images with dew drops on the spiderwebs.   I wanted to get up close and shoot the "String of Pearls" but I didn't have my macro lens with me.   It would have been the perfect solution to this situation. 

I did have a couple other lenses with me, including a 80-400mm long telephoto, a 24-105mm zoom and a 17-50mm wide-angle zoom.   I wanted to have the dew drops as sharp as possible but blur the background to keep it from being distracting.   I choose the 17-50, set it at 50mm, f/2.8.   The wide angle let me focus reasonably close and the wide open aperture blurred the background.   Typically, short focal length lenses will have a larger depth of field and in this case, even at f/2.8 the background was too distracting. 


I decided to crop down as much as possible to see if I could eliminate the background distractions.   This is an extreme crop of the same picture.

Be sure to click the photo to zoom in and see the details.

You can see that by compromising the end result is just not sharp.  If I had my macro with me I would have gotten a much sharper image of the dew drops.  Oh well.

Right now I am studying a book by Warren Wiersbe on the Book of Exodus.  In it he says "most people in our world are being crucified between two thieves: the regrets of yesterday and the worries about tomorrow.  That's why they can't enjoy today."   What a waste.   I made a choice when I packed my camera bag and got on my bike that morning.   I could regret not having what I needed, or I can be happy I got to enjoy God's String of Pearls.   Next time I go out to take photos I can worry about having to leave some piece of camera gear behind or worry about not being at the right spot at just the right time or I can enjoy the moment and be glad I'm there.

Later that morning I got to spend about an hour using my long telephoto lens to shoot deer and black bear in the Cove.   You can bet I wasn't worrying about not having my macro lens then!  God's creation is all around us.  We'll miss seeing much of it because we are so busy running around.  If we slow down and look God will provide the Wow moments for us.


Monday, February 14, 2011

Happy Valentines Day

I'm a little late getting this out. 

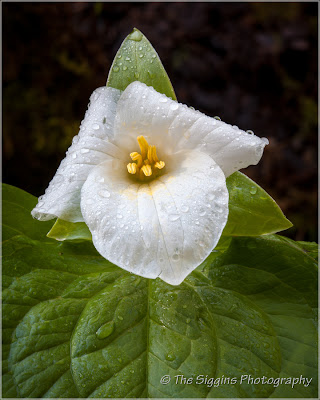
This Trillium was taken last spring on a hiking trail near Looking Glass Falls, which is near Brevard NC.   I "enhanced" the photo a bit by blurring and darkening the edges to draw attention to the flower.  I also cloned out some distracting bright spots where the light was shining through from behind (it was a bright sunny day).    I used a combination of Adobe Lightroom, Adobe Photoshop Elements (cloning), and Nik Color Efex Pro (bluring the edges).

Saturday, February 5, 2011

Morning Jewels

God's beauty can be found in nature, even in early February when everything appears to be dull grey or brown.   It rained overnight but the skies cleared at sunrise and stayed clear long enough to get out and find something to shoot.

I went out intending to get shots of the early morning sunlight shining through a light fog in the woods next to our house.   I couldn't find any angle that worked that didn't include the neighbor's house in the picture.  I wandered around a bit and found a couple trees that still have some of their leaves hanging on.  The leaves are a golden yellow, which makes a great background, especially when the sun is just coming up and back lighting the leaves.  There were raindrops clinging to many of the small branches on these trees.  I had found my subject for this morning!


The cool thing about photographing water drops is the image of what's on the other side inside the drop . In these photos you can see trees, leaves, and houses inside the drop. Look closely (click on a picture to zoom in) and you'll see they are upside down! That's caused by the way the light is diffracted in the water.


This last image is a little different.   I used a small aperture to create the star burst in the drop.   The angle was such that I didn't have any of the golden leaves in the shot and instead got the woods in the background.  I used Lightroom to tone down the background a bit and brighten the twig to make it stand out.  I also used Nik Color Efex Pro to blur the edges.


As I finished up the wind picked up, the clouds rolled in and the day turned grey and blustery.  Today I was at the right place at the right time today to capture some of nature's jewels.

These are all shot with a Canon 7D, Canon 100mm Macro lens with the camera on a tripod. 

These and other photos are available for puchrase online at http://www.thesiggins.com/Macros/Macros/   In addition to prints, you can get any photo printed on a number of different items such as mugs, t-shirts, puzzles, coasters and more.