Showing posts with label photography technique. Show all posts

Monday, June 2, 2014

Speed

While working through my backlog of photos from Korea I came across two that I thought would make a great illustration of something I talked about at the last Eastman Camera Club meeting.

We were visiting the historic city of Gyeongju South Korea with our daughter Holly and two of her friends Rhonda and Minseon.  One of the attractions is riding in these brightly painted horse drawn carriages that are festooned with Christmas lights and play really loud pop music as they go by.  No charming stroll through the park here.  They seem to challenge each other to see which one can run up and down the road faster.   We didn't take the ride but I did catch a few shots of them as the went by.

This first photo was taken as the carriage came nearer.  The shutter speed was a relative fast 1/100 of a second.  The carriage and driver with his cool sunglasses and pink cap are pretty sharp and in focus.  Although he was moving, you can't tell it in this photo.
Fast Shutter - Slow Speed

The second carriage was moving about the same speed, but the photo really has a feeling of speed.

Slow Shutter - Fast Speed
I slowed the shutter speed down to 1/3 of a second and used a technique called panning.   I panned my camera to keep the carriage as close to the same position in the frame as possible as it passed by.   When done right the background will be blurred and the subject will be sharp.   In this case I had my shutter a bit too slow for the speed of the carriage and was not able to keep from having some motion blur in the subject.   Being a horse drawn carriage on a bumpy road, there was more than just the horizontal movement.  The wheels are blurred due to their rotation, the trotting horse is very blurred and the lights show some motion blur.  Surprisingly the people came out pretty clear considering everything else in the photo.  This is not my best panning shot, but I really like the way it came out.   You get a great sense of motion and speed in this photo compared to the first.

Panning works best when the subject is moving parallel to the front of the camera and on a relatively straight path which allows you to predict where they’ll be moving to. If the subject is moving more at an angle they can move out of focus and you don't get the same effect with the background.

1/25 second exposure
The best shutter speed depends on how fast the subject is moving and how close you are. The faster the subject is moving the faster your shutter speed will need to be.   Experiment with speeds between 1/3 and 1/60 of a second.  If your camera or lens has image stabilization / vibration reduction then turn it off or turn it to Mode 2.   Set your focusing mode to lock on and continuously adjust the focus as the subject moves.  This is called AF-C on Nikon, or AI Servo on Canon.  You also want the camera set on burst mode.  As the subject approaches press the shutter button down half way to lock on the focus then press and hold it down to take as many shots as you can as it passes by.

This is a technique that takes some practice.  Luckily it's easy to practice.  Stand on the side of a busy street and take pictures of the cars that pass by.   Don't worry if you get some strange looks from the motorists.  Just look official.  You'll find they tend to hit their brakes as the go by.  Other practice subjects include bicycles, motorcycles and people walking or running.   There are plenty of examples online if you google photography panning.  Give it a try and have fun.

Saturday, May 31, 2014

Shooting without the accessory I use 95% of the time

Hi.  My name is Richard and I'm a tripod addict.  


Tripod Addict
There, I said it. Now I can start a 12 step program for photographers addicted to their tripods.

I carry that thing pretty much everywhere my camera goes.  I almost never take a photo without my camera on the top of that tripod.  It can get a bit heavy on long hikes but still I carry it.   June will even grab it and carry it when I'm not looking.

The reason I use that three-legged beast is most of my photos are landscapes that benefit from a small aperture to get a maximum focus range or depth of field (DOF).   A small aperture means I also have a slow shutter speed and I need the tripod to hold the camera steadier than I could ever do hand holding it.  The other habit I have developed is to keep my ISO (camera sensitivity to light) as low as possible to minimize digital noise, which is that unpleasant graininess in some photos. Low ISO means slow shutter speed.  I considered my tripod a necessity, which is why I haul it around the country.

Recently I hauled the tripod all the way to South Korea for a 13 day vacation.  This was our first trip where we did't have a car to carry all the camera gear to every destination.  It didn't take long to realize that carrying the tripod on crowded subways, busses, and taxis or setting it up in crowds was not going to work.  After hauling it half way around the world, I only used it once one night to make some long exposure cityscape photos.

Seoul At Night, 25 sec. exposure on tripod
I learned on that trip that I don't have to have to rely on the tripod as much as I had been. I could live with a little wider aperture and a little less depth of field.   I learned I can bump the ISO up much higher than I would have considered when using a tripod.   Most of the digital noise can be removed with software such as Adobe Lightroom or Nik Define.

Gyeongbokgung Palace at Night
Handheld 1/20 sec, f/5.6, 50mm, ISO 3200

Seoul from Namsan Tower
Handheld 1/8, f/4.0, ISO 6400
The other reason for using a tripod is when taking multiple exposures for High Dynamic Range (HDR) photography.   For HDR to work each photo must line up with all the others and none can have motion blur from camera shake.   I learned in Korea that you can make HDR photos without a tripod.


The HDR photo above was created with three shots (1/60, 1/25, 1/10 sec.) and combined in Nik HDR Efex Pro 2.  Even handheld I was able to hold the camera steady enough for the three shots to line up and not have any noticeable blur from camera shake.

There are a number of techniques for reducing camera shake when hand holding your camera.  I could go on about it here, but others have already done a great job

I'll still use my tripod when it's convenient, but I'm also going to branch out and go sans-tripod more.  Who knows what other bad habits I'll be able to break next.

Friday, October 25, 2013

Skies

It's been a busy few weeks.   I haven't blogged in weeks and have barely done anything with my fall photographs and we had our first snow flakes today! Time is passing by quickly but June and I have found time to get out and enjoy God's creation in gold, yellow, and red before the leaves are all gone.

We took one day and drove up to Burke's Garden, Virginia.  It's a favorite place for landscape photographers but we had never been.  Burke's Garden is a bowl valley completely surrounded by Clinch Mountain.  The valley is reported to be the highest in Virginia at around 3,000 feet above sea level.  This elevation brings fall to Burke's Garden before many other places in our area.  

The day we picked turned out the be cloudy and overcast.  When we got into the valley the clouds had come down far enough to cover the surrounding mountains and even creep into the valley.   Overcast days can be great for some photographs but challenging for others.  One of the most valuable lessons for an outdoor photographer is to know what to shoot under different lighting conditions.   A cloudy overcast day produces fantastic soft light, obscuring shadows and eliminating bright spots.  It can also make colors more vibrant. 

In this first shot you can see how the clouds were hanging very low over the mountains.  The clouds thinned a little allowing just enough sunlight through to highlight the trees in this shot.  Including the sky in this shot puts it in perspective and tells more about the place and conditions.

In this shot of a road lined by beautiful trees in fall spender you can see how the soft indirect light allows the color to pop without being washed out by bright light.  The sky does not add to this photo but there was no way to get this shot without including some of the sky.

Most of the time you want to avoid including the sky in the composition if it is bland and uninteresting.  Below is the same shot with different crops.


In the second version I cropped out that bland sky.  I also cropped out the grassy foreground because I didn't think it added anything to the image.  If something doesn't add to the image then think about cropping it out.

The next weekend we took a side trip to Cataloochee Valley on the way to meet friends for the weekend.  At times we had the same overcast conditions but later in the day the clouds started to break up and create some different conditions.

With some interesting clouds in the sky I had some different compositional opportunities.  In this photo of an old barn the blue sky and clouds added to the photo.  The clouds are cool and the blue is a nice contrast with the fall colors.   To make this shot I had to use a graduated neutral density filter to compensate for the sky being much brighter than the rest of the image.   I don't use these filters on every trip but when I need them they make the difference between an impossible shot and something worth sharing.

Of course these bright conditions made other photographs very challenging.  I had to wait a while for the sun to go behind a cloud before I could get a picture of leaves in that little stream.  

The secret to getting good photos outdoors is to understand your light conditions.  Unlike the studio, you take what God gives you and make the best of it.


Wednesday, September 4, 2013

Keeping My Photography On The Level

According to The Free Dictionary on the web (which must be 100% correct because it's on the internet), the phrase "on the level" means honest; dependably open and fair.  In the case of my photography as in life I'm interested in staying on the level.

I have a problem keeping my camera level when I'm in the field.   When I get home I look at my pictures and they are obviously not level.  My water looks like it's running out the left or right side of my photo.  For what ever reason when I'm looking through the view finder I think I'm level, but in fact I'm far from it.  I need some help keeping my photography level.

The best tool I have is a hot shoe bubble level.  This inexpensive little device works just like a carpenter's level.   There are two or three bubbles inside a plastic cube that attaches to your camera hot shoe.  This first one is available from Adorama for only $5.95 with free shipping.   You attach it to your hot shoe, put your camera on a tripod, and adjust the camera until the bubble is between the lines.   If you have your camera on it's side shooting a portrait orientation, then you turn the bubble to attach on one of the other sides.  Pretty straight forward and easy to use.
I also have a triple bubble level, which eliminates the need to reorient the level when switching from landscape to portrait orientation.  A little bulkier and $24.95 at Adorama.

I recommend having one of these in your camera bag and using it when ever it's important to have your camera level.

My Canon 7D has a digital level built in.  I can turn it on and tell if my camera is level by looking at the LCD display on the back or even in the viewfinder.  Having it displayed in the viewfinder is very handy when you're shooting hand held.

Here's a case where having the camera level is essential.

Oregon Sea Stack Sunset
Teach me to do your will, for you are my God; may your good Spirit lead me on level ground.
Psalm 143:10

Sunday, August 25, 2013

How to get both motion stopping and bluring shutter speeds in one image

If you've looked at my online photo gallery, especially the Waterfalls section, you know I enjoy photographing moving water.  My favorite technique is to use a slow shutter speed to make the flowing water appear silky and smooth.  Unfortunately, sometimes other elements in my photo that I want sharp are also moving.  This is especially challenging at the bottom of waterfalls because the falls themselves can produce a nice steady breeze that keeps the foliage in constant motion. 

I have recently started using a technique that keeps elements sharp that I want sharp and blurs the parts I want blurred.  This technique involves taking two exposures at different shutter speeds and blending them into one photo using photo editing software.  This is more advanced editing than I typically do on a photo but it can produce beautiful results.

Here's a recent example where I used this technique.

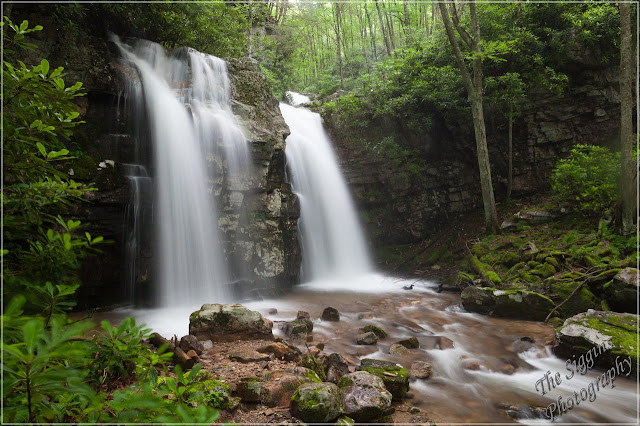
1.6 sec, f/20, 24mm, ISO 800
As you can see in this first photo the long 1.6 second exposure produced the pleasing blurred water effect I was wanting but the rhododendron leaves on the left were moving and blurred.  Most of the leaves around the base of the falls were moving but the movement of those that were further from the camera were not as noticeable.  I could have solved this problem by stepping to the right so the moving rhododendrons were not in my photo, however I wanted to include them because they framed the falls and also added a sense of depth to the photo.

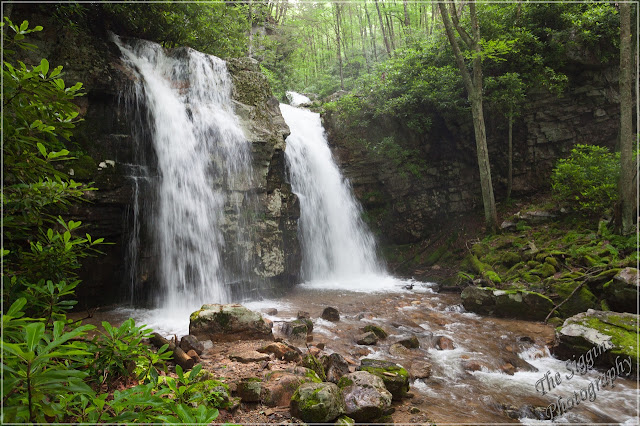
1/30 sec, f/4, 24mm, ISO 1600
Without moving the camera I changed the settings to get a shutter speed that was fast enough to keep the rhododendron leaves sharp.  Because it was pretty dark under tree canopy I had to bump up my ISO to 1600 and open up my lens aperture to f/4 to get this speed.  Because I am going to blend these two photos together when I get home the tonality (brightness) of the two exposures need to be as close as possible.   If one photo was much brighter than the other it would look unnatural when blended.   I managed the tonality by shooting in Aperture Priority (Av) mode and letting the camera set the shutter speed accordingly.  I could have done the same thing by setting the shutter speed in Shutter Priority (Tv) mode and letting the camera adjust the aperture.  I verified the tonality of the two exposures were close by comparing the histogram for each on the back of my camera.

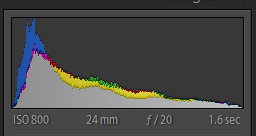
Histogram for first exposure

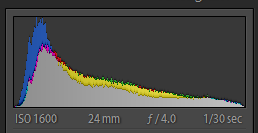
Histogram for second exposure
A histogram is a simple graph that displays where all of the tonality or brightness levels contained in the image  are found, from the darkest on the left to the brightest on the right.  You can see the two histograms above are not exactly the same but they are about as close as they can be in an environment where the lighting conditions are constantly changing.  Another important thing to remember is to take your two shots as close together as possible to minimize changing conditions.  If the sun had come out from behind the clouds between the first and second exposure then the tonality might have been very different, which would make blending later more challenging.

To use this technique you also need to make sure the white balance is the same between the two photos.   You can do this by not using auto white balance and setting the white balance on the camera or shooting in RAW mode and setting the white balance using photo editing software.  Since I pretty much shoot RAW all the time I didn't worry about setting the white balance on the camera.

When I download the photos into Adobe Lightroom I have two photos that are almost identical except for the shutter speed.  I need to take parts of each photo and blend them together into a new photo.  I used Photoshop Elements version 11 to do this.  You can use Photoshop for this, but I prefer Elements because it does everything I need and is only $65 versus over $600 for Photoshop CS6.

The blending technique using layers in Photoshop Elements is a bit advanced and more than I can cover here.  There are many free resources online that explain how to use layers.  Here are two video tutorials that are helpful:
In Photoshop Elements I created two layers from the two exposures and used the layer mask tool to reveal the rhododendron leaves from the second photo while preserving the rest of the photo. Instead of using a gradient tool like in the tutorial, I used the black paint brush over the leaves.  I was careful to not paint over the water, which would have revealed the water from the second photo, which I didn't want.

These two photos were pretty easy to blend together using layer masks because there was good separation between the leaves and the water.   If the water had been behind the leaves the layer mask would have been tedious and time consuming to create.   This is something to remember when composing the shot.

I saved the blended photo as a new file then used Lightroom to adjust the contrast, clarity, saturation, sharpness, and add a vignette. 
New Blended Photo
Once you had done this a couple times you will find it's pretty easy, as long as you think about blending when taking the photos.  Four things to remember -
  • No camera movement between shots - camera on a tripod.
  • Tonality of the two images as close as possible - shoot quickly.
  • Two images must have the same white balance.
  • Compose to minimize visual overlap of the elements to be blended.
Please let me know in the comment box below if you find these tutorials helpful and if there are others you would like to see here.  Feel free to share on facebook, Google+, etc.

Monday, August 12, 2013

Learning All The Time

Seems like every time I go out shooting I learn something new, even without trying.

I wanted to capture the misty effect you can get with long exposures of several seconds or more with waves on the beach.   When I took this shot it was still too bright for a long exposures.  In order to get the longest shutter speed possible I set my ISO as low as possible (100), my aperture as small as possible (f/22), and added a neutral density filter to the front of my lens to cut the light even more.   I further slowed my shutter by making sure I exposed for the sky and not the sea stack.   I was able to get a 15 second exposure even shooting into the sunset.

Sea Stack Sunset

When I looked at the LCD display on the back of my camera I thought I had captured what I was after.  The waves on the beach blurred into a smooth misty surface that reflected the colors of sunset.  Good for me!

When I was working on this photo just now I realized my mistake, the results of which you can see in this close crop of the trees on top of the sea stack.

See the ghost image of the tree tops?  Obviously the camera moved during that 15 seconds when the shutter was open.   Then I remembered.  To get the shot I wanted without the sandy beach I had to set my camera out near the water.  I had my camera on my tripod, which I set down in the sand and composed the shot.  I waited for the waves to be where I wanted them and started the exposure.   What happened next was comical.  The waves did not stop just below my tripod but continued up the beach and around the tripod legs.  Anyone who has stood at the edge of the surf knows what happens.  The wave washed the sand out from under the tripod legs, which then settled into the sand.  The comical part was me with my hiking boots running from the waves while leaving my camera and tripod in the surf.   Some of my photo buddies who were there with me chuckled at my antics.

Lesson learned - make sure the camera is on a solid surface and is not going to move during the exposure.  Beach sand and waves do not make a solid surface to shoot from.

I had fun trying the long exposures and will try again when I get a chance.  I'm sure I'll learn another lesson in the process.

Saturday, May 11, 2013

Trying New Things

Last weekend I splurged on myself and bought a new lens.  I found a good deal on a refurbished Canon 300mm f/4 L telephoto.   This is the same model I rented when I went to Reelfoot Lake back in February.  I really liked that lens and have become tired of carrying around my heavy Sigma 80-400 zoom.  This is the lens I plan on taking with me when looking for wildlife shots.

Today was the first chance I had to try it out.  I went out exploring the yard planning to use it to get some bird shots.  I filled the feeders and waited.  While I was waiting I noticed our recent rainstorms had knocked the dogwood flowers down and there were several on a shrub in the back yard.  What the heck, I had my camera and 300 lens so I decided to see what I could get.   Now this is not how I would have taken this shot if I had planned it.  I would have had my tripod, macro lens, and cable release to get as sharp a picture as possible.   Being too lazy to go back in the house I shot the flower petals handheld about 9 feet away with a 300mm lens.


1/400 second, f/5.6, ISO 640 using Canon 7D

I'm pretty excited about the way this came out.  The best part is I tried something new.  

I've traveled great distances to many interesting places to photograph.  I've attended workshops and learned a great deal at each one.  One thing I have learned is you don't have to go to a workshop or travel to exotic places to improve your photography.  One of the best exercises is to limit yourself to a small area and only one lens.  It forces you to use your eye to look for interesting subjects and compositions right under your nose and to think differently when composing a shot.  It makes you move past the obvious and easy shots.   As with anything else, the only way to improve is to practice.  

It's starting to look like rain again.  I may be back out taking this shot again shortly with rain drops of the leaves and petal.

Sunday, May 5, 2013

Are you an iconic photographer?

One of the first trips June and I took with my first DSLR (a Canon Digital Rebel XTi, which I still have)  was to the Canadian Rockies in Alberta.  We've been to a lot of different places since then but the Canadian Rockies is still my favorite place to visit.  I remember taking a lot of photographs, including this one of Spirit Island on Maligne Lake.
It's not really an island, but if you position yourself correctly and compose the shot just right it can appear to be an island.   This is one of those shots everyone takes.  To get the shot you either have to hike for a couple days or take a boat tour.  The boat drops you off right next to the island and gives you just enough time to walk to a spot to get "the shot" before it's time to get back in the boat and head back to the other end of the lake.

Spirit Island is what I call an Iconic Photograph - the image everyone who has been there has taken and you can find hundreds or thousands almost identical copies on the internet.  Try this - go to google.com and type "spirit island maligne lake" in the search box.  When the list of results comes up click images and see what you get.   On one trip to Zion National Park I found myself standing shoulder to shoulder with dozens of other photographers to take an Iconic Picture of The Watchman from the Canyon Junction Bridge.  Even National Geographic photographers give in to temptation and take iconic photos, such as Mesa Arch in Canyonlands National Park at sunrise.  Every place has them and they are not to be missed.  When planning a trip that I may only get to take once I prepare my hit list of iconic photos I want to take while I'm there.   I'm in the final stages of planning a trip to Washington State and Oregon and have created  quite a list of iconic photo spots to hit.

While I will take the Iconic Photos, lately I've become more interested in finding something unique and different and less interested in the images made by hundreds or thousands of photographers before me.  I try to find subjects and compositions that I won't see on other people's websites, facebook, etc.   Here's a quote from one of my favorite photographer/authors:.

"The more I study photographs from the past century -
the incredibly short lifespan of our art so far - the more
convinced I am that everything’s been photographed,
that our challenge now is to manipulate light, lines,
and moments in the frame in a way that expresses our
unique view of those so oft-photographed subjects. "
- David duChemin - Photograph Issue 2

I don't know if everything has been photographed, but it's getting harder and harder to create unique photographs.  Here's some photos I took in 2012 and some suggestions on avoiding the iconic photography rut.


Even when you are at one of those iconic spots, open your mind to different angles or subjects.  On this morning I was in the Smoky Mountains at one of the best places to photograph the sunrise.  When the sunrise didn't happen I had fun taking long exposure photos of cars going by on the road.  Not what I went for but a different take on a familiar location.


Slow down and look for something or someone outside of the main action.  In this case I was taking photos at a Revolutionary War Reenactment and discovered this man resting on a bench outside one of the cabins.   An interesting expression on his face and that red vest and green hat are a great combination of contrasting colors.

Walk a ways off the beaten path.   I was at Roan Mountain with a group of friends for sunrise photographs.  Afterward we walked down the road just a little way and found this just off the road.  People were driving and walking by about 15 feet away and never looking down where we were getting this image.


Look for small details with interesting shapes, lines and colors.  This is a section of McDonald Creek in Glacier National Park.   Although hundreds of people take photos here every day, I bet you won't see this one anywhere else.  It tells a story of how the rocks have been worn smooth and the curve carved by the blue glacier fed river.  Here's another of small details in the same river.


Look beyond the obvious.   I was on the Blue Ridge Parkway for the fall colors.  When I took this the sky was blue and the colors brilliant, but I found the the lake with leaves on the surface and a reflection of trees to be more interesting.  I think I got some strange looks when I was taking pictures looking down when the obvious iconic picture was up.

These are just some examples and suggestions.  You might want to read this article on Lightstalking - Travel Photography - A Different Point of View.

There are interesting subjects all around us.  If you look you will find all God's creations are interesting and worthy of being photographed.  All we have to do is open our minds, slow down, get off the beaten path, look for the details and look beyond the obvious. 

Sunday, July 22, 2012

One Fruit of The Spirit & Shooting Birds


Click on any photo in the blog for a larger view.


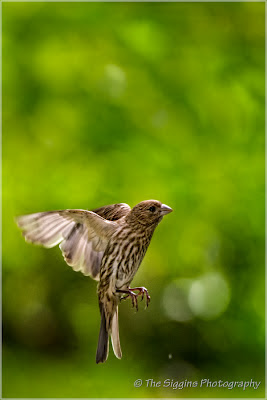
No, I haven't taken up bird hunting.  In this case I was shooting perching birds in the backyard with my 400mm zoom.   These little guys are a challenge to shoot because they fly so fast and are so small it hard to catch them in the frame and in focus.   Those big egrets are a breeze compared to these little speed demons. 

Today's bird blind was the kitchen. We have a bird feeder on a post in the backyard.  I opened the kitchen window and shot from the inside out towards the feeder.   My old Sigma 80-400 does not focus near fast enough for these birds and there is no way I could follow them in the view finder.  I set up on a tripod and pointed the camera at a point just to the left or right of the feeder where I could catch them in their flight path.   I guessed at the focus using the feeder as my reference. 

I learned that the Depth of Field (DOF) of a 400mm lens on a Canon 7D at f/11 focused at 25' is just over 6".   Most of the time it wasn't bright enough to get that large an f-stop and I had to make do with 5.6 - 7.1, which gave me a DOF of 3" - 4".   That means the bird had to fly through a space less than 4" deep and about 2' wide.

Most of the time it was cloudy and when the sun did come out it was behind the birds, making them a dark silhouette against the bright green field behind them.   I got out a large reflector and propped it up to bounce that sunlight back towards where I hoped the birds would fly.  I later discovered the birds used the reflector for target practice.

I found the birds were most active at the feeder when the sun was behind the clouds and it was too dark for a good shot.  When the sun came out the birds were no where to be seen!

I was able to get one decent shot of a Purple Finch (above) and a few of the Pine Siskins. There were also Gold Finches, Towhee, Chickadees, Cardinals, and Tufted Titmice but I didn't get them today.


Watching these graceful little creatures has a calming effect.   It's a good thing because this was an exercise in patience.  There was a lot of time standing and waiting for the birds to fly to the right spot.  When I loaded the results on the computer 90% of them were out of focus, only part of the bird was in the frame, or there was no bird at all.   
  
The title of this blog hints at one of the key factors in wildlife photography - patience.   "But the fruit of the Spirit is love, joy, peace, patience, kindness, goodness, faithfulness, gentleness and self-control.  Against such things there is no law." - Galatians 5:22-23.  You can't rush wildlife photography.  Patience may be the biggest contributing factor to getting decent wildlife photos.


When shooting wildlife it's good to remember this saying by Ralph Waldo Emerson - "Adopt the pace of nature: her secret is patience. "


Sunday, March 25, 2012

View From Our Backyard

I was washing dishes Saturday afternoon and looked out the kitchen window to see this.


We get some awesome sunsets across that pasture and I've tried to capture them before.  Most of the time by the time I get my camera and tripod out, run outside, and set up the light is gone.   I've never been able to capture any of those light displays.  This time was different.  I had just gotten a new Canon 5D Mark ii the day before and it was sitting out where I could grab it on the way out the door.   I didn't bother with the tripod and decided to do the best I could without it.

The bright sky and relatively dark field was much to big of a dynamic range of light for the camera to capture.  Either the sky was going to be blown out bright white or the field and trees were going to be very dark.  I shot three exposures (-1 EV, 0, +1 EV) to capture the entire range of light.   I should have gone with a wider spread because the brightest part of the sky was blown out at -1.   After I made those shots I changed the settings and poof the light was gone!   Unlike the light in my last post, this time it only lasted a couple minutes.

I used ISO 800 and f/22 to try and get a star burst from the clouds.  At that setting I got shutter speeds of 1/20, 1/40 and 1/80.  I was hand holding with image stabilization on.  I had no idea if the three images would line up or if I had too much camera shake.

My workflow for this photo was longer than most:
  1. Ran the three exposures through Nik Define to remove the digital noise due to the ISO of 800.
  2. Combined them using Nik HDR Efex Pro using a Natural setting.  I used some control points to tone down the dramatic clouds that HDR processing created.  I used another control point to brighten up the tree on the right that had come out too dark.
  3. Edited in Photoshop Elements to remove some severe lens flare created by shooting into the sun and some power lines in the distance.
  4. Edited in Nik Color Efex 4 to fix the clouds (they came out light brown), make the rolling hills more distinct, and bring out the "God Beams" of sunlight.  Also added a little dark vignette  around the edges.
I am truly blessed to live in such a beautiful part of the country, have such a great view right outside my back door, and have a God that creates such beauty each and every day.  I'm also thankful for my wife June who first pointed out the light and offered to finish the dishes while I went out and played. My photography would be dull and uninteresting without her spotting the shots for me.

Of course, you can buy prints of this photo online 

Wednesday, December 21, 2011

eBook Review - Rabari - Encounters With The Nomadic Tribe

If you read my earlier post about my photography library you know I love books about photography.  I have books about composition, technical aspects, printing, Lightroom, HDR, and many others.   Recently I've been buying electronic eBooks.   These books are typically not printed in hard copy format but are books in Adobe Acrobat (PDF) format that can be read on a PC, MAC, iPAD, or Smart Phone.  It makes taking your library along with you on a photo outing much easier.  Because there is no printing or distribution costs these eBooks are typically cheaper than hard copy books.   Most are also shorter than normal books.  I'm really not sure why.

This week I got a copy of Rabari - Encounters With the Nomadic Tribe by Mitchell Kanashkevich.  This is part of The Insider Series on Travel Documentary Photography by LightStalking.   The title suggests it is a travel book but it's really a book about photography that just happens to use the author's four month long travels in this region of India for the examples. 

Here's the table of contents for the book:

After a brief introduction to the project, the equipment (surprisingly affordable) and the work flow, the author goes into details about each of 10 different photos from the project.  For each photo, he discusses background information, objectives for that particular photo, the light, the moment and/or pose, the composition, the "Biggest Challenge" and how me managed it, and the what/why of post processing.

The author provides great insight into what was going through his mind when he was working on that particular photo. Reading these well written descriptions is like being with him on the photo shoot and having him tell you what he's doing and why.

One thing I was surprised to learn was how little equipment he used.   He didn't have high end cameras, lenses, or elaborate artificial lights.   Instead he relied on a 5-in-one reflector for his lighting.   He describes the conditions he was shooting in and includes diagrams showing where the subject, light source and camera were located.

I found his description of the biggest challenge with each situation and how he overcame it to be instructive.  While I may never run into that exact challenge, his approach to solving the problems was educational as I learned things I will be able to apply later.

He uses a combination of Adobe Lightroom and Adobe Photoshop to edit his photos.   In the book he talks about what adjustments he made to the photo and how he made the adjustments.  The book is more about the photography and is less about post-processing. He includes before and after versions of the photo.

Reading this book was entertaining and informative.  The photos reached out and grabbed me right off.   You can see why Mitchell Kanashkevic is a successful  travel and documentary photographer.  I recommend this book for amateurs as well as professional photographers.

Rabari – Encounters With the Nomadic Tribe is available for download for the special Christmas release price of $19.95 when you apply the special launch discount code “HAPPYXMAS” until Dec 25th.  Go online and buy a copy.   There's no waiting for shipment so you can start reading right away.

Friday, November 18, 2011

I've just ordered the biggest print I've ever made

For some time I've wanted to create a large pano print to hang over the living room couch.  I have a framed print there now but it's just not big enough.   I'm talking about something about 4 feet wide!

To print something that large takes some preparation.   A single 18 Megapixel photo cropped down wouldn't have the printed resolution I was looking for.  I needed to take several images and stitch them together to create a wide pano.   I wanted a landscape scene that would look good with the colors in the couch.  I had made several attempts but never cared for what I got.  Either the light was not good, the colors didn't match, the scene was not great or the stitch didn't work.  On a recent photo workshop I had the conditions I was looking for.

I wanted to the pano to be wide enough to give me some flexibility for cropping to print.  I decided to make a series of 7 images.   In this case I was looking into a sunrise and the range of light was going to be more extreme than my digital camera sensor was going to be able to handle.  I needed to take three different exposures at each point in the arc to capture the full range of light so I could blend them together later using HDR software.   That meant I had to take 21 images!   The sun was coming up and the light was changing so I wouldn't get a lot of chances at this.   To make the stitch come out I set the camera exposure on manual, exposure bracketing -1EV, 0EV and +1EV, aperture at f/14, ISO at 100 and set to daylight white balance, removed the polarizer filter, and made sure the camera and tripod were level.  These are all things I learned the hard way on the other failed attempts.

When I got home I found I had what I had been hoping for.  I ran each set of three bracketed images through the Nik HDR Efex software to create seven new single HDR images using saved the settings so I could process each set exactly the same.   I then used Hugin pano stitching software to create a final image that was wide enough to fill 4 feet.  The end result could have gone up to 6 1/2 feet wide without having to scale up!

For printing I wanted to create a Triptych, which is three prints hung side by side.  In this case I wanted to create the appearance of looking out windows to a beautiful landscape.   Enter Groupon codes for 16x20 gallery wrapped canvas prints from Canvas on Demand (I'm getting hooked on Groupon).  I divided my photo into three 16x20 panels and placed my order.   It's going to be a while before I get my prints, but when hung on the wall the should look something like this


I'm real happy with the way this came out and can't wait to see the actual prints.  Check back in a few weeks for the end results.

Saturday, September 17, 2011

Reflections of The Past

June and I met Jerry while shooting in Saltville VA last Saturday.  He described himself as the Church Historian of the Madam Russell Methodist Church.   We got to spend a long time with Jerry while he told us some of the history of the area, Saltville, and the Madam Russell Methodist Church.  

Jerry mentioned that he keys to the William Alexander Stuart house and we could go by there for a personal tour and photo shoot.   William Alexander was Confederate General J.E.B. "Jeb" Stuart's brother and manager of the Saltville Salt Works during the civil war.   When Jeb Stuart was killed his wife and children moved in with William in Saltville.   The house came under both Confederate and Union guns during battles for the Saltworks.

I came away with some interesting photos from inside the old house.  It's been lived in, upgraded over the years, and was purchased years ago to become a B&B.   As you can see, the B&B didn't quite make it.

These photos are all multiple exposure High Dynamic Range photos.   In each one I took several different exposures from very under exposed to very over exposed.  I then used Nik HDR Efex Pro to combine the different images into a single tone-mapped image.  The Nik software has a number of different tools that can be applied to give the final image many different looks from realistic to cartoonish.  I chose to bring out the texture in these to convey the old and weathered look.

3 exposure, -2. 0. +2 EV
6 exposure, -3 2/3 EV to +1 1/3 EV
3 exposure, -2, 0, +2 EV


The first two fit the Reflections of The Past theme with the mirrors.   This last one was taken in an upstairs bedroom looking out into the hall to the top of the stairs.   I think the beautiful wood floors contrast with the cracking paint on the door, the peeling ceiling, and the old wallpaper.  

I've found the older I get the more I enjoy photographing old things.   I guess I have more of an appreciation of history.

Wednesday, September 7, 2011

Compromising With Pearls

Recently when biking around Cades Cove at sunrise I came across a field of tall grass, spiderwebs, and dew.   This combination can create some beautiful abstract artsy images with dew drops on the spiderwebs.   I wanted to get up close and shoot the "String of Pearls" but I didn't have my macro lens with me.   It would have been the perfect solution to this situation. 

I did have a couple other lenses with me, including a 80-400mm long telephoto, a 24-105mm zoom and a 17-50mm wide-angle zoom.   I wanted to have the dew drops as sharp as possible but blur the background to keep it from being distracting.   I choose the 17-50, set it at 50mm, f/2.8.   The wide angle let me focus reasonably close and the wide open aperture blurred the background.   Typically, short focal length lenses will have a larger depth of field and in this case, even at f/2.8 the background was too distracting. 


I decided to crop down as much as possible to see if I could eliminate the background distractions.   This is an extreme crop of the same picture.

Be sure to click the photo to zoom in and see the details.

You can see that by compromising the end result is just not sharp.  If I had my macro with me I would have gotten a much sharper image of the dew drops.  Oh well.

Right now I am studying a book by Warren Wiersbe on the Book of Exodus.  In it he says "most people in our world are being crucified between two thieves: the regrets of yesterday and the worries about tomorrow.  That's why they can't enjoy today."   What a waste.   I made a choice when I packed my camera bag and got on my bike that morning.   I could regret not having what I needed, or I can be happy I got to enjoy God's String of Pearls.   Next time I go out to take photos I can worry about having to leave some piece of camera gear behind or worry about not being at the right spot at just the right time or I can enjoy the moment and be glad I'm there.

Later that morning I got to spend about an hour using my long telephoto lens to shoot deer and black bear in the Cove.   You can bet I wasn't worrying about not having my macro lens then!  God's creation is all around us.  We'll miss seeing much of it because we are so busy running around.  If we slow down and look God will provide the Wow moments for us.


Wednesday, June 29, 2011

Do You Feel Persecuted?

Many churches today are persecuted in one way or another for many different reasons.   The Prince William's Parish Church, or the Sheldon Church as it is known today, has seen extreme persecution in it's 266 year history.  The church is located between the towns of Beaufort and Yemassee in South Carolina.  It was built between 1745 and 1753 and funded by William Bull, who was the Lieutenant Governor of South Carolina.  Bull died before the church was even completed and was buried at the base of the altar inside the church.  His grave is there, inside the old walls.
William Bull's Grave

During the Revolutionary War, the church was set on fire when British General Augustine Prevost invaded the area in 1779.  In 1826, the church was rebuilt using the surviving walls of the original structure.  On January 14, 1865, the church was burned a second time when it was set on fire by Sherman's troops during his "March to the Sea'' campaign.   It was never rebuilt.

I have done a little internet research to try and understand why churches were burned during the wars.  One site claimed gunpowder was stored in the church during the Civil War.  Another claimed the British associated some churches with American revolutionaries.   I never did find anything definitive. 

Today the wall and front columns are still standing surrounded by beautiful Live Oaks and Dogwoods.   There are a few graves around the church dating back to the early 1700's.


Some of the oldest graves

Old Sheldon Church
We got to the church not long after sunrise to take advantage of the soft, warm early morning light.   Before the sun was high enough to shine on the church itself, the indirect light made the church ruins glow like there was a light on inside.   It was a bit hazy early in the morning, which made the skies white or grey.   I've intentionally cropped the photos to remove as much of the sky as possible.

After spending some quality time with South Carolina's finest mosquitoes, we were getting ready to leave when the sun got just high enough to shine through the tree leaves.   I took advantage of this to capture a "sun burst" above the church.   To get this effect you need to shoot with a small aperture (I used f/25 here) and position the camera so the sun is partially blocked, creating a pinpoint light source. 

I hope you enjoy these photos.  These and others are available for purchase in the Sheldon Church Gallery