Showing posts with label landscape. Show all posts

Friday, January 11, 2019

Welcome New Subscribers. Here's something on Black & White Landscapes

Can converting a color photo to black and white improve it?  What type of photos work better as black and white?  How is shooting for black and white different?

I've been writing this blog for several years.  Sometimes I write a new post almost weekly.  Other times, I'm not so diligent.  Recently there have been several new people subscribe to the blog and that has motivated me to try to do better.  Here's my first post of 2019.

Winter in East Tennessee can be challenging for nature/landscape photographers.  The trees are bare, there are no flowers. In fact, there is very little color to be found during the winter months.  When blessed with a nice snowfall we have abundant opportunities to make some beautiful photos of snow scenes, but that doesn't happen very often.  Except for sunrise rise and sunset, most days are grey and blah.

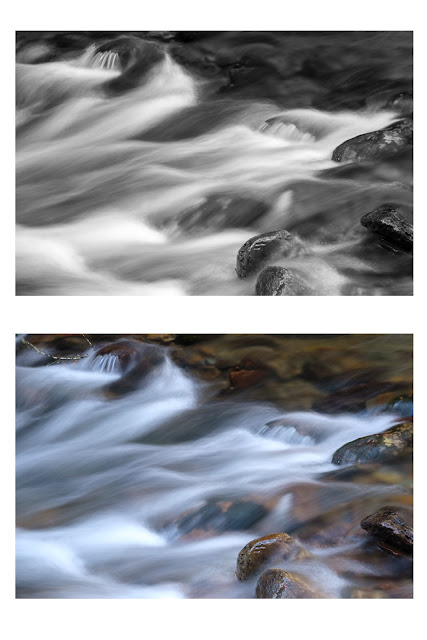
Some of the best color in the winter is around streams where moss grows on the rocks, like in this photo from Rocky Fork State Park.
Rocky Fork
Streams and waterfalls are some of my favorite subjects to photograph.  I try to capture the movement of the water using a longer exposure of around 1 second.  This can result in a photo with bright white water and darker surrounding objects.  I've found high contrast scenes like this can be dramatic when converted to black and white.
Converted to Black & White
When color is removed the composition and the tonal range of light in the photo become more important.  The tonal range of your landscape is basically the amount of highlights, darks, and every shade of grey in between. Highlights are your brightest whites, darks are your dark blacks.

When you are shooting a black and white photo, you should shoot in color and convert to black and white in post-processing.  That will give you the most control of the tonal values when editing the photo later.  If you shoot in black and white you will not be able to change the tonal values of different colors, such as making the green moss brighter in the example above.

You have to think differently when composing a black and white photo.  Without color, you’re dealing strictly with light tones now.  You should try to use that to your advantage when composing your shot. Instead of relying on color to separate your subject or draw the viewer's eye, look for light to create a dramatic photograph.  Shapes and lines can be important compositional elements in a black and white photo.  Often a high contrast photo will work great as a black and white.  Things such as texture become more important when color is removed.
Glacier National Park

The photo from Glacier National Park is one of my favorite black and white landscapes.  There is dramatic light, high tonal range, interesting clouds, and plenty of detailed texture in the trees and mountains.

Visualizing a scene in black and white is a skill that can take some time to develop.  Setting your camera to black and white can be a helpful tool when trying to visualize the black and white shot.  Just remember to take a color shot as well.

Below are a few examples from a recent trip to Rocky Fork State Park near Flag Pond, Tennessee. 


Making black and white photos can be fun.  Give it a try and let me know what you come up with.

Thursday, April 19, 2018

Don't Be Satisfied With The First

Many landscape photographers, including myself, have a bad habit of shooting the first obvious composition.  That's fine, but the problem comes when we stop there and don't take the time to look for other different less-obvious compositions.

1/4 sec, f/22, ISO 200, 41mm (cropped sensor)
Here's an example from a recent trip to Charleston Falls Preserve in Ohio.  The falls are billed as a miniature Niagra Falls because of the rock strata.  When we were there the water flow was low and the falls were nothing like Niagra, miniature or not.  There is a nice footbridge that crosses the creek below the falls.  This bridge is the obvious place to shoot from and I made all these photos from that bridge.  The best thing I can say about this first photo is it accurately depicts the falls.  It's what I call a documentary photo - accurate, but uninteresting.

The nice footbridge was also a barrier to getting to where I would like to have shot the falls - standing in the water about 20 feet from the base of the falls.  I could have positioned my camera low near the surface of the water and used the flowing water as a nice leading line up to the falls.  The day was cold, rainy and muddy - not worth climbing over the railing.

When the water falls vertically, a portrait (tall) aspect composition will often work best when shooting waterfalls.  That's how I shot the first example.  It shows the entire falls and the pool below.   Another option is to zoom in to capture some of the details in the scene.   In the second photo, I stood closer and used a horizontal crop to emphasize the three places where the water hits the rocks.

1/3 sec, f/11, ISO 200, 28mm
There is still a lot more rocks than water in the second photo.  I think the water hitting the rocks is the much more interesting than the rocks.   By zooming in even more I can emphasize the white water on the rocks. I also put a polarizer filter on my lens for this third photo.  The polarizer cut some of the glare off the wet rocks.
1/4 sec, f/11, ISO 200 66mm
My favorite part of this third photo is the flowing white water contrasting with the hard dark rocks.  The splashing water throws up a mist where it hits the rocks making it appear to glow.  Personally, I think this is a better composition than either of the first two.

When a photo is about contrast and shapes it can be a good candidate for black and white.  When you take away the color it can draw the viewers attention to other parts of the photo.  In this case that is the misty glowing water, the shapes or the water and rocks, and the contrast between the white water and the dark rocks.
The third photo converted to B&W
All of these photos were taken from the short footbridge.  By moving to different positions on the bridge and trying different compositions I was able to find multiple compositions I would have missed if I had stopped with the first.  When you arrive at a photo location, take time to look around.  You might try leaving your tripod and walking around with just your camera looking for interesting shots.  You can always go back for the tripod when you find a composition you like.  Just don't be satisfied with the first.

Sunday, July 16, 2017

Working A Scene

One of my favorite waterfalls can be found in Western North Carolina near Rosman. It's not in a National Park, National Forest or even a State Park. In fact, it's not on public lands at all.  It is in the back yard of a private residence! The owners are nice enough to allow, and even encourage, visitors to their own private waterfall on Shoal Creek.

After parking behind the house and walking about 200 yards the trail climbs a very short distance and then descends a set of stairs to the base of the falls. This is the first view of the falls taken next to the small pool below the 60-foot falls.

1/2 sec at f/16

I've been here twice and neither time was there a lot of water flowing over the falls. I think this level of water is just about perfect. It allows individuals streams to separate when falling over the rocky bluff. There is a lot of interesting details and patterns in these falls. While you can easily see the entire waterfall from this vantage point, there is much more to see and photograph.

Landscape photographers need to move around and "work the scene".  Avoid the temptation to place your tripod in the first place you find.  Move closer or farther back.  Use your zoom lens, which can give a different view from moving closer.  Get lower.  If possible, get higher and shoot down. We didn't stay long enough because standing in water with thunder storms near by is not a good way to live long and prosper.

1/2 sec at f/16

Hoping across the rocks to the center of the stream gives you a slightly different perspective with the rocks in the foreground. The first and second shots include the lush green foliage and thick moss on the sides of the waterfall. It was an overcast day and the soft indirect light really made these greens pop.
1.8 sec at f/16

The pool below the falls is not very interesting and does not add much to the composition. Wading through the pool I got closer to the falls and made the shot above, cropping out most of the pool and the gray skies. You'll notice I also cropped off the top of the falls. I did this to emphasize the shapes and patterns in the lower falls, which I found to be very interesting.

2.0 sec at f/16

I think the triangular shape of the bottom of the falls with the water flowing down the stair step to makes an interesting composition. I was able to include just enough of the water flowing in from the left and the greens in the upper right.  

Tall waterfalls like this typically work best as vertical portrait orientation shots. However, the horizontal ledges in the falls made an interesting landscape orientation composition when I zoomed in closer.

0.9 sec at f/16
I zoomed in closer to emphasize the hard geometric lines and shapes of the rocks and the soft flowing water. I always like green plants or moss showing through behind a waterfall.  
4.3 sec at f/16
All these photos were shot at ISO 200 and f/16. The shutter speed varied due to the changing light conditions. By the time I made this last photo the skies had turned dark from the returning thunderstorms. It was time to head for the safety of the car again.

Making Photos With Flowing Water

To make photos with the soft flowing water you should start with a shutter speed of 1/2 second and vary it to get different effects. You might need to adjust your exposure compensation or use manual mode to not let the white water become over exposed in the long exposures. Of course, your camera must be steady through the long exposure so a tripod is pretty much essential to keep the rocks solid and sharp. If you place your tripod in a stream be aware that the water will introduce some movement and potentially blur your long exposure photos. I  place my hand on the tripod and press down during the shot to control as much of the movement as possible.

The other thing I find to be essential for these shots is a polarizer filter. This will reduce the glare off the wet rocks and foliage.  Be sure to turn the filter to adjust how much glare you want to remove.

Finally, if you have read this far you probably want to know where these falls are so you can visit them yourself.  These are Eastatoe Falls near Roseman North Carolina.

Directions to Eastatoe Falls:

  1. From Rosman NC, drive south on U.S. 178 for approximately 3.4 miles to a private drive on the right.
  2. There is a sign for Mountain Meadow here, and the driveway leads back to a house, and what used to be a craftshop on the left.
  3. The home owners have made a small parking area behind the house labeled with "Park Here" signs. The trail leads across the lawn into the woods and to the falls.
Please be courteous and respectful when visiting these falls. There are many beautiful falls on private property, but very few of them are accessible to the public because the land owners do not allow access.  


Wednesday, May 24, 2017

Landscape Photography Tips - When to get the best light.

Last Thursday I did a little program on Landscape Photography for the Eastman Camera Club.   We had a good turn out, but some people were not able to make it.   I've been asked for copies of my slides and I saw a few people taking pictures of the slides, which is a fine way to take notes.  Rather than sharing my entire presentation without notes, I'm going to give some tips from that program here. This is the first of what I think will be a few posts over the next week or two.


The program was divided into the following five sections from most to least important:
  1. Light
  2. Subject
  3. Composition
  4. Techniques
  5. Gear
Note that gear is listed last.  In my opinion, a high-quality professional camera, lens, and accessories in the hands of someone who doesn't understand the first four points may be a waste of money.  A skilled photographer can make quality photos with a variety of gear.  Some professionals even make and sell photos with their cell phone!  Don't get me wrong - quality camera gear is important, but it is more important to focus on the first four points.

All you really have to have to make great landscape photos is:
  • A camera or lens that lets you shoot wide angles.   I like something that starts around 17mm on a full frame camera or 13mm on a cropped sensor camera.
  • A camera or lens that lets you zoom in and isolate a subject.  A lens that lets you zoom out to somewhere between 200mm and 300mm (full frame equivalent) will meet most of your needs.
  • A tripod.  See my earlier post on tripods.
You will find lenses with focal lengths between the wide angle and telephoto useful. There are a number of other accessories that are useful, but not required.  I'll post about those another day. To quote Forest Gump - That's all I'm going to say about that! (for now).

In my experience, light is the most important factor that goes into making great landscape photos. Unlike photographers who work primarily indoors, a landscape photographer can't control the light. What we can control is when and where we make our photos.

  • Time of day and direction of sunlight
  • Season
  • Cloudy or clear skies
  • Wind
Each of these four factors impact the quality of landscape photos.

Best Time of Day

Golden Hour

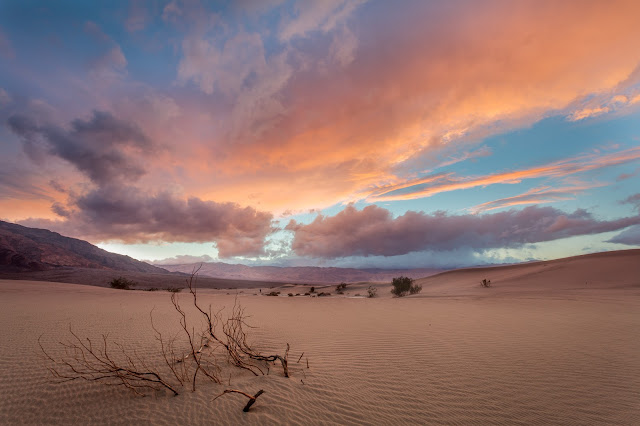
The best time of day for landscape photography is the golden hour - the hours after sunrise and before sunset.   At this time of day, the sunlight will be soft, warm and low.  Add some clouds and the golden hour can also be very dramatic. In the photo above, the sun was behind me and lighting up the clouds with a warm orange color. The orange clouds also provided some nice color contrast with the blue sky. This warm cloud color reflected down on the sand, making it appear warmer.  The low angle of the sunlight also emphasized the ripples in the sand adding an interesting foreground element.

Now imagine if you will what this photo would have looked like around mid-day. The sun would have been high overhead and the ripples in the sand would have been almost impossible to see in the photo. Here's a photo made nearby in the early afternoon.
Mid-day
Because the angle of the sunlight is high it's difficult to discern the layers in the dunes and mountains. This makes the photo appear flat and less interesting.  The color does not have that warm pleasing look like the previous photo. The second photo does have a desolate feel to it.  If your shooting a cover for "A Horse With No Name" this may be exactly the right photo to tell that story.

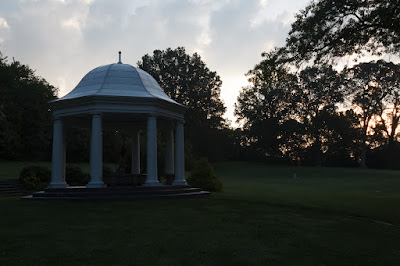
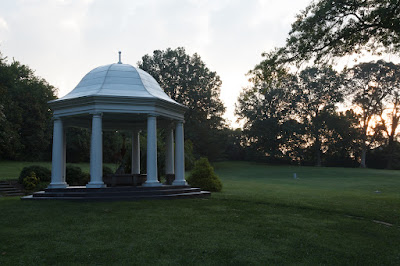
Below is a great example of how the quality of the mid-day and late afternoon sunlight can make all the difference in a photo. The photo on the left was taken at mid-day when the sun was shining down on a creek in a small canyon in Glacier National Park. The light is direct and harsh and the highlights are too bright. The second photo was taken a few hours later on the same day. The light in the second photo was indirect, soft and the tonality is balanced. A few hours makes the difference between a photo destined for the bit bucket and a keeper.  


Besides the golden hour light, there is another reason to shoot around sunrise and sunset. Those are the times when the wind is typically the calmest. If you want to make a photo with a mirror like reflection in a water surface or no movement in vegetation you should try to be there around sunrise. The early morning winds will usually be calmer than those around sunset.
Early Morning Reflections
Don't pack up and leave after the sun sets.  Just before the morning golden hour and after the evening golden hour is what's called the blue hour when the sun is significantly below the horizon.  During the blue hour, the sky will take on a beautiful blue shade.

Blue Hour
As landscape photographers, we can't control the light, but we can control when we make our photographs.  This may involve getting up hours before sunrise and staying out hours after sunset. The middle of the day is reserved for taking naps!

The material in my presentation to the Eastman Camera Club and this post come from my Basic Photography Class.  The class is four two-hour sessions plus a local field trip to practice.  I will be scheduling another class later this year after summer vacation times.  If you would like to be notified when the class is scheduled, send a note to rcsiggins@gmail.com.

Friday, September 2, 2016

First try using non-HDR techniques

High Dynamic Range or HDR is a popular technique for handling situations where the difference between the brightest and darkest parts of a photograph is too great for a digital camera to handle.   HDR is so popular that it is built into cameras and even cell phones.  However, HDR can produce images that appear unnatural.   This may be fine for some subjects, but it's not typically a good choice for landscapes.  

Here's a recent example.  I took the following three images
1 1/3 stops under-exposed
Default exposure
1 1/3 stops over-exposed
Using the Google Nik HDR Efex Pro software I created an HDR image from these three.
HDR Image
I used settings in the HDR software to create a result that was as natural as possible.  I then used On1 Effects software to apply some filters to take away some of the harsh look in the image.  As you can see, the HDR image just doesn't look right.

I then tried a new Photoshop technique called Apply Image Masking.  I learned this from a recent article on the Light Stalking website.   In less than one minute in Photoshop, I created what I think is a much more realistic image. I then applied the same On1 Effect filters.  Here is the end result.

Apply Image Masking in Photoshop
Click on one of the images above and you will be able to use arrow keys to flip between the different versions.

I think I have found a new go-to tool for my image editing toolbox that I will use instead of HDR. This will not work for all situations.   If there is movement between the different images, such as a person walking or trees blowing in the wind, defects will be produced that look like ghosts.

I love learning new things and the realm of digital photography is always changing.   I wonder what I will learn today?

Wednesday, March 16, 2016

A Different Perspective

Well, we're back from a week in Iceland and a week in Florida.  What a contrast!   Iceland was wild, cold, and empty.  Florida was crazy, warm, and crowded.   I'm probably in the minority here, but of the two I pick Iceland hands down.  I'll be posting photos from both trips as I work through the thousands of photos from these two weeks.

As I was working through some Iceland photos, I came across two that show the effect of camera angle and focal length and how a little change in each can make a significant change in a photo.

Both photos were taken at the same place at about the same time.   I only changed the camera position and the focal length of the lens.


Camera Position Lower, Focal Length = 24mm

To me, the first photo gives the viewer a sense of vastness.  The pool of water surrounded by ice and snow is the dominant element.  You can see the water flowing away and the mountains in the distance but you have to look for them.   It's hard to get past that dark pool.


Camera Position Higher, Focal Length = 35mm

For the second photo, I raised the height of the camera on the tripod just a bit.   This allows the viewer to better see the water flowing away from the pool towards the mountains in the distance.  I changed the focal length just a little from 24mm to 35mm.   The longer focal length in the second photo made the mountains appear to be closer.  A shorter  focal length (wider view) will make distant objects  appear to be further away.  The longer the focal length (greater zoom) the closer they will appear.  They are still not the dominant element but I can easily see them.

My friend and our guide in Iceland John "Snake" Barrett took this to an extreme.

A Really Different Perspective
Photo by Chuck Barnes
This is the same location as my two photos.    I can't wait to see what his perspective looks like.

I hope this illustration is useful.  Check back for more photos and tips.

Saturday, January 16, 2016

Wait For It - Timing The Light

Here's a quick post to illustrate the power of timing in landscape photography.  

Normally timing a photo is not all that important for landscape photographers.  We can take our time to set up a shot and shoot when ready. Unless it's a wildlife shot the subject is not moving and timing is not the most important thing to be concerned with.

Sometimes timing a landscape shot can make the difference between a ho-hum photo and one that really grabs your attention.  This morning was just such a time.   June and I were walking at our local state park and I was lucky enough to have my camera with me.   It was a typical winter morning.  The wind was calm, the sky was overcast, and occasionally the sun would break through the clouds for a minute or two. The moving clouds and constantly changing light was what made the difference today.

Here are three shots taken in a span of  less than two minutes.

8:54:32
8:55:17

8:56:20
In the second photo, the sun was hitting the bank and bare maple trees but not the hillside behind.  At that brief moment, the bright trees were standing out against the darker background.  The high contrast causes your eyes to be drawn right to the trees.  These conditions lasted less than a minute.

I was able to get this shot because I was watching for interesting light and paying attention to the interplay between the cloud shadows and the trees.   When you're out looking for interesting subjects to photography be sure to pay attention to the light.  It can make all the difference in the world.

Sunday, March 8, 2015

A Well-Watered Garden

What comes to mind when you hear "a well-watered garden"?  Lush greens, vibrant colors of spring flowers?  Kind of the exact opposite of what we have been experiencing through the last few months of winter.

To be well-watered, your garden needs a reliable source of water.  A lake, river, or even a spring provides the moisture your garden needs to produce the lush greens and vibrant colors.  

This month's calendar shot is from Magnolia Plantation and Gardens outside Charleston, South Carolina.  From their website "Founded in 1676 by the Drayton family, Magnolia Plantation has survived the centuries and witnessed the history of our nation unfold before it from the American Revolution through the Civil War and beyond. It is the oldest public tourist site in the Lowcountry, and the oldest public gardens in America, opening its doors to visitors in 1870 to view the thousands of beautiful flowers and plants in its famous gardens."

My photo was taken April 12, 2014 while on a long weekend photo outing with the Eastman Camera Club,   I have hundreds of photos from Magnolia Plantation and Middleton Place just down the road.  The photo at the bottom of the March calendar page is from Middleton Place., as is the December photo.
Middleton Place
Middleton Place
We were there in April to enjoy and photograph the Azaleas in bloom.   The gardens come alive with brilliant oranges, reds, purples, and whites.   Both plantations are wonderful places to visit and photograph in April.

One suggestion if you go -- try to go on a weekday and get there as early as possible before the crowds descend.  If you can be there on a cloudy or rainy day it will be even better.  The clouds may keep some people away and a cloudy day is perfect for this kind of photography.
Magnolia Plantation
You can bet they are diligent in watering these gardens to keep the shrubs and trees as beautiful as possible.   What about you?  Are you feeling well-watered or is your soul a bit scorched?   As Isaiah said, The Lord can satisfy your needs and renew your soul like a well-watered garden.   Unlike man-made gardens, His spring of renewal never runs dry. All you have to do is ask.

Sunday, December 28, 2014

The Early Bird

"Faith is the bird that feels the light when the dawn is still dark."

Rabindranath Tagore
Indian Poet

The best time to take photos outdoors is the hour around sunrise or sunset.   If you want to avoid other people in your photo, dawn is the perfect time.  Few people will be up and about at sunrise.   It's my favorite time to make photos.

The problem with taking photos at dawn is I have to head for my destination long before I know what the conditions will be like.  Will the sun paint the clouds with brilliant reds, oranges, and yellows or will the sky be overcast and gray?  I have found that weather forecasts will give a general idea what to expect, but often the moment the sun breaks the horizon will be very different from the forecast.   I have to get up when it's still dark and see what is in store when I get there.

Blue Heron in Morning Light

On a recent trip to visit my family in South Florida June and I got up early and left the house while everyone was still comfortably asleep.   Our destination was Wakodahatchee Wetlands.  This is a favorite place to photograph birds in a natural setting.  Boardwalks snake throughout the wetlands, making it easy to get close to birds, gators and other wildlife.  On this morning, there were fewer birds than what we had seen in the wetlands before.  Mid-December is a few weeks early for nesting activities and brilliant mating colors that present many photographic opportunities.  However, there were still enough birds to fill all our available time and the rising sun bathed the scenes in a warm soft light, like the photo above.

We don't always have the gift of sunrise colors on every outing but if we didn't get up while it is still dark we would never get to experience the beauty of a sunrise and the beautiful colors of dawn. 

“Never be afraid to trust an unknown future to a known God.” 
Corrie ten Boom

Saturday, March 22, 2014

In Search of Fog

The Smokey Mountains get their name from the blue haze that come from the streams, moist forest floor and thick vegetation that blankets to mountain sides and valleys. The Cherokee called the mountains Sha-co-na-qe, means "place of blue smoke."   You can see the smoky haze from a distance but most of the time you don't notice it when in the forest.  

Sometimes a rainstorm will create a thick fog that rolls in and seems to seep into the forest.  When the fogs rolls in many people will stay in their warm hotels or cars and not get out in it.  When I see fog I grab my camera and head out to explore.  Foggy conditions can create nice moody and ethereal feelings.  Trees can fade into the fog as the get further away from the camera.   Harsh shadows from bright sun disappear and are replaced by even soft light.   It's a great time to photograph.

When June and I spent last weekend in the Smokies we had plans to hike most days.   It was cold, rainy and we forgot to bring our rain gear so instead of hiking we explored close to the car.  When it rained most of the last night we were treated to fog blanketing into the mountains the next morning.   We started at a lower elevation and chased the fog as it lifted up the mountain sides.   Our first stop was the creek at the Chimneys Picnic Area.  By the time we got down to the stream the fog had lifted.  Back into the car and chasing the fog up the road to higher and higher elevations.  When we reached the Newfound Gap Overlook there was a nice wispy fog blowing in and around the trees.

Trees in Fog from Newfound Gap Overlook
Bare trees in the fog are interesting but what I was looking for was a shot from down in the trees with fog all around.  I found what I was looking for just a short hike up from the parking lot.

Appalachian Trail at Newfound Gap
The further up the trail you look the more the trees fade into the fog giving a feeling of traveling into the unknown.   Everything was wet and even though there was no direct light there were still reflections off the wet surfaces.   I could have used a polarizing filter in this shot which would have taken some of the glare off the wet logs on the trail. 

The fog was clearing at this high elevation and I figured my fog shots were done for the day.  Driving down the mountain back into Tennessee we ran into some of the thickest fog we have ever seen.  I was hoping to find a pull off where I could stop and get some more fog shots but the fog was so thick we couldn't see the pull offs until we were past them.   We finally found a large parking lot with a Quiet Walkway.  Thinking that we are "serious hikers" we have not tried these Quiet Walkways thinking they didn't have much to offer.  We discovered we have been missing out.  This walkway went through a nice open forest along an old stone wall and down to the Little Pigeon River.

The fog was very thick and beautiful here.


When shooting in fog your camera can be fooled by the brighter fog and under expose the shot.  Be sure to check your histogram and adjust your exposure to bring the histogram curve as close to the right edge as possible without clipping the right side.
Little Pigeon River
What a treat we had that day in and out of the fog.   Not only did we have the beautiful fog but we also found two wildflowers on this Quiet Walkway that were about to bloom.

Bloodroot

Trillium

The next time were in the park we're going to check out this Quiet Walkway and others that we have been passing up for too long.