Showing posts with label monochrome. Show all posts

Friday, January 11, 2019

Welcome New Subscribers. Here's something on Black & White Landscapes

Can converting a color photo to black and white improve it?  What type of photos work better as black and white?  How is shooting for black and white different?

I've been writing this blog for several years.  Sometimes I write a new post almost weekly.  Other times, I'm not so diligent.  Recently there have been several new people subscribe to the blog and that has motivated me to try to do better.  Here's my first post of 2019.

Winter in East Tennessee can be challenging for nature/landscape photographers.  The trees are bare, there are no flowers. In fact, there is very little color to be found during the winter months.  When blessed with a nice snowfall we have abundant opportunities to make some beautiful photos of snow scenes, but that doesn't happen very often.  Except for sunrise rise and sunset, most days are grey and blah.

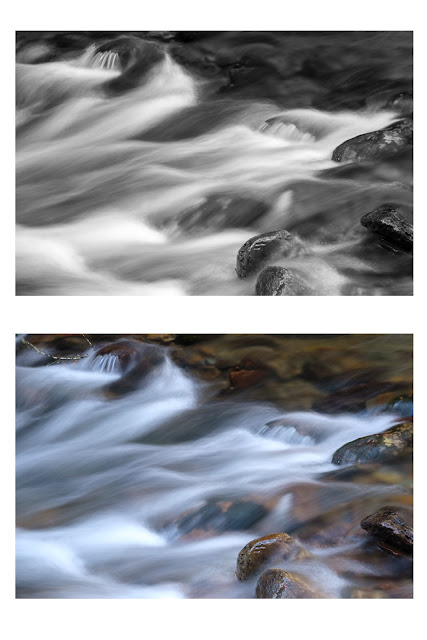
Some of the best color in the winter is around streams where moss grows on the rocks, like in this photo from Rocky Fork State Park.
Rocky Fork
Streams and waterfalls are some of my favorite subjects to photograph.  I try to capture the movement of the water using a longer exposure of around 1 second.  This can result in a photo with bright white water and darker surrounding objects.  I've found high contrast scenes like this can be dramatic when converted to black and white.
Converted to Black & White
When color is removed the composition and the tonal range of light in the photo become more important.  The tonal range of your landscape is basically the amount of highlights, darks, and every shade of grey in between. Highlights are your brightest whites, darks are your dark blacks.

When you are shooting a black and white photo, you should shoot in color and convert to black and white in post-processing.  That will give you the most control of the tonal values when editing the photo later.  If you shoot in black and white you will not be able to change the tonal values of different colors, such as making the green moss brighter in the example above.

You have to think differently when composing a black and white photo.  Without color, you’re dealing strictly with light tones now.  You should try to use that to your advantage when composing your shot. Instead of relying on color to separate your subject or draw the viewer's eye, look for light to create a dramatic photograph.  Shapes and lines can be important compositional elements in a black and white photo.  Often a high contrast photo will work great as a black and white.  Things such as texture become more important when color is removed.
Glacier National Park

The photo from Glacier National Park is one of my favorite black and white landscapes.  There is dramatic light, high tonal range, interesting clouds, and plenty of detailed texture in the trees and mountains.

Visualizing a scene in black and white is a skill that can take some time to develop.  Setting your camera to black and white can be a helpful tool when trying to visualize the black and white shot.  Just remember to take a color shot as well.

Below are a few examples from a recent trip to Rocky Fork State Park near Flag Pond, Tennessee. 


Making black and white photos can be fun.  Give it a try and let me know what you come up with.

Tuesday, July 25, 2017

Power of Color in Black and White Photos

Black and white photography can produce some captivating and artistic photos. By removing color from the image you emphasize the tonality, geometric shapes, and composition of the photo. Of course, not all images work in black and white. A brilliant sunset loses its a beauty when all the color is removed. I find converting an image to black and white to be a fun creative challenge that can result in an image to be proud of.

Most digital cameras and even some cell phones can take photos in black and white. If you let your camera do the conversion to black and white it will store the image without the color information. You have now limited your ability to adjust the image later.  My suggestion is to always capture your images in color and convert to black and white in post processing.  Here's why.

The best way to explain what I am talking about is by showing an example.  The video below shows how powerful the color information is behind a black and white photo.


I hope that video is helpful.  Making videos is new for me and was a little intimidating.  I think I need some practice.

Here are some more examples of converting a color photo to black and white.

Sample Number One - Street Portrait

I made this photo of Carrington Kay at the Music On The Square in Jonesborough TN. I wasn't in a great position to make photos and was more interested in enjoying the music anyway. The musicians were in the shade but the background building was still in the sun. I edited the color version to deemphasize the background and focus on the two individuals, however, the red brick still grabs your attention more than I wanted it to.
Color
I used Lightroom to convert the image to black and white using the color sliders like I did in the video. The red brick wall no longer grabs the viewers attention allowing the musicians to be what your eye sees first.

Converted to BW in Lightroom
Click on the first image to zoom in then use the right and left arrow keys to flip through the different versions to see the differences in each.


Sample Number Two - Dull Sunrise

I said earlier that sunrises or sunsets are not typically what I would convert to black and white. In the example below the sunrise colors were very muted.  In fact, there is very little color in this image.
Fuji Provia Profile
When you shoot color in RAW format you can apply camera profiles later in Lightroom. In this example, I used a profile that simulates the Fuji Acros B&W film.  Applying this profile also changes the contrast and introduces simulated grain to make the digital image appear as if it was shot on Fuji Acros B&W film.

Fuji Acros Profile
By converting this image to B&W I removed the color distractions and emphasized the repeating patterns and composition. The surface of the water was blurred by using a 9-second exposure.

I really like the Acros profile and it's easy to apply in Lightroom.  If I don't like the result, it is easy to switch back to the default Provia color profile.

Sample Number Three- Timeless Scene

One more example of converting a color image to black and white.  In this case, the crisp color image appeared too new for the subject, which looked like it was set in the 1950s.  
Produce Stand in Color
 By converting to B&W the resulting image fits better with the subject.
Converted to BW in Lightroom
There are a number of ways to convert a color image to black and white.  I have shown you two ways in Lightroom. Other tools I use are Silver Efex Pro 2 from Google (Nik) and On1 Photo RAW.

Converted to BW in Silver Efex Pro 2 High Structure (Harsh) preset.


Converted to BW in On1 Photo RAW 2017 - Black & White Rugged Preset
These are just a few tools available for converting to B&W. There is an infinite number of ways to adjust an image when converting.  How you convert your photos is up to you. Use your creativity to express yourself and tell a story with your photos. Just make sure you capture the image in your camera, in color, preferably in RAW format.

Do you find these blog posts worth the time it takes to read them? Is there something you would like to see on the blog? Send me a note and give me some feedback.  I really do appreciate the feedback.