Showing posts with label light. Show all posts

Monday, March 30, 2020

"How do you know that?" Characteristics of light in photography

The depth of field (what's in focus) in this photo is pretty small.  About all you can read is the one line - "How do you know that?" 

I don't consider myself an expert photographer but I do enjoy sharing what I have learned, often the hard way, over the years.  Most things I've learned from experience and that's how I "know that." One of the best ways to share what I've learned is by example, which I try to do when blogging.

Being at home more has led me to experiment photographing things around the house.  In this case, an old non-fiction book and a pair of antique eyeglasses my dad gave to me.  They belonged to a relative but no one remembers who.  I'm not great at still life photography.  I do better at making photos of things that have been arranged for me, like wildflowers and mountains than things that I have to arrange.  However, we grow by working on things we are not good at.

The very first topic in my photography class is what I consider the most important.  It is not camera settings, the latest gear, or posing beautiful subjects.  I consider light the most important element in photography.  The right light can make a photo but even the most beautiful subjects can be poor photos in the wrong light.  Photographers love to talk about good light and bad light.  Light is not good or bad, but different kinds of light work better in different situations.

Light has three characteristics

  1. Direction
  2. Color
  3. Hard (direct) or soft (diffused)
Color Under LED Lights
I want to show you a little example of hard vs. soft light using a couple examples of photos I made with the book sitting on our kitchen table.  Above the table is a hanging lamp with 5 LED bulbs.  To the right is a set of French Doors that lead out to a covered deck area.  Those two light sources have different characteristics.


The lens aperture and focal length in these two photos are the same. The LED lights made the paper very yellow when using the auto white balance setting.  I corrected the white balance (light color) in each photo to be as realistic as possible. 


Direct Overhead Light


Indirect Side Light


Notice the shadows in the first photo.  They come from the overhead lights.  In the second photo what shadows can be seen are faint and soft.  The overhead lights also made the tabletop brighter.  The indirect light from the right made the book in the background brighter.

Indirect Light
Direct Overhead Light

In the second example, you can see how the direction of the light creates different shadows.  The photo with the indirect light coming from the right created a shadow in the crease of the book.  The direct light also overpowered the indirect light and minimized the reflections from the door in the lens.  The indirect light highlighted the brass hinge and the color of the eyeglass arms.

“There are no rules for good photographs, there are only good photographs.”
–Ansel Adams

Neither photo is right or wrong, just different.  As the photographer, it is up to us to use the light in our composition to emphasize what we want and de-emphasize what we don't want.  

Before making your next photo think about the light.  Where is it coming from?  Is it creating hard shadows?  Is it warm and pleasing or blue and cold?  How can you use that light to make a better photo?

Sunday, May 19, 2019

Using Exposure Compensation

“Each day brings new opportunities, allowing you to constantly live with love—be there for others—bring a little light into someone's day. Be grateful and live each day to the fullest.
― Roy T. Bennett, The Light in the Heart

Light is the most important part of photography.  Without it, there would be no image, no memories, no joy in a photograph.  But, too much or too little light can be detrimental to our photos.  Understanding light is key to making better photos. 

Our cameras don't understand light.  They have powerful computer processors that measure all the light coming in through the lens and hitting the sensor, but they don't know anything about the subject, what is important in the photo, or what is unimportant.  The software developers who program those processors write algorithms to take all the inputs and make a decision on the three factors that make up the exposure triangle - shutter speed, aperture, and ISO.  Depending on your camera settings one, two or all three of these are constantly being adjusted depending on the light the camera sees at that instant.  Without knowing your composition your camera can sometimes make bad decisions.

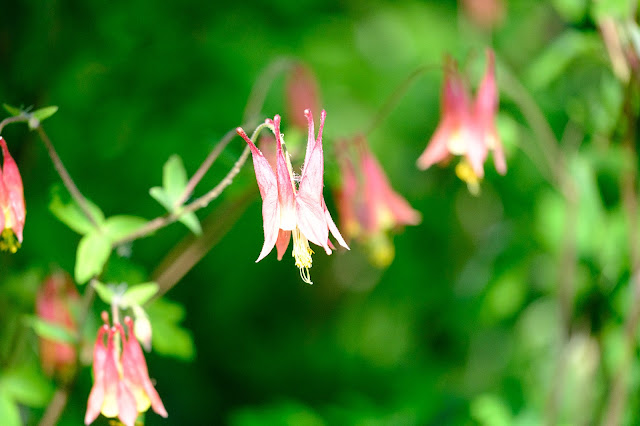
Take this photo as an example.  The conditions were harsh.  It was a bright sunny day with harsh direct light.  The breeze was blowing and the Columbine flowers were in constant motion.

1/4000 sec, f/2.8, ISO 1600

I was shooting with an aperture of f/2.8 to create a shallow depth of field making the center flower stand out from the background.  The high ISO was to get a very fast shutter speed to freeze the motion of the flowers.  The camera saw all the light and decided on a shutter speed of 1/4000 of a second.  Even with that fast shutter speed, there was too much light.  Although the overall exposure was not bad, the main subject was overexposed and the photo was ruined.

There are a number of ways to fix this, and none involve post-processing (editing) on a computer later.  If you are comfortable shooting in full manual mode, you set the aperture, shutter speed, and ISO while keeping an eye on the histogram.  My personal preference is to stay in aperture priority mode, where I spend most of my time, set the ISO, and let that advanced processor in the camera figure the shutter speed at that instant.  Remember I said the flowers were constantly blowing around.  That made the light constantly changing.  Instead of setting the shutter speed myself I gave the camera a hint that the exposure needed to be turned down. 

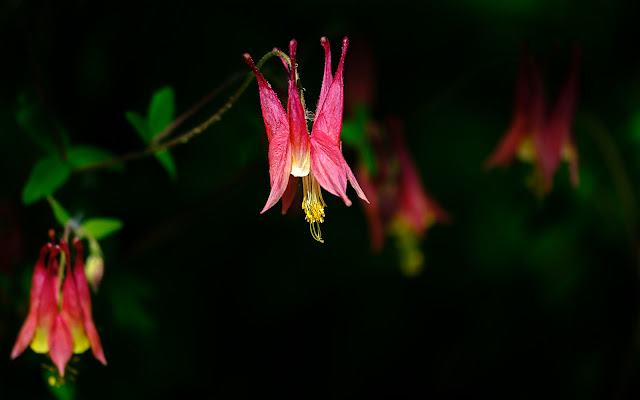
Almost every camera (even some cell phones) has a setting called exposure compensation.  It is often a button on the top or back of the camera that has a +/- symbol.  Some cameras have this setting buried down in a menu.  This typically only works when the camera is in Program, Aperture Priority, or Shutter Priority mode.  By using exposure compensation I was able to tell the camera to alter the calculated exposure by a given number of stops.  In this case, I dialed in a -2 EV exposure compensation and shot again.  I also lowered the ISO to 400 because I didn't need it that high to get the shutter speed I was wanting.

1/6000, f/2.8, ISO 400
Now, the subject of my photo is properly exposed.  The background is now almost black.  That works great because the background is unimportant and making it dark it makes the red flower jump out.

A common exposure problem occurs when the background is brighter than the subject.  By default, the camera will expose so the subject is dark and the background is correct, like in this photo.


By dialing in a +1 2/3 EV exposure compensation I am able to brighten the bird so that details in the feathers and eyes can be seen.  By making this adjustment the sky becomes overexposed.  This is fine because the subject is the bird, not the sky.

The key to knowing when to adjust the exposure compensation is knowing what the subject is and if it is properly exposed.  If the subject is too bright or too dark, throw in some exposure compensation to properly expose the most important part of the photo.

You may be tempted to assume you can correct the exposure later in post-processing.  Don't be fooled.  Parts of your photo that are overexposed often cannot be brought back and brightening underexposed photos can introduce digital noise.  It's much better to get the exposure right when you make the photo than to try to correct it later.

If you find this tip useful please subscribe to my blog to get future tips emailed to you.  If you have questions, feel free to contact me and I'll do my best to answer them.

Wednesday, May 24, 2017

Landscape Photography Tips - When to get the best light.

Last Thursday I did a little program on Landscape Photography for the Eastman Camera Club.   We had a good turn out, but some people were not able to make it.   I've been asked for copies of my slides and I saw a few people taking pictures of the slides, which is a fine way to take notes.  Rather than sharing my entire presentation without notes, I'm going to give some tips from that program here. This is the first of what I think will be a few posts over the next week or two.


The program was divided into the following five sections from most to least important:
  1. Light
  2. Subject
  3. Composition
  4. Techniques
  5. Gear
Note that gear is listed last.  In my opinion, a high-quality professional camera, lens, and accessories in the hands of someone who doesn't understand the first four points may be a waste of money.  A skilled photographer can make quality photos with a variety of gear.  Some professionals even make and sell photos with their cell phone!  Don't get me wrong - quality camera gear is important, but it is more important to focus on the first four points.

All you really have to have to make great landscape photos is:
  • A camera or lens that lets you shoot wide angles.   I like something that starts around 17mm on a full frame camera or 13mm on a cropped sensor camera.
  • A camera or lens that lets you zoom in and isolate a subject.  A lens that lets you zoom out to somewhere between 200mm and 300mm (full frame equivalent) will meet most of your needs.
  • A tripod.  See my earlier post on tripods.
You will find lenses with focal lengths between the wide angle and telephoto useful. There are a number of other accessories that are useful, but not required.  I'll post about those another day. To quote Forest Gump - That's all I'm going to say about that! (for now).

In my experience, light is the most important factor that goes into making great landscape photos. Unlike photographers who work primarily indoors, a landscape photographer can't control the light. What we can control is when and where we make our photos.

  • Time of day and direction of sunlight
  • Season
  • Cloudy or clear skies
  • Wind
Each of these four factors impact the quality of landscape photos.

Best Time of Day

Golden Hour

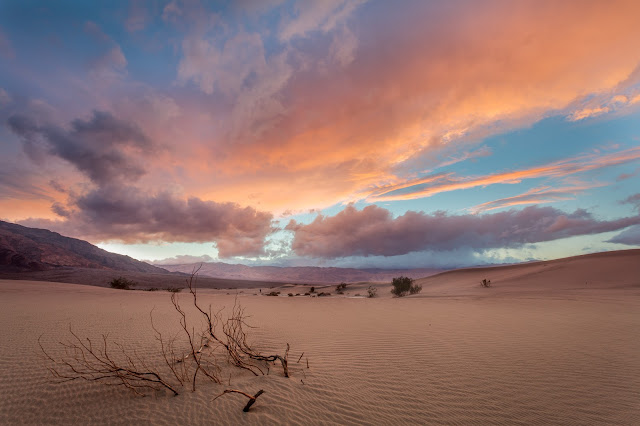
The best time of day for landscape photography is the golden hour - the hours after sunrise and before sunset.   At this time of day, the sunlight will be soft, warm and low.  Add some clouds and the golden hour can also be very dramatic. In the photo above, the sun was behind me and lighting up the clouds with a warm orange color. The orange clouds also provided some nice color contrast with the blue sky. This warm cloud color reflected down on the sand, making it appear warmer.  The low angle of the sunlight also emphasized the ripples in the sand adding an interesting foreground element.

Now imagine if you will what this photo would have looked like around mid-day. The sun would have been high overhead and the ripples in the sand would have been almost impossible to see in the photo. Here's a photo made nearby in the early afternoon.
Mid-day
Because the angle of the sunlight is high it's difficult to discern the layers in the dunes and mountains. This makes the photo appear flat and less interesting.  The color does not have that warm pleasing look like the previous photo. The second photo does have a desolate feel to it.  If your shooting a cover for "A Horse With No Name" this may be exactly the right photo to tell that story.

Below is a great example of how the quality of the mid-day and late afternoon sunlight can make all the difference in a photo. The photo on the left was taken at mid-day when the sun was shining down on a creek in a small canyon in Glacier National Park. The light is direct and harsh and the highlights are too bright. The second photo was taken a few hours later on the same day. The light in the second photo was indirect, soft and the tonality is balanced. A few hours makes the difference between a photo destined for the bit bucket and a keeper.  


Besides the golden hour light, there is another reason to shoot around sunrise and sunset. Those are the times when the wind is typically the calmest. If you want to make a photo with a mirror like reflection in a water surface or no movement in vegetation you should try to be there around sunrise. The early morning winds will usually be calmer than those around sunset.
Early Morning Reflections
Don't pack up and leave after the sun sets.  Just before the morning golden hour and after the evening golden hour is what's called the blue hour when the sun is significantly below the horizon.  During the blue hour, the sky will take on a beautiful blue shade.

Blue Hour
As landscape photographers, we can't control the light, but we can control when we make our photographs.  This may involve getting up hours before sunrise and staying out hours after sunset. The middle of the day is reserved for taking naps!

The material in my presentation to the Eastman Camera Club and this post come from my Basic Photography Class.  The class is four two-hour sessions plus a local field trip to practice.  I will be scheduling another class later this year after summer vacation times.  If you would like to be notified when the class is scheduled, send a note to rcsiggins@gmail.com.

Saturday, January 16, 2016

Wait For It - Timing The Light

Here's a quick post to illustrate the power of timing in landscape photography.  

Normally timing a photo is not all that important for landscape photographers.  We can take our time to set up a shot and shoot when ready. Unless it's a wildlife shot the subject is not moving and timing is not the most important thing to be concerned with.

Sometimes timing a landscape shot can make the difference between a ho-hum photo and one that really grabs your attention.  This morning was just such a time.   June and I were walking at our local state park and I was lucky enough to have my camera with me.   It was a typical winter morning.  The wind was calm, the sky was overcast, and occasionally the sun would break through the clouds for a minute or two. The moving clouds and constantly changing light was what made the difference today.

Here are three shots taken in a span of  less than two minutes.

8:54:32
8:55:17

8:56:20
In the second photo, the sun was hitting the bank and bare maple trees but not the hillside behind.  At that brief moment, the bright trees were standing out against the darker background.  The high contrast causes your eyes to be drawn right to the trees.  These conditions lasted less than a minute.

I was able to get this shot because I was watching for interesting light and paying attention to the interplay between the cloud shadows and the trees.   When you're out looking for interesting subjects to photography be sure to pay attention to the light.  It can make all the difference in the world.

Sunday, April 27, 2014

Getting Over Bad Light

"The truth is... there is no such thing as bad light, only bad
attitudes. We all want to be rewarded with shimmering shafts
of light, dancing rainbows and fire in the sky. When we don’t
get nature’s be-jeweled finery we feel ripped off. But nature
rewards those with open minds and open eyes. All we need
is to drop our expectations of ‘trophy’ light and accept the
little gifts to be found in ‘bad’ light. Great photos can be made
anytime, even on grey, drab days."

- Darwin Wiggett, Good Photos in Bad Light

Back on January 12 I blogged about Good and Bad Light.  In that post I said that in landscape photography you have to take the light God has given and work with it.   Good advice I forgot on a recent trip.

On our trip to Charleston SC a couple weeks ago we had planned to go to a couple plantations / gardens to make great photos of blooming flowers in a beautiful garden setting.  Of course the best light for this kind of photography is slightly overcast and that was what I was envisioning for weeks before.  What we got was multiple days of bright sunny cloudless days.

Given bright sunny days, the best conditions  to shoot was going to be during the "golden hour" which is the hour around sunrise or sunset.  Being on the coast  June, our friend Tekii, and I decided to go to the beach or waterfront to catch the sunrise instead.
Folly Beach Pier

The sunrise was beautiful even without the clouds that can add drama to a sunrise.

After breakfast we arrived at Middleton Place and were greeted by bright sunny harsh light.  These are difficult conditions to photograph in due to the high contrast between the brightest parts and the darkest parts of the photo.
First Shot in "Bad Light"
Not wanting to grumble out loud, I thought to myself "this is not going to be a very productive photography day".   

The second day we met up with the Eastman Camera Club and went to Magnolia Plantation and Gardens.  Conditions were exactly the same and I'm thinking the same thing as the day before.  Why can't we have some clouds?  

Azaleas and Spanish Moss
Shortly after we arrived one of our group reported they ran into Tony Sweet's wife and said Tony was there shooting.  Tony is one of the best nature photographers and instructors out there and here he was shooting in this terrible light!   At that point I decided I have no reason to grumble about bad light. As Darwin Wiggett said, I need to drop my expectations of ‘trophy’ light and accept the little gifts to be found in ‘bad’ light.  I was forgetting the fact that the Azaleas were at peak bloom and there was little to no wind.  A good friend was there the next weekend and the blooms had started to fall and he had to deal with the wind blowing the flowers around.

Later on I learned that Brenda Tharp was also at Magnolia Plantations that day.  Brenda wrote the very first photography book I bought and one I keep going back to. Two of the best nature photographers in the US were there shooting in the same conditions I was unhappy with.   Who was I to grumble about bad light?

Here's Tony's blog about that day.  Note there is not a word about "bad light" in his blog.
 
After getting over my mental roadblock I ended up having a good time at both places.   I looked for conditions where the light was not so harsh.   If a scene was evenly lit without deep shadows (Reflecting Pool) there are good photos to be made.  I looked for subjects that were in full shade (Azaleas and Spanish Moss).  If the scene had bright spots and dark shadows then HDR could be used to even out the light (Tree Lined Wall).


Reflecting Pool


Purple Reflections

Tree Lined Wall

These few days around Charleston were a great lesson.  I need to remember to not let my "bad attitudes" get in the way and enjoy what God has created. 

More photos from our trip to Charleston are available in the Charleston and Hilton Head folder


Sunday, January 12, 2014

There's Bad and Good Light?

I'm preparing to teach a basic photography class.  This is a first for me and I'm trying to put some effort into preparing.   In the very first class I'm going to touch on light and how there can be good light and bad. 

Light in itself is not good or bad and it can not create a good photograph, but depending on the characteristics of the light it can make our photographs better or worse.   I've gone through my photo library and have picked out a few photos to show how light can change a photo.   Here's one example I came up with.

Both shots are the same creek taken from the same spot using all the same equipment.  The difference is the time of day and the direction of the sunlight.

Morning Shot
The morning was a bright sunny day and that sun was shining down on the little cascade.  The bright clear sunlight made the scene very contrasty.  The brights were too bright and blown out (no details in the brightest parts).  I could have compensated for that bright light by turning down my exposure but then the shadows would be dark and there would be little details to be seen there either.   Typically I'll walk right by a scene like this but that little cascade was just too pretty to pass up.  I was hoping I could do something with it in post-processing.

Afternoon Shot
Lucky for me we came back by this same spot in the late afternoon and the light conditions had changed dramatically.  Now there was only soft indirect light illuminating the scene.  No harsh , shadows to deal with.  The soft light also created less glare on the water, rocks and foliage. 

One reason I'm talking about light in the very first class is it is the single most important part to photography.   When shooting landscapes and nature you have to take the light God gives you and either work with it or pass.  There is no amount of camera gear or post-processing editing that would make the first shot look like the second. 

Understanding light is foundational.   Everything else is secondary.