Saturday, December 30, 2017

Adobe Lightroom Class

Allan Barnett and I will again be teaching a class on Adobe Lightroom in February 2018.


You’ve probably heard about Adobe Lightroom software and maybe you have already purchased and installed a copy.  Great!   Now, what do you do?   Sign up for the Adobe Lightroom Class offered by the Eastman Camera Club!

You will learn how to edit landscapes

We’re going to have a great time learning how you can use Lightroom to manage and edit your photos.  In my opinion, Lightroom is still the best tool for digital photographers.  Unlike some other software, Lightroom was designed from the ground up for photographers.  Once you get into it you’ll find it makes perfect sense.  However, when you start Lightroom for the first time you may feel like you just sat down in the cockpit of a Boeing 777.   Don’t panic!   In just four evenings you will become familiar with most of those buttons and when / how to use each one.

Correcting exposures in Lightroom


Our class will be from 6:00 – 8:00 in Room 221 of the Eastman Toy F. Reid Employee Center, February 13, 15, 20 and 22.

How to sign up
Go to or call ( 229-3771) the Eastman Recreation Office in the Employee Center and ask to be put on the list for the Lightroom class in February.  You will need to pay the $60 fee up front.  The class is limited to the first 10 people to sign up.

You will need to bring a laptop with Lightroom installed.  We will be teaching from the latest Lightroom Classic CC version but older versions will be fine.

Contact me if you have any questions. - rcsiggins@gmail.com 


Thursday, December 28, 2017

A Photographic Adventure to Kokomo Opalescent Glass Factory


For more than 128 years Kokomo Opalescent Glass has been producing world famous sheet art glass. Hand mixed sheet glass is an art form in itself. Many of the employees are second and third generation and are proud to carry on the rich heritage of America's Oldest Art Glass Company.

The term "opalescent glass" is commonly used to describe glass where more than one color is present, being fused during the manufacture.  Named after the appearance of opals, opalescent glass can be one solid color, but it is generally a mixture of two or more colors with streaks and swirls. The opalescent stained glass is generally translucent but often almost opaque. While the milky and swirling mixture of colors in opalescent glass let in less light than traditional windows, it was perfect for dark late 19th century interiors with lighting provided by electricity.
Opalescent Glass

Use of the colored glass itself to create stained glass pictures was motivated by the ideals of the Arts and Crafts movement and its leader William Morris in England. This can be contrasted with the method of painting in glass paint or enamels on colorless ["white"] glass that had been the dominant method of creating stained glass for several hundred years since the Renaissance in Europe.

John LaFarge was the first designer to incorporate opalescent glass into a window and received a patent for his new product on February 24, 1880. Tiffany received several patents for variations of the same opalescent process in November of the same year. La Farge was persuaded by Tiffany with hints of a future partnership and possible collaborations to waive his patent. The promises never materialized while competition and animosity grew between the two artists. Fellow artist and glassmakers Oliver Kimberly and Frank Duffner, founders of the Duffner and Kimberly company, and John La Farge were Tiffany's chief competitors in this new American style of stained glass. Tiffany, Duffner and Kimberly, along with La Farge, had learned their craft at the same glasshouses in Brooklyn in the late-1870s.

Eventually, Tiffany became the darling of the Gilded Age industrialists and he created a glass and decorating studio that boasted more than a hundred workers. La Farge remained the lone artist who contracted out fabrication of his designs to smaller studios. Both LaFarge and Tiffany secured their glass from the Kokomo glass factory in Kokomo, Indiana, after it became a reliable source for them in 1888.

The Kokomo Opalescent Glass Works was founded by Charles Edward Henry, who was relocating his existing stained glass manufacturing business from New Rochelle, New York. KOG has long been an important supplier to the American stained glass industry, including documented sales to Louis C. Tiffany, and in 1889, KOG won a gold medal at the Paris World Exposition for their multi-colored window glass.

Naural gas was plentiful and cheap near Kokomo Indiana in the 1880. Literally, hundreds of glass businesses took advantage of this and built in the area by 1890s.  Most closed after the natural gas boom ended. The same fate almost befell the glassworks as Henry’s business slipped into receivership around 1890. Three Kokomo residents bought the works in a receivers sale in 1891.

KOG was a leader in the development of opalescent glass from its origins and has hundreds of color recipes, documented color combinations, and numerous textures and density formulas in sheet glass. Variation is one of the hallmarks of the way the glass is made, still using equipment for the hand-mixed roller table process that was first installed in the early 1900s. Surprisingly, many of the recipes for colors still come from Peter Hoss’s 1904 handwritten book. The process remains very much the same as is was in the beginning. “Recipes” that are over 128 years old are still hand mixed to make the world famous sheet art glass.
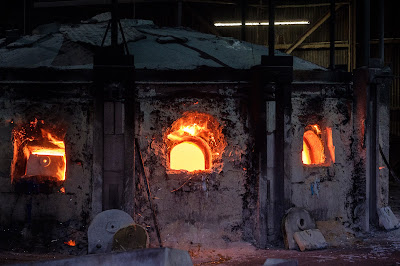
The Beehive Furnace
The glass is created in a gas-fired furnace that runs day and night.  They only turn it off for routine maintenance a couple times a year.

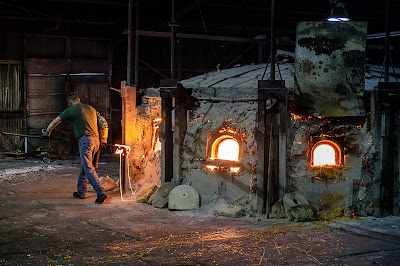
Ladling Molten Glass
About 1,400 pounds of ingredients are placed into each of the 12 pots of the furnace and overnight they are melted in preparation to become sheet art glass.  They can use these pots to prepare up to twelve different colors at a time.

The colored molten glass is scooped out of the pots by hand using one of many sizes of ladles and placed on the mixing table. The ladles weigh 20 to 50 pounds empty and can be double that when full.

Running glass to the mixing table
The molten glass must be moved from the furnace to the mixing table quickly before it can cool.  The men practically run across the factory floor with these heavy ladles full of glass, spilling the molten ingredients across the floor.


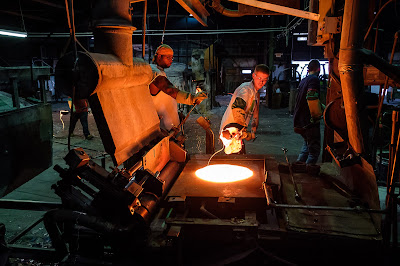
Ladling Onto The Mixing Table


Each color is added to the water cooled mixing table in proportions based on recipes dating back to 1904.

The molten glass is then hand mixed by the Table Man using a two-pronged fork before being rolled out into a 1/8 inch thick sheet. The Table Man job is as much art as anything else and is one of the most important in the process.  The air-cooled rollers transfer one of 17 textures to the glass.  Some of these textures match the ones used in the late 19th century.
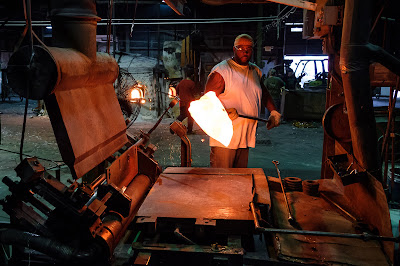
The Table Man Mixes The Glass

The rolled sheet is positioned to go through the Lehr (the annealing oven) which takes about 1/2 hour to be annealed.Annealing cools the glass slowly which helps to remove internal stresses in glass and to strengthen it. Once annealed it is moved onto the cutting table and hand cut then packed up for shipment.  Producing hand mixed sheet glass in this manner is a very labor-intensive process.


A new sheet of glass is created about every 90 seconds using a process that hasn't changed much at all in 128 years.
Feeding the glass into the rollers

Once the glass sheet is finished it is cut into rectangles and stored in the factory warehouse.
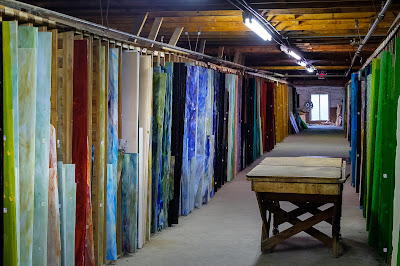
One of several rooms full of glass sheets.

The glass is packed in custom wooden crates before being shipped out around the world.

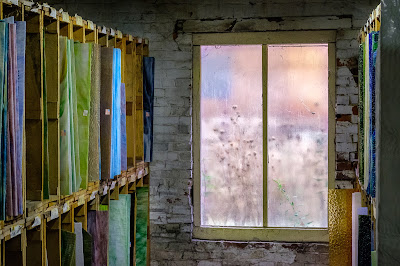
A dirty window mimics the opalescent glass
Packing for shipment


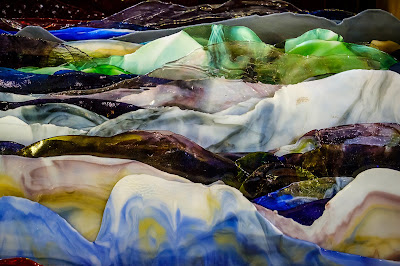
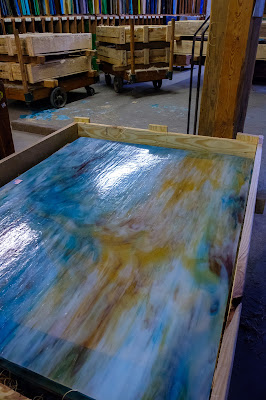
Glass Mountain Ranges
I found this whole process fascinating.  It is very different from the engineered processes at my employer of 35 years.  The 128-year-old process is very much an art process. They are proud of their heritage and resistance to modernization. The company was recently bought by an Engineer.  It will be interesting to go back in a few years to see how things have changed.


The KOG factory tour is well worth the stop.  Check out their website for information on the tours.
https://www.kog.com/tourinfo.html

These and other photos are available on my website.
http://www.thesiggins.com/My-Gallery/Travel-1/Kokomo-Opalescent-Glass-Factory/

Wednesday, December 27, 2017

Lightroom CC Auto Exposure

Lightroom has always had an Auto Exposure feature that attempted to fix an image exposure by analyzing the image and automatically changing the tone sliders. I never used this feature because it didn't come close to what I considered the correct adjustments.  Adobe recently released Lightroom CC Classic version 7.1, which is supposed to make major improvements to this feature.  I was interested to see if it is really better.

According to Adobe, the new "Enhanced Auto feature has been optimized by machine learning." to automatically apply the best edits for the following slider controls: Exposure, Contrast, Highlights, Shadows, Whites, Blacks, Saturation, and Vibrance. Using an advanced neural network powered by Adobe Sensei, our artificial intelligence (AI) and machine learning platform, the new Auto Settings creates a better photo by analyzing your photo and comparing it to tens of thousands of professionally edited photos to create a beautiful, pleasing image."  The button is no longer called the “Auto Tone” — now it’s called “Auto Settings” because it goes beyond just the tonal sliders in the Basic panel by adding Vibrance and Saturation into the mix. So in theory, the auto button should adjust my photos to what a professional photo editor would do.  Let's see.

Example 1 
Original Unedited Image

Original Tone
Lightroom 7.0 Auto Tone

Version 7.0 Tone

Lightroom 7.1 Auto Tone

Version 7.1 Tone
One reason I never used the earlier versions of the Auto Tone feature was that it always seemed to make the image too bright. You can see this in the version 7.0 example above. Scott Kelby called it the "overexpose button." The new version does not seem to have that problem.

The official differences from the old Auto-Tone are:

  • The new Auto tone will also adjust the Vibrance and Saturation in addition to Basic panel tone controls.  It does not touch the Clarity setting.
  • The analysis is done on the cropped image, ignoring what is outside the crop. If you crop after applying Auto, the Auto button will re-activate – click on it again to redo the analysis.
  • The analysis also takes into account your existing white balance and camera profile.

One thing I have noticed in my testing is the analysis can take a few seconds to complete.  The Auto button is disabled until it is complete.  This is not listed in the "official differences".

Of course, testing on one image is not enough.  Here are a few other examples of the unedited and 7.1 auto results.

Example 2 - an easy one.  Click on one of the images and use your arrow keys to flip back and forth between the two images.
Original

7.1 Auto Tone
The sky was too light in this example and auto brought down the highlights.  It also dropped the blacks -14 and reduced the contrast by -17.  It's not exactly what I would have done, but still a good starting point for future refinement.

 Example 3 - click this image to see a larger side by side comparison.
In this more difficult example, there was a great deal of contrast in the original image.  The auto turned the contrast down -20, dropped the highlights -63 and brought up the shadows +44 to even out the image.  Really not too bad.

My final test image is the hardest yet.  It was taken under extremely difficult lighting conditions inside a glass factory.  The room was dark but the molten glass was very bright.  The auto tone didn't handle this image very well.

  Example 4
In my opinion, it made the image too dark.  I guess that is not one of the tens of thousands of professionally edits that were fed into the artificial intelligence.

In the end, no automatic feature is going to be correct every time, but this version seems to be much better than the previous versions.  I plan on using the new Auto Settings feature when I start my edits.  It can give me a good start with just one click.

Sunday, December 10, 2017

Slow Down

"Slow down, you move too fast
You got to make the morning last
Just kicking down the cobblestones
Looking for fun and feelin' groovy
Ba da da da da da da, feelin' groovy"


A great folk song that was released in 1966.  I think this could be a great theme song for something we all need to do -- slow down.

My First Real Camera
I got my first "real" camera in 1976 as a high school graduation present.  It was a Yashika Tele-Electro SLR.  It was a pretty advanced camera at that time.  I used it to take photos through college, but a college student budget limited how many photos I took.  When you live on a shoestring you think about each exposure you make on that roll of film.  I probably didn't make much more than 1,000 photos with that camera.

Fast forward to today. I sometimes take over 1,000 shots in a single day. It's really easy to do. With high capacity memory cards, I can keep making shot after shot without being concerned with the cost of each. Once I pay for the camera gear and memory cards, the only real cost is the time it takes to go through all those photos once I get them on my computer.  

As photographers, we have borrowed a phrase from gun owners - Spray and Pray. Spray and pray is a derisive term for firing an automatic firearm in long bursts, without making an effort to line up each shot or burst of shots. This is especially prevalent amongst those without the benefit of proper training. If we take lots of shots with guns or cameras we try to rely on the odds that a few will be good enough.

The Gudak App
Today I ran across an article about a new digital smartphone app that is catching on in some parts of the world. The app mimics old film cameras. It even looks like a Kodak disposable film camera. A virtual roll of film has 24 frames and once you finish that roll you have to wait 3 days to get those photos "developed". You also have to wait several hours before you can load up a new virtual roll of 24 exposures. People who use this app can't "spray and pray".


Inside Administration Building at Univ. of Notre Dame

When I made the photo above I had to slow down and take my time to line up the shot. No runnin and gunnin here. I had to take my time and think about this shot. I doubt I'll ever be back to try this shot again so this was a once in a lifetime chance.

I do recommend to my photography students that they make several photos of a subject. They should move around to make several different compositions. They should also make multiple shots at different exposures so that they can pick the best exposure later. This is not the same as Spray and Pray but requires thought, planning and time.

Another important reason to slow down is so we don't miss the photo opportunities right by us. I found this photo of the lily pads and leaves while walking around Bays Mountain Park in Kingsport.  I was there for fall color and hoping to see one of the resident beavers in that area of the lake. If I hadn't taken the time to look around I could have easily missed this shot.
Lily Pads and Leaves

The Christmas season seems designed to make us go fast and do more. It's hard to slow down. It requires some effort. Let's all slow down, look around, and see what God has placed right in front of us.

Thursday, December 7, 2017

Zoom! Zoom!

I have a Mazda Miata convertible sports car that I've had now for 15 years and put 105,000 miles on it.  When I bought it, Mazda had an advertising slogan that they used to market the cars -- "Zoom! Zoom!"  While my little car doesn't have a great deal of power, it is fun to zoom zoom around the mountain roads with the top down and the wind blowing through our hair.

But this is a blog about photography, not cars.  There is a fun technique that can be tried with a zoom lens to get the "Zoom Effect".  You get this effect by using your lens to zoom in or out while making the photo.  The resulting photo will have blurring lines emanating from the center of the photo that make the subject appear to be moving toward or away from you.  Here's an illustration from a recent trip to the Christmas Lights at the Detroit Zo.

My Unmoving Subject

The Zoom Effect

The first shot was made without camera or lens movement.  In the second I turned the zoom ring on my lens during the 1/5 second exposure. Zooming will blur what is on the edges of the frame but not blur what is in the center of the photo.  The amount of blur depends on how much you zoom the lens.  In this example, I was using a relatively fast shutter speed of 1/5 of a second because I was hand holding my camera and I wanted to avoid as much blur due to camera shake as possible.  If I had my camera on a tripod I could have used a longer exposure and zoomed even more.

Here are a couple more examples.
1/3 second
 Can you tell what that is?  I was at a zoo after all.

This technique is not limited to lights or outdoors.  Here's an example with a mantle clock.
17 seconds
In this case, I had my camera on a tripod.  I started the exposure, waited 5 seconds, zoomed out for about 5 seconds, and then let the shutter timer run out.  You can see the face of the clock appears inside the face of the clock.

3.1 seconds
One of the coolest subjects to try this on is fireworks. Set up to get an exposure of a couple seconds long, wait for an explosion in the frame and zoom.
2 seconds

Here are some tips to use when trying the zoom effect:

  1. You want a long exposure, preferably longer than 1 second.  This is a technique that works well at night or in low light situations.
  2. Keep the camera steady by using a tripod.  Trying to hold the camera still while zooming is very challenging.
  3. What is in the center of the shot will be blurred less than what is on the sides.  Put your subject in the center.
  4. Zoom smoothly.  I like to start zoomed out, start zooming, then press the shutter.   This will help keep the zoom speed consistent throughout the exposure. This will take some practice.
  5. Make multiple shots while varying the shutter speeds and amount of zoom.  Try some zooming in and others zooming out. This is not a one shot and done scenario.  Take many shots because you will delete many.
Give this a try.  You have to be willing to delete a large percentage of the shots but keep trying and you will come away with some cool compositions.  Let me know if you try this and how it comes out.