Showing posts with label photographic technique. Show all posts

Tuesday, June 25, 2019

Fun With Panning

Panning photography can be fun and frustrating.  Fun because you can make some fantastic photos that really grab a viewers attention.  Frustrating because it is not easy and takes some practice.  The good news is you can do this with most any camera that allows you to set the shutter speed.

A panning example. 1/15 sec, f/13 at 27mm (full frame equivalent)

Panning is a technique where the photographer pans the camera along with the moving subject keeping the subject close to the same position in the frame.  When done correctly, and with a bit of luck, you end up getting a relatively sharp subject but a blurred background, like the photo of the red Mustang.

Recently June and I were exploring downtown Knoxville, Tennessee around the Market Square.  It's a fun place to practice street photography, which is candid unposed photography of people, typically in an urban setting.  There are plenty of interesting people in downtown Knoxville on a Friday night, doing many different things.  One thing we saw lots of were people zipping around on e-scooters.  People on scooters make great subjects for panning because:

  • They are slow moving
  • They are on predictable paths
  • The main subject is people

You can do panning with other subjects but faster subjects moving erratically are more difficult to photograph.
Too slow.  1/10 sec, f/14 at 53mm
Setting up the camera - You will want to be in Shutter Priority or Manual Mode.  For a slower moving subject, such as scooters and bicyclists, you will want a shutter speed between 1/15 and 1/30 of a second.  Using a  shutter speed slower than 1/15 will make it difficult to avoid motion blur in the subject, as in the motorcyclist above. You may need a faster shutter speed when photographing a faster moving subject.

Set the camera to continuous focus tracking so that it will adjust focus as the distance to the subject changes.  Using burst mode or continuous shooting mode will allow you to take many shots as the subject moves by you. 

1/18 sec, f/11 at 53mm
Setting up the shot -  you want to position yourself so your view of the subject is perpendicular to the direction of motion, as seen in these example photos. This will minimize the change in camera to subject distance and improve the odds that the camera will be able to keep the subject in focus.

Be aware of the background.  Just like any photograph, you don't want a bright colorful background to distract from the subject.  Also, watch out for objects in front of the subject as you pan.

I like to zoom out a bit and crop later to get a better composition.  As the subject approaches center them in the photo and press the shutter.  In burst mode, the camera will keep taking photos as long as you keep your finger on the shutter or the memory buffer fills up.  The key is to keep the subject in the same position within the frame.  It's not as easy as it sounds and this is the part that takes practice and a bit of luck.  Keep shooting while the subject moves past you.

1/15 sec, f/11 at 53mm
Go out and give this a try.  It will take a lot of practice so be patient. You can practice by heading to most any downtown area where there are cars or people passing by.  Add your comments to this post to let me know how you're doing.

Friday, October 25, 2013

Skies

It's been a busy few weeks.   I haven't blogged in weeks and have barely done anything with my fall photographs and we had our first snow flakes today! Time is passing by quickly but June and I have found time to get out and enjoy God's creation in gold, yellow, and red before the leaves are all gone.

We took one day and drove up to Burke's Garden, Virginia.  It's a favorite place for landscape photographers but we had never been.  Burke's Garden is a bowl valley completely surrounded by Clinch Mountain.  The valley is reported to be the highest in Virginia at around 3,000 feet above sea level.  This elevation brings fall to Burke's Garden before many other places in our area.  

The day we picked turned out the be cloudy and overcast.  When we got into the valley the clouds had come down far enough to cover the surrounding mountains and even creep into the valley.   Overcast days can be great for some photographs but challenging for others.  One of the most valuable lessons for an outdoor photographer is to know what to shoot under different lighting conditions.   A cloudy overcast day produces fantastic soft light, obscuring shadows and eliminating bright spots.  It can also make colors more vibrant. 

In this first shot you can see how the clouds were hanging very low over the mountains.  The clouds thinned a little allowing just enough sunlight through to highlight the trees in this shot.  Including the sky in this shot puts it in perspective and tells more about the place and conditions.

In this shot of a road lined by beautiful trees in fall spender you can see how the soft indirect light allows the color to pop without being washed out by bright light.  The sky does not add to this photo but there was no way to get this shot without including some of the sky.

Most of the time you want to avoid including the sky in the composition if it is bland and uninteresting.  Below is the same shot with different crops.


In the second version I cropped out that bland sky.  I also cropped out the grassy foreground because I didn't think it added anything to the image.  If something doesn't add to the image then think about cropping it out.

The next weekend we took a side trip to Cataloochee Valley on the way to meet friends for the weekend.  At times we had the same overcast conditions but later in the day the clouds started to break up and create some different conditions.

With some interesting clouds in the sky I had some different compositional opportunities.  In this photo of an old barn the blue sky and clouds added to the photo.  The clouds are cool and the blue is a nice contrast with the fall colors.   To make this shot I had to use a graduated neutral density filter to compensate for the sky being much brighter than the rest of the image.   I don't use these filters on every trip but when I need them they make the difference between an impossible shot and something worth sharing.

Of course these bright conditions made other photographs very challenging.  I had to wait a while for the sun to go behind a cloud before I could get a picture of leaves in that little stream.  

The secret to getting good photos outdoors is to understand your light conditions.  Unlike the studio, you take what God gives you and make the best of it.


Sunday, August 25, 2013

How to get both motion stopping and bluring shutter speeds in one image

If you've looked at my online photo gallery, especially the Waterfalls section, you know I enjoy photographing moving water.  My favorite technique is to use a slow shutter speed to make the flowing water appear silky and smooth.  Unfortunately, sometimes other elements in my photo that I want sharp are also moving.  This is especially challenging at the bottom of waterfalls because the falls themselves can produce a nice steady breeze that keeps the foliage in constant motion. 

I have recently started using a technique that keeps elements sharp that I want sharp and blurs the parts I want blurred.  This technique involves taking two exposures at different shutter speeds and blending them into one photo using photo editing software.  This is more advanced editing than I typically do on a photo but it can produce beautiful results.

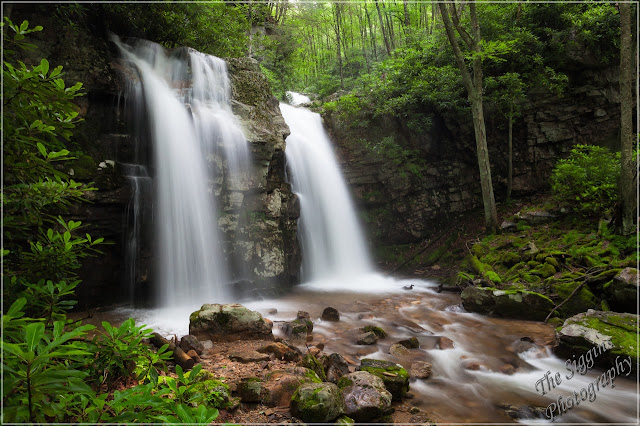
Here's a recent example where I used this technique.

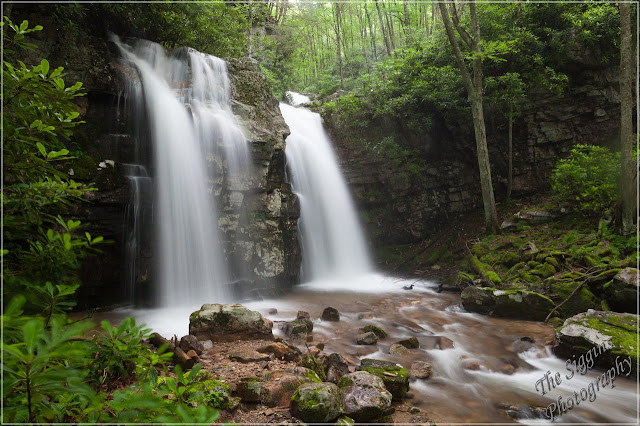
1.6 sec, f/20, 24mm, ISO 800
As you can see in this first photo the long 1.6 second exposure produced the pleasing blurred water effect I was wanting but the rhododendron leaves on the left were moving and blurred.  Most of the leaves around the base of the falls were moving but the movement of those that were further from the camera were not as noticeable.  I could have solved this problem by stepping to the right so the moving rhododendrons were not in my photo, however I wanted to include them because they framed the falls and also added a sense of depth to the photo.

1/30 sec, f/4, 24mm, ISO 1600
Without moving the camera I changed the settings to get a shutter speed that was fast enough to keep the rhododendron leaves sharp.  Because it was pretty dark under tree canopy I had to bump up my ISO to 1600 and open up my lens aperture to f/4 to get this speed.  Because I am going to blend these two photos together when I get home the tonality (brightness) of the two exposures need to be as close as possible.   If one photo was much brighter than the other it would look unnatural when blended.   I managed the tonality by shooting in Aperture Priority (Av) mode and letting the camera set the shutter speed accordingly.  I could have done the same thing by setting the shutter speed in Shutter Priority (Tv) mode and letting the camera adjust the aperture.  I verified the tonality of the two exposures were close by comparing the histogram for each on the back of my camera.

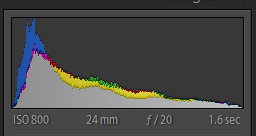
Histogram for first exposure

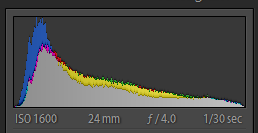
Histogram for second exposure
A histogram is a simple graph that displays where all of the tonality or brightness levels contained in the image  are found, from the darkest on the left to the brightest on the right.  You can see the two histograms above are not exactly the same but they are about as close as they can be in an environment where the lighting conditions are constantly changing.  Another important thing to remember is to take your two shots as close together as possible to minimize changing conditions.  If the sun had come out from behind the clouds between the first and second exposure then the tonality might have been very different, which would make blending later more challenging.

To use this technique you also need to make sure the white balance is the same between the two photos.   You can do this by not using auto white balance and setting the white balance on the camera or shooting in RAW mode and setting the white balance using photo editing software.  Since I pretty much shoot RAW all the time I didn't worry about setting the white balance on the camera.

When I download the photos into Adobe Lightroom I have two photos that are almost identical except for the shutter speed.  I need to take parts of each photo and blend them together into a new photo.  I used Photoshop Elements version 11 to do this.  You can use Photoshop for this, but I prefer Elements because it does everything I need and is only $65 versus over $600 for Photoshop CS6.

The blending technique using layers in Photoshop Elements is a bit advanced and more than I can cover here.  There are many free resources online that explain how to use layers.  Here are two video tutorials that are helpful:
In Photoshop Elements I created two layers from the two exposures and used the layer mask tool to reveal the rhododendron leaves from the second photo while preserving the rest of the photo. Instead of using a gradient tool like in the tutorial, I used the black paint brush over the leaves.  I was careful to not paint over the water, which would have revealed the water from the second photo, which I didn't want.

These two photos were pretty easy to blend together using layer masks because there was good separation between the leaves and the water.   If the water had been behind the leaves the layer mask would have been tedious and time consuming to create.   This is something to remember when composing the shot.

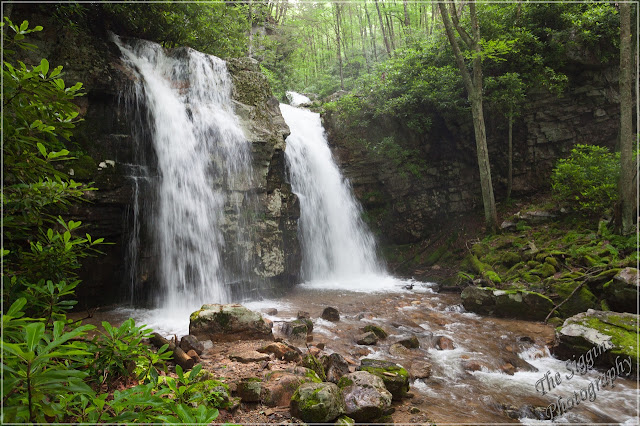
I saved the blended photo as a new file then used Lightroom to adjust the contrast, clarity, saturation, sharpness, and add a vignette. 
New Blended Photo
Once you had done this a couple times you will find it's pretty easy, as long as you think about blending when taking the photos.  Four things to remember -
  • No camera movement between shots - camera on a tripod.
  • Tonality of the two images as close as possible - shoot quickly.
  • Two images must have the same white balance.
  • Compose to minimize visual overlap of the elements to be blended.
Please let me know in the comment box below if you find these tutorials helpful and if there are others you would like to see here.  Feel free to share on facebook, Google+, etc.

Monday, August 12, 2013

Learning All The Time

Seems like every time I go out shooting I learn something new, even without trying.

I wanted to capture the misty effect you can get with long exposures of several seconds or more with waves on the beach.   When I took this shot it was still too bright for a long exposures.  In order to get the longest shutter speed possible I set my ISO as low as possible (100), my aperture as small as possible (f/22), and added a neutral density filter to the front of my lens to cut the light even more.   I further slowed my shutter by making sure I exposed for the sky and not the sea stack.   I was able to get a 15 second exposure even shooting into the sunset.

Sea Stack Sunset

When I looked at the LCD display on the back of my camera I thought I had captured what I was after.  The waves on the beach blurred into a smooth misty surface that reflected the colors of sunset.  Good for me!

When I was working on this photo just now I realized my mistake, the results of which you can see in this close crop of the trees on top of the sea stack.

See the ghost image of the tree tops?  Obviously the camera moved during that 15 seconds when the shutter was open.   Then I remembered.  To get the shot I wanted without the sandy beach I had to set my camera out near the water.  I had my camera on my tripod, which I set down in the sand and composed the shot.  I waited for the waves to be where I wanted them and started the exposure.   What happened next was comical.  The waves did not stop just below my tripod but continued up the beach and around the tripod legs.  Anyone who has stood at the edge of the surf knows what happens.  The wave washed the sand out from under the tripod legs, which then settled into the sand.  The comical part was me with my hiking boots running from the waves while leaving my camera and tripod in the surf.   Some of my photo buddies who were there with me chuckled at my antics.

Lesson learned - make sure the camera is on a solid surface and is not going to move during the exposure.  Beach sand and waves do not make a solid surface to shoot from.

I had fun trying the long exposures and will try again when I get a chance.  I'm sure I'll learn another lesson in the process.

Monday, May 27, 2013

Time for the second curtain.

OK, this is a bit of an advanced topic but one that fun to try.   It's called second curtain flash, rear curtain flash or show sync flash.  I mentioned it to a friend and accomplished photographer Saturday night and he had never heard of it.   That made me think maybe I should blog a bog on the second curtain.

First, a little explanation of how a camera shutter works.   There are two halves called curtains and they work just like a curtain would.   Before you click the shutter release the curtains are closed and no light is reaching the sensor.  Imagine a stage with the curtain closed.  The place where the two curtains meet is all the way on one side of the stage.  When you take the picture the first curtain slides open exposing the sensor (stage) to light.  Once the time determined by the shutter speed has been reached the second curtain slides across closing the shutter.  Unlike a theater curtain this all happens very quickly around 1/60 of a second.    But if your shooting under low light conditions you might have a long shutter speed.

First / second curtain setting determines when the flash fires.  By default the sequence of events (first curtain) is as follows
  1. First curtain opens
  2. Flash fires right away
  3. Second curtain closes after a period of time
 When the camera is set to second curtain the events are slightly different
  1. First curtain opens
  2. Flash fires after a period of time (shutter speed)
  3. Second curtain closes
Under most conditions this makes little difference to the photograph.  It does make a difference when the subject is moving and you use a flash.   When the flash fires it produces a bright light for a very short time, which freezes motion.   If you shutter is open longer than the time the flash is on then any movement will create a ghosting effect.  You know, the blurs where people moved while you were taking a longer exposure.   First or second curtain setting determines where the frozen image is in relation to the blur.   With first curtain you get the sharp image when the flash goes off, then the blur.   With second curtain you get the blur then the sharp image.  Confused?  Take a look at this image.


In this image the car is moving from right to left.  I shot from a tripod with a 1.3 second exposure and my flash set to second curtain.  During the 1.3 seconds the car moved across the frame leaving streaks (it was moving slow).  Then the flash fired and froze the car in place on the left side.   To me this seams like a more appealing image than with first flash in which case the car would have been frozen on the right with the blur moving to the left if front of the car.

 Here's a second example with a 0.6 second exposure.  It was much later at night than the first image, which was a dusk where there was more ambient light.


The can see the driver is frozen talking on her cell phone  (not a good idea) but the tail lights create a cool cartoon blur effect.

Want to see more examples?  Do a google earch for second curtain flash images. If you want to read more check out Neil van Niekerk's blog.

 I'm pretty sure most cameras have this feature but it may be down deep in the menu.  Another case where you want to get your camera manual out and actually read it.