The world outside our homes seems to be getting worse and worse. As I write this at 3:30 PM on March 23, the US now has the third-highest total cases, adding over 8,000 today. A couple more days and we may pass Italy. By the time you read this, the world will have changed again one way or another.
The dichotomy of worrying breaking virus news and the world of nature is extreme. Walk outside
 |
| Aperture = f/5.6 |
and check out what's blooming. We have a flower garden where we have been planting native wildflowers for several years. Yesterday June and I took a hike and saw wildflowers bursting forth everywhere. The world of nature marches on just as it has since the beginning of the world.
Photographing flowers is a perfect thing to do now. We can do it while keeping socially distant and being surrounded by nature will improve our outlook and health. June and I took our cameras on our hike yesterday. We didn't have tripods, which would have made a big difference in the quality of our photos but we were there first to get exercise.
This is all leading up to my photographic tip for today -- the importance of the aperture setting when making macro (close-up) photos of small objects, such as flowers. Those of you who have taken my class should remember I refer to the lens aperture as the depth-of-field (DOF) control. By adjusting the aperture (opening in the lens that lets light in) we control how much light is captured by the camera and how much of the scene is in focus. The depth of fields is the distance between the camera and the nearest and the furthest objects that render the image to be in sharp focus. By adjusting the aperture we control the size of the DOF - more or less in focus. Understanding this is critical to making good macro photos, where the DOF is tiny.
I am including some examples in this blog to illustrate my point. With one exception, these were all taken on our hike yesterday with my Fuji X-T3 mirrorless camera, an 80mm macro lens, and without a tripod. It was an overcast day with little breeze to move the flowers.
You can click on any of the images to get a larger view and then use the left and right arrow keys to flip through all the images.
The first example was actually taken in our flower bed before our hike. This Lungwort plant is a volunteer that just showed up a year or so ago. It looks a little like Virginia Bluebells but the leaves are mottled.
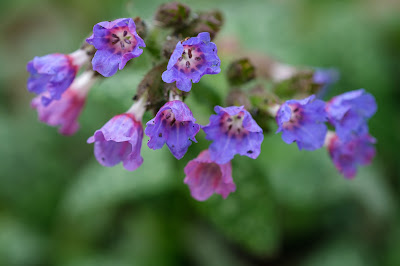 |
| Aperture = f/5.6 |
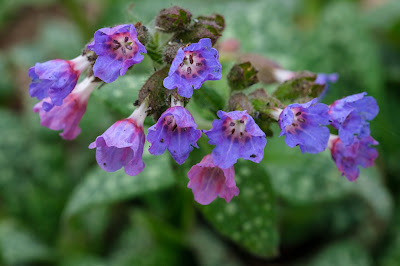 |
| Aperture = f/13 |
The first thing you notice is the background in each photo. At f/5.6 it is blurry and at f/13 it is more in-focus, but still not sharp. I think the background in the first is less distracting, however, some of the flowers are clearly out of focus in the first one. Which is better is a matter of personal taste. There are many different aperture settings that I could have used.
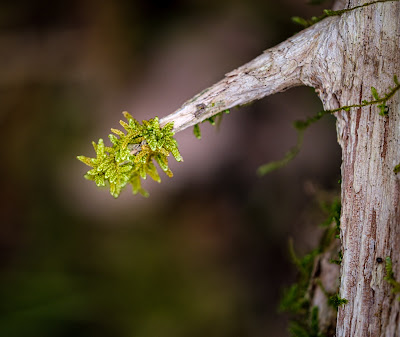 |
| Moss Brush, uncropped, aperture = f/2.8 |
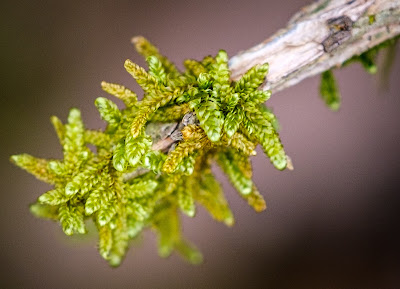 |
| Cropped, aperture = f/2.8 |
This next example is the same photo. I cropped it down so you can see how small the depth of field is at f/2.8 using a macro lens. The depth of field is maybe 1/8 inch in this example. The important thing to understand here is focusing on the right spot is critical in macro photography. Not only do you need to think about how much to keep in focus, but you also need to think about what is in focus. The "in focus" range is 1/3 in front of the focus point and 2/3 behind it. With DSLR cameras, the aperture is wide open before you make the shot. Most cameras have a DOF preview button, which will allow you to see what the photo will look like at the set aperture.
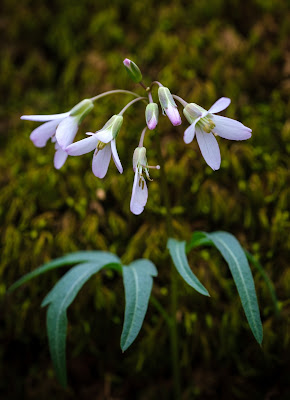
I shot this pair of Spring Beauties at three different settings
 |
| Aperture = f/8 |
 |
| Aperture = f/5 |
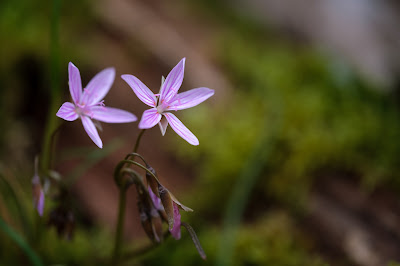 |
| Aperture = f/3.6 |
Notice how the depth of field changes at different settings. The most noticeable difference is how blurry the background is. Even at f/8, both flowers were not completely in focus, which brings up my final tip for macro photography. Because the DOF is so shallow, the position of the subject(s) in the composition can make a big difference. The Spring Beauties were at slightly different distances from the camera. If I had moved the camera so the two flowers were the same distance away I could have gotten more of them in focus. In the final example below, I positioned the camera so I was shooting perpendicular to the spiral of this Christmas Fern.
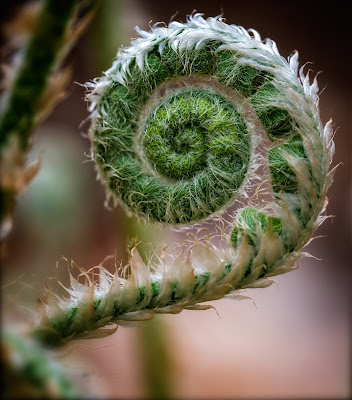 |
| Aperture = f/5.6 |
Although I had a relatively wide aperture (f/5.6) and a shallow DOF, most of the curl is in focus. If you look closely the front of the curl is in focus, but the back edge is not.
With these examples, I hoped to illustrate the importance of controlling the DOF in order to create a more pleasing photograph. The best way to really understand this is to go out and try it for yourself. Set your camera in Aperture Priority mode and make the same shot at different aperture settings. The camera will adjust the shutter speed accordingly. If you have the ISO set on automatic it will adjust that as well. Then take a look at each shot and see how things change. You'll find you like some better than others. Then remember to try multiple settings on all your macro photos.
Now, grab your camera and go out in nature. Just be sure to stay 6 feet away from those other photographers and hikers.


