Friday, January 25, 2013

Is it real or is it Photoshop?


I recently saw an article on the 10 Myths About Photography by  Scott Bourne---Photo  Focus. 

Number 5 caught my attention - "If you do anything to a photo in Photoshop it's no longer a photo. Opinion - if it started its life in a camera it's a photo. Ansel Adams never used Photoshop, but he manipulated the Hell out of his pictures. There is no reality in photography. There never has been. It doesn't exist"

People ask me if I edit my photos.  The answer is yes.  I edit every photo I take.

A photograph is a two dimensional representation of a 3 dimensional world.   Photographers can arrange their composition to give more of a three dimensional feel but it's still on a flat screen or piece of paper.   They can make changes using Photoshop, Lightroom or other photo editing programs to make it look like it has depth.  They can also manipulate the photo to make it more pleasing.   How much editing is OK and where is the line?

Almost all digital photos have been manipulated. In fact, unless you take your photos in RAW mode, they have been manipulated by your camera before you see them.   By default cameras automatically adjust the color, sharpness, contrast, saturation, and possibly other photo settings.  This is done automatically, unless the camera has been set to store the images in RAW mode.  RAW images are uncompressed and unprocessed by the camera.  


The first version of this creek picture is the unprocessed RAW image.   It's not a bad photo but it lacks something and also has something I don't want.   The second version is edited in Adobe Lightroom to adjust to white space (color), vibrance (saturation), contrast, and sharpness.  I also darkened the trees at the top and darkened around the edges slightly.   These changes emphasize the flowing water and give the colors a little more pop.   In the original there was a twig sticking out of the water that was very distracting.   I used Photoshop Elements to digitally remove it.

Click the first image and you will get a window where you can go back and forth comparing the two versions.

If I had my camera on automatic it would have done some of these adjustments, such as white space, vibrance, contrast, and saturation, for me.   I prefer to turn off the automatic adjustments and adjust each one.
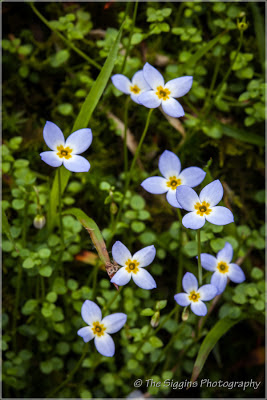
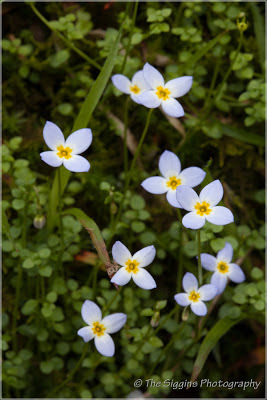
Here's another example of editing a RAW photo.   The first image is the unmanipulated copy and the second has been edited in Lightroom.   The color of the Bluettes is the edited version are more like what I saw.     I also darkened the corners and edges to draw the viewers eye to the center.

This third example is a bit more manipulated.   The first version is straight out of the camera and pretty dull.   This was a really cool scene but the camera didn't capture it the way I saw it.   I first cropped and straightened the image to make sure the barn is the obvious subject.  I also increased the clarity to draw the trees out of the fog and brightened the barn, also to draw attention to it.    The white balance and vibrance were also adjusted.  There was also some large white object to the right of the barn that was very distracting so I "removed it".


Which of these is more "real"?  The more important question is which is more interesting to look at?   The first may be closer to what was actually there, but I think the second is a more interesting photo.  Unless a photo is intended for documentary purposes, it usually can benefit from some manipulation.   The manipulation is what painters have done for centuries and in fact many of the guidelines used by photographers were first discovered by painters.   Photographers are artists and as artists can adjust a photo any way they feel will improve it.  


Friday, January 18, 2013

Post Processing Polarization

When I'm shooting outdoors I almost always have a polarizing filter on on my lens.  A polarizer is one of the most useful tools available for a landscape photographer.  It cuts the glare off water surfaces, windows, and other reflective surfaces.  It can cut the glare and darken leaves and flowers.  It gives a sky that rich blue color and makes clouds really pop.  The best part is the effect is adjustable.  Turn the filter to increase or decrease the polarization effect to get it the way you want it.  It's my favorite tool when shooting landscapes.

I don't use many other filters because you can simulate them when editing the images later, but a polarizer is not so easy to simulate.   If you have glare on water, windows, or leaves there's not much you can do about it after you take the photo.   It's always best to get the best image you can in camera and don't rely on post processing to fix problems later.


There is one polarizer effect that you can simulate in post processing and that's the blue skies.   I do this is Lightroom sometimes if for some reason I didn't have the polarizer on or didn't get the effect I was looking for.   I do this by using the Hue, Saturation, Luminance sliders.

I want to reduce the luminance (brightness) and increase the saturation of the blue part of the sky, without impacting other parts of the photo.   To do this I select Saturation and click the round target icon just under the word Hue.   I then use my mouse to click and hold in the blue part of the sky.  While holding the left mouse button down I drag the mouse up to increase the saturation of the color I clicked on.   You can manually move the blue slider but the color of the sky is often a combination of Blue, Aqua and even some other colors.  Using the target allows you to select the exact color combination you want to adjust.

Likewise, you can click the Luminance and repeat the process to reduce the brightness to get the effect you want.  Be sure to cluck the Done button when you're finished.


The two photos above are before and after I adjusted the saturation and luminance of the blue portion of the sky.   This pretty closely matches the effect you get from a polarizing filter.  Of course you might have problems with this technique if you have other blues in the photo that are close to the color of the sky.   I suggest trying this out.  Just be careful to not over do it.

If you have Nik Color Efex software you can get a similar effect using the Polarizer filter.   Here's the same photo with the polarizer applied in Nik Color Efex


The Nik software has a rotation slider simulating the effect of turning the polarizer filter to adjust the effect.  Again, be careful to not over do it.

These are a couple quick techniques to fix the sky if you didn't have a polarizer when you took the image.   Don't rely on this and other post processing adjustments.  Try to make the best photo possible when you take the shot.  You'll get consistently better photos every time.

Several people commented on my last post.  Thanks for letting me know what you think.  I love hearing from you and welcome questions or criticisms.   Let me know what you think and if you found this useful.


Monday, January 14, 2013

You Can't Always Get What You Want....

Saturday evening we were in Pigeon Forge for Wilderness Wildlife Week and had a little time to kill before meeting some friends for dinner.   The sky was starting to look a little interesting and there was a chance for a cool sunset.   The problem was I didn't know any places close by with a clear view of the west without the billboards, neon lights, The Titanic, or King Kong in the way.   The best chance to get the photos I wanted was Wears Valley.

We took some back roads to try and get up above the valley for a view of the sunset but didn't find anything we could get to from the road.   Time was running out and the sun waits for no one.

We had driven past this little white church right on Wears Valley Road many times over the years and always said we should stop and explore a bit.   The the sunset was turning into a bust as we drove on to Headrick Chapel.  According to wikipedia

"For most of the 19th century, funerals in Wears Valley were held at Headrick Cemetery, near the valley's western entrance. A large oak tree provided shelter for funeral-goers, although cold weather and rain often made apparent the need for a building in which to conduct indoor services. In 1902, according to local lore, the oak tree was destroyed by lightning, and in response, the residents erected Headrick Chapel on the cemetery's grounds. The chapel was shared by four Baptist and Methodist congregations, with funeral services having priority. The chapel's bell would ring once for every year of the deceased's life, a tradition still observed by the inhabitants of Wears Valley. In 2001, Headrick Chapel was placed on the National Register of Historic Places."

When we arrived I got my tripod out and started to set up when I realized I had forgotten the quick release plate needed to attach my camera to my tripod.   I always shoot on a tripod and now not only was there no sunset color in the sky I didn't have the equipment I thought I needed.  Things weren't turning out according to my plan.


We wandered around for a little while and took a few shots.  I even tried shooting through the dirty windows.  When we left for dinner I really didn't think I had anything worth keeping.   When we got home Sunday afternoon I discovered there were one or two that while not good enough to print, they were good enough to share.

Because there was little color in the sky or the flora and the chapel was basically white the images seemed to work best as back and white.  Some people don't like black and white.  Here's a color version for you.

I think there are a lot of cases where a monochrome image is a better choice than color.     Do you prefer color or black and white?

I didn't get the photos I thought I wanted but I had fun and learned a little about the Headrick Chapel in the process.   I have to keep reminding myself that God has places the photos out there for me to find, but it's his plan and not mine that will lead me there and I will find what I need.   I have to be open to plans that aren't mine.

"You can't always get what you want
But if you try sometimes you just might find
You get what you need
"

  Mick Jagger

Wednesday, January 9, 2013

What a difference

This weekend I'm going to spend a day at Wilderness Wildlife Week in Pigeon Forge Tennessee.   This will be my forth trip to this fantastic event.   Started by Ken Jenkins 23 years ago this event is committed to the education and enjoyment of the public as to the wonders of Great Smoky Mountains National Park.  It is 8 days filled with free and low cost programs, classes, and hikes including some great photography programs.   Check out the program on the website to pick out sessions you might want to attend.

There are a couple I highly recommend

Nature Photography Workshop: Kendall Chiles, Tom & Pat Cory, Daniel Dempster and Harold Stinnette 9:00 AM - 1:00 Saturday January 12.  I've attended this one before and am going again.   You would pay good money to go to a workshop led by any one of these professionals.   Getting 4 hours of instruction from all five for free is a deal not to be missed.  

Learning to See Photographically: Bill Fortney 2:30 - 3:30 PM Saturday January 12 and 10:30 - 11:30 AM on Sunday January 13.   You will never go wrong going to anything by Bill Fortney.   I have seen an earlier version of this program and will make sure I see it again.   I just can't get enough of Bill's instruction and inspiration.

If you go, get to the rooms early and get a seat.  They always fill up and people will stand along the sides and in the back.

The last time I was at WWW was 2011.   On Friday night that year it snowed and June and I got up early and skipped several of the programs to head into the park to play in the snow.   It wasn't easy finding a gate that was open and we almost got locked in when they closed the gate near Townsend.   This is a picture of the road to Tremont on January 8, 2011.  You can see there were no tire tracks on the road.  There were a few people down that road.   I'm not sure how long before they got out.

The  forecast high for this Saturday is 67.   Not much of a chance of snow this year.   That's OK.  That way I won't be tempted to skip the programs this year.


Sunday, January 6, 2013

Blessed!

This week I sold the last of my landscape calendars to raise money for Hope Haven Ministries.  I have one in my office at work and one in the kitchen at home, but didn't have one for my office at home.   Never fear, June found Art Wolfe's Scenic Landscapes calendar at Big Lots!  If you're a landscape photographer you probably know who Art Wolfe is.  He's pretty well known.  He even had  a couple TV Series including - Travels To The Edge with Art Wolfe.  I was pretty excited when she called and told me she got an Art Wolfe Calendar (being married to a landscape photographer, she knows who he is).

When I opened up the calendar I was surprised to find that I have been to 7 of the 12 places on Art's calendar and had similar photos from 6 of them.   Not only were they similar, but a few were very similar.   I thought it would be fun to compare them side by side.

I scanned the calendar pages and then added my photo beside the calendar photo.

My Delicate Arch picture was taken on our very first trip where I first got interested in photography.  I was using a Canon compact digital camera and my dad's collapsible tripod from back in the 60's.  I don't have the original file so this is a picture of a print hanging in our kitchen.


The Lake Josephine shots were not in exactly the same place but you can match up the mountain peaks.

 Moraine Lake was also taken with the Canon compact digital camera and hand-me-down tripod.

 I didn't have a similar shot of Bridalveil Falls, but we were there. 


Finally, The Swiftcurrent Lake shots were both taken at sunrise from close to the same spot.  It looks like he might have been standing in the water.  Since the air temp was around 40 that morning I didn't venture into the lake.

My point is not to compare my photography with Art's.  What stuck me is how blessed June and I are to be able to travel and how patient she is when I want to get up before sunrise on vacation and take forever to get a shot.  When I can open a 12 month landscape calendar and say I've already been to 7 of the 12 places (with plans to go to an 8th this year) I know I am blessed.

Tuesday, January 1, 2013

What to do on my day off? Water drop shots!

There's not much going on photographically outdoors right now.   It's rainy, overcast, and there is very little color.   Not enough to convince me to go out shooting in the rain.   Instead, I decided to make the best of an indoor day and try my hand at taking pictures of falling water drops.

I used common household items to build my "set".  A step ladder, clean oil pan, zip lock bag, and some colorful things for a back ground. 

I filled the bag with water and hung it from the top of the ladder over the oil pan full of water.  I attached my off camera flash to the side of the ladder and positioned a reflector on the opposite side.   Then it was a matter of poking a small hole in the bag and getting to work. 

I tried a variety of back drops.  The more colorful and bright the better the results.   You see in the photo on the right that  I was using one of June's old clown costumes and a red stadium chair.

The hardest thing is to focus in the right spot.  I held a pencil so the point was right where the  drops hit the surface of the water and manually focused on the pencil.

I found the following gave me the best results:
  • Camera in manual mode, lens in manual focus
  • 1/250 of a second (max sync speed)
  • f/7.1 - f/22 depending on how much I wanted to blur the background.
  • ISO appropriate to get a good exposure using these settings, usually 200 - 400.
  • flash output set to 1/10.  This results in a faster flash.
Then I just started firing away as fast as the flash would recycle.  There's no timing these shots so it's all chance.  I took 192 shots and quickly deleted 147.  Out of the 45 remaining I picked 26 to work on. I then narrowed them down to 14 that were worth sharing.  All 14 are available on my website.

Here's a few of those 14.


Notice the red from the stadium chair in these shots.


Look closely and you will see the clown suit in the water drops.  You can click on any photo to get a larger view.

Most of my shots were looking across the water and slightly down.   I also shot looking down at the surface of the water.   These came out almost black and white so I went ahead a converted them to true black and white.

I hope you like these.  They were fun to do.   Best of all, I didn't have any water disasters and only had to wipe up a little water off the kitchen floor.