Sunday, October 13, 2019

A Useful Weather Page For Outdoor Photographer

In my opinion, the most important part of photography is light.  Sure composition and a sharp technique are key elements to making a good photo, but if you follow the light you can find the composition and use your photographic skills to make a great photo.   As outdoor photographers, we are at the mercy of the weather to give us the light we want. 

I have used an App called The Photographers Ephemeris or TPE for years.  It will tell me where the sun and moon will be for any given time and place anywhere in the world.  This is more than just knowing when the sun comes up or goes down.  It will tell me the direction and angle of elevation, which will tell me how the sunlight will affect the scene.  You can use TPE for free on the web https://www.photoephemeris.com/tpe-for-desktop or buy a smartphone version for a few bucks.  Check it out.

Besides the sun, other major factors include clouds, wind, dew, and rain,  There are many weather apps and websites available.  One website I find useful is Weather Underground https://www.wunderground.com/ because of the useful information on the 10-day forecast.
Some key pieces of information available on this single page.

  • General forecast - Partly Cloudy for today.
  • Forecasted temperature and dew point.  When the temperature falls below the dew point you get dew on the grass, flowers, etc. making for great macro photos.
  • Cloud cover - sometimes you want lots of cloud cover to give nice soft light.  Other times you want scattered clouds for photos that include the sky.  The example above shows cloudy in the morning and burning off around noon.
  • Wind speed - this is important if you are wanting to minimize plant movement in the image.  In this example, the wind is forecast to pick up around noon.
Using this example I can see that the morning is best for macro photos of flowers and the afternoon might be better for big landscape shots.

As photographers, we have a wealth of information that can help us plan our outings and improve out odds of making great photos.  Now, go out and make some.

Friday, September 13, 2019

Registration is open for the next Basic Photography Class


I teach a basic photography class about 3 - 4 times a year.  The next one has been scheduled for:

Thursday, Nov. 7    6 - 8 PM
Tuesday, Nov. 12   6 - 8 PM
Thursday, Nov. 14   6 - 8 PM
Saturday, Nov. 16   TBD  - outing time depends on what works best for the class.
Tuesday, Nov 19     6 - 8 PM

That's 10 hours of instruction!

The class will start out with learning the basics of photography - light, shutter speed, aperture and how to use them on your camera.  From there we will get into color, composition, lighting, techniques and photographic gear selection.  We'll talk about some common photography challenges and how to overcome them. We will go over different photo editing packages, organizing photos, printing, and sharing online.   The class will be a combination of classroom teaching, practicing our new photography skills, and reviews of photography assignments.

The class is designed for photographers of all ages who have a DSLR, mirrorless camera, or advanced compact camera.

Classroom sessions are November 7, 12, 14 and 19 from 6:00 PM– 8:00 PM in the Eastman Employee Center.


 There will be one field trip on Saturday, November 16 to practice what we have learned.  The Saturday time will depend on what works best for the majority of the students.


In every class we will have time for:

  • Review of Homework – yes, we are in school again.
  • Problem Solving - Bring your camera and problem photos to class
  • Question and Answer


The class is open to Eastman Camera Club members.  The good news is anyone can join the club by going to https://eastmancameraclub.net/ and clicking on About near the upper left of the page.

Cost - $45/person.   Maximum of 14 people per class.  Please sign-up at the Toy F. Reid Eastman Employee Center (229-3771)

Contact me if you have questions – richard@thesiggins.com
                   423-416-1258

Friday, August 9, 2019

Photo Adrenaline and The 1%

I got to do something few of my fellow photographers have gotten to do.  I went with June and five friends to Machias Seal Island Migratory Bird Sanctuary (MBS). It is a tiny, treeless oceanic island in the Bay of Fundy rising barely 30 feet above sea level.  This is one of the best locations where Atlantic Puffins raise their young before heading back out to sea.  It was something I was really looking forward to.

To get to the island you have to take a boat from Cutler Maine or Grand Manan Island New Brunswick. The number of visitors is strictly limited and you have to make reservations months in advance to get one of the trips in June and July.

Once we got there, we were instructed while on the island to always walk with a Tern Stick above our heads.  The ArcticTerns were also raising young on the island and they will aggressively attack anyone without the protection of a stick above their heads.

Tern Attack!
Arctic Term With Lunch

Camera and Bird Blind
After being given the strict rules of the island, we were led to one of several bird blinds where four of us stood shoulder to shoulder for about 45 minutes while photographing Puffins, Razorbills, and those aggressive Terns.

As I said, I was looking forward to photographing Puffins.  Once we were in the blind and opened the tiny windows, we saw hundreds of Puffins all over the rocky shore of the island.  They were everywhere and many were just a couple feet away.  Sometimes they looked right at me.


My photo adrenaline was pumping and I shot 1,439 photos in the one hour and 45 minutes we were on the island! Now, what am I going to do with that many photos?  Realistically, I should only need about a dozen photos, or less than 1% of what I shot.

Reviewing my Puffin photos I can identify several mistakes I made.

400mm, 1/2000 sec, f/18, ISO 10000

  1. Using a center focal area caused me to crop off the Puffin's feet when they were very close.  I should have moved the focus area higher in the frame to avoid this.
  2. Many photos are very similar.  I could have worked harder on composing more interesting environmental photos, shots that show cute behavior or other compositions rather than firing like a semi-automatic machine gun.
  3. I have many shots of the back of the bird where I can't see the eyes.  Why did I shoot these?  Adrenaline!
  4. Those shots of a Puffin with several small fish hanging out of their bill is rare, or it was for our group.  I only saw a Puffin with a fish once, and it quickly jumped down between rocks without turning it's head for me.
  5. Trying to focus on a bird in flight with foliage in the background is futile.  In most of these shots, the camera focused on the background, not the bird.  It was much easier to focus on the bird when they had clear skies behind them, then track them.  Once I lock on, the camera can do a much better job keeping the bird in focus, even when they fly by the foliage.
  6. Puffin With Fish
  7. When the birds were very close, the depth of field where things are in focus was small.  I needed to shoot with an f-stop of f/8 or higher to get multiple birds in focus.
Razorbill

It was mostly foggy while we were on the island, which I understand is the normal weather condition.  The fog made shooting birds at a distance difficult.  Either the camera couldn't focus or the fog made the photos too hazy.  I did get a few clear shots at a distance, such as the bird in the water and the one in flight.

I have now reduced the 1,439 photos from the Machias Island trip down to 175.  I have picked 15 that I like, which means I have reached my goal of narrowing my photos down to the 1%.

Sunday, July 28, 2019

Use Limitations To Unleash Your Creativity

Over the years I have gathered quite a collection of cameras and lenses.  So much so that when June decided to try her hand with an interchangeable lens camera I was able to give her a mirrorless camera and three lenses.  This is my backup camera and three lenses that I no longer use but never got around to selling.  Not counting the three lenses I gave June, I have six lenses covering focal lengths from 12mm to 400mm (18-600mm in full-frame terms).  Because I use a cropped sensor mirrorless camera system I can easily carry all those lenses in a single backpack.  I pretty much have unlimited flexibility with which to create my photos.  I found this flexibility was putting me into a creative rut. I was relying on my collection of lenses to come up with a good composition. 

Don't misunderstand -- each of those lenses serves a different purpose, from fast wide 12mm lens for night sky photos to the 100-400mm zoom for wildlife photography.  Sometimes I would use a lens that is typically not used for a given style of photography, such as using the 100-400mm zoom for landscapes, but most of the time I was relying on a zoom lens to compose the photo without making other efforts to be creative.

Recently we took a couple trips to Knoxville Tennessee, Michigan, and Indiana.  For a couple outings on those trips, I took only one lens - a 35mm f/2 prime (no zooming) lens for my Fuji XT-3 mirrorless camera.    I recently added this lens to my collection because the 35mm focal length is close what our eyes see (normal lens) and the wide f/2 maximum aperture allows me to shoot in low light conditions and to blur the background in my photos.  It's a tiny little lightweight lens on a small mirrorless camera that doesn't attract much attention or weigh much at all.  I can carry it all day long and no one pays much attention to the little camera and lens.
f/2 at 1/50 sec, ISO 800
By limiting myself to a single focal length I had to compensate by moving around to get a good composition.  The wide f/2 aperture allowed me to shoot in dark places I couldn't with other lenses, such as the bar, but at the same time, I had to think about creatively using the depth of field.

f/4, 1/1600 sec, ISO 4000
f/2, 1/10 sec, ISO 400

I found myself having to look around and find new perspectives.  While waiting outside a gift shop, I found a whirlygig that had some cool shapes.  I could use the f/2 aperture to blur out any distracting elements in the background.  I focused on water dripping from a pipe.  I found a single yellow petal from a Sunflower in a bed of red leaves (I didn't put it there, this time.)

f 5.6, 1/90 sec, ISO 320

f/2.8, 1/2000 sec, ISO 200
Sometimes the 35mm focal length worked out, such as the bridge photo.  Other times I had to work to create a pleasing composition because of physical barriers that kept me from being able to stand where I wanted, such as the boat and lily pad flower and the red/orange flowers where I had to cut off the left petal.
f/7.1, 1/100 sec, ISO 200


f/16, 1/120 sec, ISO 640
I found that I enjoyed my single-lens outings and found some creative photos that I might have missed if I had relied on my arsenal of lenses.  My new photos don't look like the thousands I have already taken.  By restricting one area, I have opened up my creativity and made photography fun.

Give this a try.  You don't have to restrict yourself to a single fixed focal length lens.  Restrict yourself in other ways -- only make photos that contain a specific color.  Only do portrait orientation photos.  Limit yourself to a specific aperture or shutter speed setting.  You might find you have more fun while learning to be more creative.

Here are a few more photos from those single-lens days.
f/5.6, 1/105 sec, ISO 400

f/5, 1/150 sec, ISO 200

f/2, 1/125 sec, ISO 160

f/2, 1/50 sec, ISO 1000

f/4, 1/45 sec, ISO 160


Sunday, July 7, 2019

Don't Be A Digital Hoarder

Here are a few tips on dealing with something that can be difficult for some people to do - deleting photos.
Violets from a walk in a local park.


In the age of high-speed digital cameras and huge memory cards, it's easy to make several hundred photos in a day.  This is especially true when visiting a place rich with photo opportunities, such as a National Park.  It can be true when just going for a walk with your camera.  Sometimes when I load the photos on my computer I will have an overwhelming number to deal with.  Here's what I do to manage those.
Sandhill Cranes from Hiwassee, TN.


  1. I use Adobe Lightroom to manage all my photos on my home computer. First thing I do after loading the day's photos is to quickly go through and mark the obvious duds as rejects, then delete them.  There is nothing special about how Lightroom does this. Other software tools allow you to quickly get rid of the duds.  The important thing is to get rid of those bad photos.
  2. I find I want to pick a few photos to quickly edit and share online.  There is nothing wrong with this, as long as I don't stop there, leaving a lot of abandoned digital images on my computer.
  3. Wait a few days then go through the photos again, picking out some more favorites to edit and more importantly, deleting more.  I always have lots of photos that are just so-so that I will probably never touch.  My camera will shoot 11 frames a second on high-speed mode so I find I also have many images of the same thing.  I use the Lightroom compare feature to cull those down to one or two to keep.
  4. The final step is one I don't always do but can be the most important.  I will go back to the photos several months later and go through them again.  At this point, I will have several that I edited, and some of those are marked as my picks or favorites.  I want to be aggressive here, deleting the majority of those unedited photos.  Sometimes I'll find a photo that I hadn't edited that turns out to be a keeper, like the two in this post.  Most of the time I find I still have a lot of photos not worth keeping.  It is this final step where I do the most clean up.  When we come back from a photo outing we are excited about our photos and don't want to delete them.  It's amazing how much easier it is to get rid of them a few months later. This morning I went through just three photo outings and deleted 549 images.  
Like a closet or garage, it's easy to let digital images get cluttered on your computer.  Be aggressive and don't become a digital hoarder. 

Tuesday, June 25, 2019

Fun With Panning

Panning photography can be fun and frustrating.  Fun because you can make some fantastic photos that really grab a viewers attention.  Frustrating because it is not easy and takes some practice.  The good news is you can do this with most any camera that allows you to set the shutter speed.

A panning example. 1/15 sec, f/13 at 27mm (full frame equivalent)

Panning is a technique where the photographer pans the camera along with the moving subject keeping the subject close to the same position in the frame.  When done correctly, and with a bit of luck, you end up getting a relatively sharp subject but a blurred background, like the photo of the red Mustang.

Recently June and I were exploring downtown Knoxville, Tennessee around the Market Square.  It's a fun place to practice street photography, which is candid unposed photography of people, typically in an urban setting.  There are plenty of interesting people in downtown Knoxville on a Friday night, doing many different things.  One thing we saw lots of were people zipping around on e-scooters.  People on scooters make great subjects for panning because:

  • They are slow moving
  • They are on predictable paths
  • The main subject is people

You can do panning with other subjects but faster subjects moving erratically are more difficult to photograph.
Too slow.  1/10 sec, f/14 at 53mm
Setting up the camera - You will want to be in Shutter Priority or Manual Mode.  For a slower moving subject, such as scooters and bicyclists, you will want a shutter speed between 1/15 and 1/30 of a second.  Using a  shutter speed slower than 1/15 will make it difficult to avoid motion blur in the subject, as in the motorcyclist above. You may need a faster shutter speed when photographing a faster moving subject.

Set the camera to continuous focus tracking so that it will adjust focus as the distance to the subject changes.  Using burst mode or continuous shooting mode will allow you to take many shots as the subject moves by you. 

1/18 sec, f/11 at 53mm
Setting up the shot -  you want to position yourself so your view of the subject is perpendicular to the direction of motion, as seen in these example photos. This will minimize the change in camera to subject distance and improve the odds that the camera will be able to keep the subject in focus.

Be aware of the background.  Just like any photograph, you don't want a bright colorful background to distract from the subject.  Also, watch out for objects in front of the subject as you pan.

I like to zoom out a bit and crop later to get a better composition.  As the subject approaches center them in the photo and press the shutter.  In burst mode, the camera will keep taking photos as long as you keep your finger on the shutter or the memory buffer fills up.  The key is to keep the subject in the same position within the frame.  It's not as easy as it sounds and this is the part that takes practice and a bit of luck.  Keep shooting while the subject moves past you.

1/15 sec, f/11 at 53mm
Go out and give this a try.  It will take a lot of practice so be patient. You can practice by heading to most any downtown area where there are cars or people passing by.  Add your comments to this post to let me know how you're doing.

Sunday, June 16, 2019

Let's Get Rid of The Noise

I don't usually do software reviews but sometimes I run across a tool that is so much better than what I have to work with that I have to tell others about it.  This time it's DeNoise AI from Topaz Labs

I have plenty of photo editing tools, including Lightroom Classic, Photoshop, and On1 Photo RAW 2019.  Until recently I have resisted the siren call of the latest greatest piece of software that will make all my photos look fantastic.  I find it's better to be proficient in a few than to have a toolbox of expensive packages that I rarely use.  About a month ago I saw a review of the DeNoise AI package and thought I would give it a try.  Several friends use Topaz Labs software but I had not gone down that path.  They offered a free trial so I decided to give it a try.  I'm glad I gave it a try.  I'm now the proud owner of another piece of software for photo editing.

The reason I decided to put the $79.99 down and buy a copy is the quality of the images that come out of the software.  I like to photograph birds, which means I'm shooting at shutter speeds of 1/1000 - 1/2000 second.  My long lens that I use for bird photography works best at f/6.4.  That means I am often shooting at high ISO values that result in noisy photos like the one below.

1/1000 sec at f/6.4 ISO 12800
This photo is cropped down to about 25% of the original size of the RAW file out of my Fuji X-T3.  You can see the noise in the background.  That's more noise than I like.  I used the Lightroom Noise Reduction tools and was able to remove some of the noise, but lost some of the details in the bird.

Lightroom Noise Reduction Applied

The last version was editing using DeNoise AI.
Topaz DeNoise AI


The Topaz software was better at removing the noise and did a much better job at retaining the details in the feathers, eye, and claws.  If you want to compare each version, click on one and then use your arrow keys to flip through each one on your screen.

The DeNoise package is easily called from within Lightroom or Photoshop.  You can also open and edit files outside these packages.  It an take a few seconds to process the image.  On my desktop system it makes good use of the graphics card processing power to speed up the process.  This is something Adobe has yet to get working correctly. You experience may vary, especially if you are using a laptop.

Here is another example showing before on the left and after on the right.


This is not a tool I will use all the time.  A properly exposed image with ISO values of 800-1600 may not need to be run through DeNoise AI.  However, I will be using it on any high ISO images where that nasty grain shows up.

Now, the team at Topaz Labs is not perfect.  Their website has many broken links and I know of one photographer who had trouble getting their copy activated after purchasing.  He had some difficulty with their tech support but in the end, he got it working and is happy with the product.

I suggest you give the free trail a test drive and decide for yourself.  Use this coupon code for 15% off any Topaz product.  http://topazlabs.refr.cc/richards

Sunday, May 19, 2019

Using Exposure Compensation

“Each day brings new opportunities, allowing you to constantly live with love—be there for others—bring a little light into someone's day. Be grateful and live each day to the fullest.
― Roy T. Bennett, The Light in the Heart

Light is the most important part of photography.  Without it, there would be no image, no memories, no joy in a photograph.  But, too much or too little light can be detrimental to our photos.  Understanding light is key to making better photos. 

Our cameras don't understand light.  They have powerful computer processors that measure all the light coming in through the lens and hitting the sensor, but they don't know anything about the subject, what is important in the photo, or what is unimportant.  The software developers who program those processors write algorithms to take all the inputs and make a decision on the three factors that make up the exposure triangle - shutter speed, aperture, and ISO.  Depending on your camera settings one, two or all three of these are constantly being adjusted depending on the light the camera sees at that instant.  Without knowing your composition your camera can sometimes make bad decisions.

Take this photo as an example.  The conditions were harsh.  It was a bright sunny day with harsh direct light.  The breeze was blowing and the Columbine flowers were in constant motion.

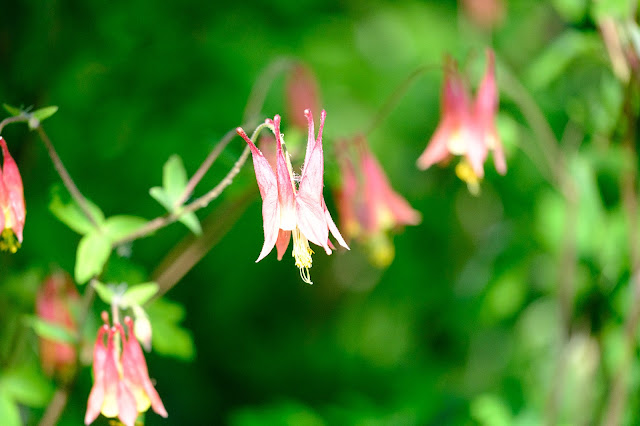
1/4000 sec, f/2.8, ISO 1600

I was shooting with an aperture of f/2.8 to create a shallow depth of field making the center flower stand out from the background.  The high ISO was to get a very fast shutter speed to freeze the motion of the flowers.  The camera saw all the light and decided on a shutter speed of 1/4000 of a second.  Even with that fast shutter speed, there was too much light.  Although the overall exposure was not bad, the main subject was overexposed and the photo was ruined.

There are a number of ways to fix this, and none involve post-processing (editing) on a computer later.  If you are comfortable shooting in full manual mode, you set the aperture, shutter speed, and ISO while keeping an eye on the histogram.  My personal preference is to stay in aperture priority mode, where I spend most of my time, set the ISO, and let that advanced processor in the camera figure the shutter speed at that instant.  Remember I said the flowers were constantly blowing around.  That made the light constantly changing.  Instead of setting the shutter speed myself I gave the camera a hint that the exposure needed to be turned down. 

Almost every camera (even some cell phones) has a setting called exposure compensation.  It is often a button on the top or back of the camera that has a +/- symbol.  Some cameras have this setting buried down in a menu.  This typically only works when the camera is in Program, Aperture Priority, or Shutter Priority mode.  By using exposure compensation I was able to tell the camera to alter the calculated exposure by a given number of stops.  In this case, I dialed in a -2 EV exposure compensation and shot again.  I also lowered the ISO to 400 because I didn't need it that high to get the shutter speed I was wanting.

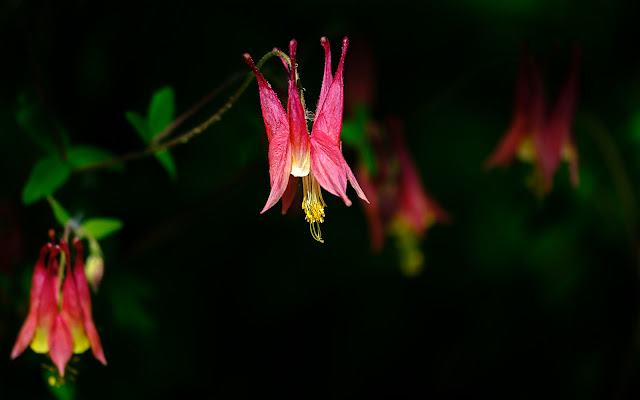
1/6000, f/2.8, ISO 400
Now, the subject of my photo is properly exposed.  The background is now almost black.  That works great because the background is unimportant and making it dark it makes the red flower jump out.

A common exposure problem occurs when the background is brighter than the subject.  By default, the camera will expose so the subject is dark and the background is correct, like in this photo.


By dialing in a +1 2/3 EV exposure compensation I am able to brighten the bird so that details in the feathers and eyes can be seen.  By making this adjustment the sky becomes overexposed.  This is fine because the subject is the bird, not the sky.

The key to knowing when to adjust the exposure compensation is knowing what the subject is and if it is properly exposed.  If the subject is too bright or too dark, throw in some exposure compensation to properly expose the most important part of the photo.

You may be tempted to assume you can correct the exposure later in post-processing.  Don't be fooled.  Parts of your photo that are overexposed often cannot be brought back and brightening underexposed photos can introduce digital noise.  It's much better to get the exposure right when you make the photo than to try to correct it later.

If you find this tip useful please subscribe to my blog to get future tips emailed to you.  If you have questions, feel free to contact me and I'll do my best to answer them.

Wednesday, February 20, 2019

Slow down and wait for it

On a recent trip to Death Valley National Park, I was out wandering the Mesquite Flats Sand Dunes early one morning.  I was looking for lines and shapes in the dunes that might make interesting compositions.  It was just over an hour past sunrise and the sun was still low in the sky, giving some nice side light.  It was also overcast and the sunlight was constantly changing.

I made the first shot below while the sun was between clouds.  I had hiked all over the dunes looking for a composition like this with a leading line, ripples in the sand, and no footprints.  The low side light produced some nice dramatic shadows in the sand, which was also one of the elements I was looking for. 
First Shot
 About 30 seconds later the sun went behind a cloud and without moving the camera I got a different photo.
Second Shot 
I actually like the second shot better.  There was enough indirect sunlight to make the ripples in the sand and the shape of the dunes stand out, without the high contrast shadows.  What looks good is subjective and you make like the first one better. The thing about art is there is no right answer.

Sometimes we shoot like we are in a hurry.  Set up, make the shot, move on to the next one.  It pays to slow down and wait for different lighting.  You don't know what you will get.

Friday, February 15, 2019

Basic Photography Class March 28, April 2, 4 and 9.


I will be teaching my Basic Photography Class starting on March 28, 2019.  The class will start out with learning the basics of photography - light, shutter speed, aperture and how to use them on your camera.  From there we will get into color, composition, lighting, techniques and photographic gear selection.  We'll talk about some common photography
challenges and how to overcome them. We will go over different photo editing packages, organizing photos, printing, and sharing online.   The class will be a combination of classroom teaching, practicing our new photography skills, and reviews of photography assignments.

The class is designed for a photographer who has a DSLR, mirrorless camera, or advanced compact camera.

Classroom sessions are March 28, April 2, 4 and 9 from 6:00 PM– 8:00 PM in the Eastman Employee Center.   There will be one field trip on Saturday, April 6 to practice what we have learned.  The Saturday time will depend on what works best for the majority of the students.

In every Class we will have time for:
  • Review of Homework – yes, we are in school again.
  • Teaching
  • Problem Solving - Bring your camera and problem photos to class
  • Questions and Answers

The class is open to Eastman Camera Club members.  The good news is anyone can join the club by going to http://eastmancameraclub.com/ and clicking on About near the upper left of the page.

Cost - $45/person.   Maximum of 14 people per class.  Call Eastman Recreation Office at 423-229-3771 to sign up.   This is a popular class and always fills up so don't wait.  Contact me if you have any questions.

Saturday, February 9, 2019

Change Your Perspective

Here's an example that shows how changing your camera position relative to the subject can make a difference in your photo's composition.

I took these two photos earlier this week in Joshua Tree National Park.  The first one was taken at 5:52 PM using a focal length of 52mm (78mm in full frame equivalent terms). 

52mm from closer

I intentionally stood where the crescent moon would be between the branches.  I like that composition, but I didn't stop there.  I took several more shots of the moon and that tree.  

88mm from farther away

The second photo was taken less than two minutes later.  I stepped back several feet from the tree and zoomed in to 88mm (132mm).  Simply moving changed the position of the moon relative to the tree.  Zooming in also increased the size of the band of warm sunset color and made the moon appear larger relative to the tree.

Neither composition is "right".  With all art, it is a matter of personal taste.  I hope you enjoy one of these photos and get some value from this blog post.  Please leave a comment and let me know.

Friday, January 11, 2019

Welcome New Subscribers. Here's something on Black & White Landscapes

Can converting a color photo to black and white improve it?  What type of photos work better as black and white?  How is shooting for black and white different?

I've been writing this blog for several years.  Sometimes I write a new post almost weekly.  Other times, I'm not so diligent.  Recently there have been several new people subscribe to the blog and that has motivated me to try to do better.  Here's my first post of 2019.

Winter in East Tennessee can be challenging for nature/landscape photographers.  The trees are bare, there are no flowers. In fact, there is very little color to be found during the winter months.  When blessed with a nice snowfall we have abundant opportunities to make some beautiful photos of snow scenes, but that doesn't happen very often.  Except for sunrise rise and sunset, most days are grey and blah.

Some of the best color in the winter is around streams where moss grows on the rocks, like in this photo from Rocky Fork State Park.
Rocky Fork
Streams and waterfalls are some of my favorite subjects to photograph.  I try to capture the movement of the water using a longer exposure of around 1 second.  This can result in a photo with bright white water and darker surrounding objects.  I've found high contrast scenes like this can be dramatic when converted to black and white.
Converted to Black & White
When color is removed the composition and the tonal range of light in the photo become more important.  The tonal range of your landscape is basically the amount of highlights, darks, and every shade of grey in between. Highlights are your brightest whites, darks are your dark blacks.

When you are shooting a black and white photo, you should shoot in color and convert to black and white in post-processing.  That will give you the most control of the tonal values when editing the photo later.  If you shoot in black and white you will not be able to change the tonal values of different colors, such as making the green moss brighter in the example above.

You have to think differently when composing a black and white photo.  Without color, you’re dealing strictly with light tones now.  You should try to use that to your advantage when composing your shot. Instead of relying on color to separate your subject or draw the viewer's eye, look for light to create a dramatic photograph.  Shapes and lines can be important compositional elements in a black and white photo.  Often a high contrast photo will work great as a black and white.  Things such as texture become more important when color is removed.
Glacier National Park

The photo from Glacier National Park is one of my favorite black and white landscapes.  There is dramatic light, high tonal range, interesting clouds, and plenty of detailed texture in the trees and mountains.

Visualizing a scene in black and white is a skill that can take some time to develop.  Setting your camera to black and white can be a helpful tool when trying to visualize the black and white shot.  Just remember to take a color shot as well.

Below are a few examples from a recent trip to Rocky Fork State Park near Flag Pond, Tennessee. 


Making black and white photos can be fun.  Give it a try and let me know what you come up with.