Sunday, December 29, 2013

What I Learned in 2013


I learned this, at least, by my experiment: that if one advances confidently in the direction of his dreams, and endeavors to live the life which he has imagined, he will meet with a success unexpected in common hours.”
― Henry David Thoreau, Walden: Or, Life in the Woods 

I have tried to advance my photography in a positive direction this year.  I've gone new places,  tried new things and learned all along the way.   My experience says Thoreau was right -- "we will meet with a success unexpected in common hours".  I usually go out with a photographic objectives in mind.  I want to try a new technique, photograph a new subject, get that iconic shot, and better yet get the one that no one else has.   Sometimes I meet my objectives, but more often I learn things and have success in unexpected ways.   Of course photography is a passion so I'm going to have a good time.

As I look back on 2013 I have decided to not do a "best of 2013" collection.   I've already shared my best shots on my calendar, on Google+, and on facebook and no one really wants to see them again.  Instead I have decided to share some things I have learned this year and some successes I have had at unexpected times.  These are not my best photos of the year but they can illustrate a point.

If you click on any of the photos below you will get a window with a larger version.  You can then use the right and left arrows to browse through the images.

Here goes.
  • If you try new things you'll learn something new.  If I go at it with the right attitude I will have fun, even if I don't get anything worth sharing.   I've tried water drop photography a couple times and done it differently each time.  You never know what you'll get.
  • You don't always have to go far to find opportunities.   The photo below was taken a short walk from the lodge where we were staying.  We had taken an eagle tour, drove around the lake and didn't find any better opportunities than right next door.

  • There are always photographs to be made, if you just look around.   The photo below was shot from an overlook on the Blue Ridge Parkway one cold morning when snow was still covering the road.   It's not what we were looking for that morning.

  • If you don't try you'll never get the shot.   I shot this photo of a very active bee while hand holding my camera.   It's a low probability shot, but if I didn't try my probability would have been zero.

  • Rainy days are great times for photography in the woods.  It was raining pretty hard when I took this.  The rain drops don't show because of the slow shutter speed.  The overcast light was great and the rain made the colors more vibrant.

  • Shoot the details.  This is just part of a steam locomotive I shot this year.  Because I shot this detail of a lamp I had a customer buy three large canvas prints of the Shay #4 engine, including this one.

  • Don't shoot from the first place  you set your tripod.   My first position for this shot was a few steps to the left and the mountain in the distance wasn't visible between the trees.  All that was visible was blah white sky.  I took a few steps to the right and got a better composition.

  • Get away from the crowd.  I took the shot below while on a photography workshop.  I don't think anyone else got this shot because June and I were the only ones that didn't follow the crowd down the mountain that day.

  • Be aware of your surroundings.  While photographing a waterfall we noticed this American Dipper (aka Water Ouzel) catching food in the stream. We then noticed a juvenile near by on a moss covered rock.  I put my long lens on, waited and was rewarded.

  • Don't be timid.  Just act like you belong there.  At a concert at the Ryman Auditorium in Nashville  I walked up to the edge of the stage to shoot this. 

  • Don't give up when you're lost.  On the way back home after a weekend away we stopped for gas and saw a sign for a waterfall and took off up the mountain.  After a while we realized there was no waterfall where we were.  It was getting dark and we had a long drive ahead of us.  We could have given up but instead we tried and eventually found the right road.

  • Have fun.  This Ibis was perched on top of the bird food dispenser.    He must not have read that is said "Feed the ducks, geese, and swans."  

  • Finally, give back and help others.   I volunteer to take pictures at a couple different community events.  They get some free photography and I get to try new things.

I've learned a lot this year and improved a little.  I hope you get something from what I've learned.  

“It's not about what it is, it's about what it can become.
― Dr. Seuss, The Lorax

Saturday, December 28, 2013

Evolution of a Composition

I haven't been out shooting much lately.  Winter in East Tennessee does not provide many opportunities for beautiful landscapes.  The colors are grey or muted brown.   It does not snow often and when it does I'm usually at work. 

Today was different.  I checked the weather forecast last night and saw that they were calling for 30% cloud cover at dawn.   You have to have some clouds to get a good colorful sunrise, but not so much that the sky becomes overcast.  Thirty percent sounded pretty good to me so I set the alarm. 

It was worth it!  Here's what June and I witnessed this morning.


Pretty special, huh?  

Afterwards we drove around a bit looking for other opportunities and found ourselves at the shore of Patrick Henry Lake.  I was hoping the sunrise would light up the fog on the lake but it didn't happen.  At June's suggestion I shot this.

 
I always listen to June's suggestions.   My photography is better when she is with me. 

The photo above is cropped and a little tone adjustments were added.    The colors are too blah but the contrast between the bare trees on the left and the fog is interesting.   When there is little color but interesting contrasts it's a good idea to convert to black and white and see how it comes out.

I think this is more interesting than the color version, but the real interesting part of this shot is the branch sticking out of the fog on the left side.   This was shot at 200mm.  I really needed to zoom in closer to isolate that section.  I could have gotten my 300 and 1.4 teleconverter to more than double to focal length but I was too lazy to walk back to the car. 

I decided to crop the photo to isolate what I thought was the interesting part.  The problem is this reduced my 21 megapixel original down to a 1.9 megapixel photo.  OK for a small version on facebook, but too small for anything else. 

I got a copy of Perfect Resize for Christmas.  Using that software I was able to enlarge it back to 16 megapixels, more than big enough for most anything I want to do with it.


This composition evolved from the original as shot, to a wide crop, to a black and white, to an extreme crop black and white.   I like the last one, but each one is different and conveys a different mood.

This has been a pretty good day for shooting.

Wednesday, December 25, 2013

Calendar Chronicals - The End of 2013

Christmas is behind us and there are just a few days left in 2013.   I have one more photo to share from the 2013 calendar and that's The Joy Boat on the back.

AM Shot
As I said in an early post, we found this boat on the shore of Swiftcurrent Lake on the way to Grinnell Glacier in Glacier National Park.   We passed it at 9:42 AM on the way up and again at 5:30 PM on our way back.  Both times we stopped so I could take some shots of the boat with the lake and mountains in the background.  

I've learned to take the shot when I see it and don't count on getting it later.  You never know what the conditions will be later.   The boat might not have been there later, it could have been raining, and the light would be different. 

PM Shot

The conditions for the morning and evening shots were similar.  Other than the direction, the light was pretty much the same.   I composed the shot differently each time.  We were in more of a hurry in the morning and didn't stay long at the boat.  After a day of hiking we were too tired to move quickly in the evening.  After spending some time with our tired feet in the cold lake water we stopped again and I took a little more time composing the shot the second time around.  

The morning shot was taken at 17mm, the widest lens setting I have.  The afternoon was taken at 24mm, which didn't distort the boat as much and brought the trees on the far shore in closer.   I also took the afternoon shot from a lower position to get a better perspective on the boat.  I didn't include the mountain peak in the afternoon shot because it was pretty dark a featureless due to the angle of the sun. 

I have two different shots of the same subject.  I prefer the afternoon because of the sunlight and the camera angle. You may prefer the morning shot with the mountains.  There's no right or wrong answer.

The verse for this photo is Psalm 30:5 - "Joy comes in the morning".  As we wrap up another year we can look forward to God providing joy in our lives.  We will all have trials in 2014 but God promises Joy.  All we have to do is ask and it will be given.  

I hope you have a joyful 2014.   Stay tuned as the Calendar Chronicles continues in 2014.

Sunday, December 1, 2013

The Calendar Chronicles - December 2013

The photo for December 2013 was not taken in the middle of winter but in September 2012 just a few days after the November calendar photo and is also from Glacier National Park.   I choose this photo for December because it is a very peaceful scene, perfect for the Luke 2:14 verse.  People have told me that they would love to be sitting in those chairs.  I can't blame them.


Sunrise ViewFrom The Many Glacier Hotel
"Glory to God in the highest, and or earth peace to men on whom his favor rests"

This is the deck of the Many Glacier Hotel on Swiftcurrent Lake in Glacier National Park.  This beautiful hotel sits right on the lake with view of the Grinnell Glacier off in the distance.  This morning was one of the few times there wasn't white caps on the lake. 

Here's the front of this hotel to give you some perspective.


Many Glacier HotelClassic panoramic shot.  We stayed here four nights.  Best place in the park!
Many Glacier Hotel

The Many Glacier Hotel was completed in 1915 by the Great Northern Railway as part of a series of hotels and back country chalets in the park. The locations were carefully chosen so the distances between hotels was a days ride by horseback.  The foundation of this historic hotel is made of stone, with a wood superstructure. The four-story lobby is surrounded by balconies, whose railings are patterned after Swiss designs.  The massive pillars holding up the roof over the lobby are tree trunks.

Many Glacier HotelThe lobby was the place to hang out.  Most of the time it was filled with people (this was 7:30 in the morning) because it was the only place to get a wifi signal.  Those columns are tree trunks.
Lobby of The Many Glacier Hotel
The photo above was taken around sunrise before most people were up.  Normally the lobby is full of people with laptops and tablets because it was the only place you could get a wifi signal and internet service.

The calendar photo was taken shortly after sunrise and the sun was just lighting up Grinnell Point across the lake.  The night before I had gone out on this same deck to try and get some pictures of the star filled night sky.  The wind was so fierce that those chairs blew across the deck and about knocked me down. 

As with most of my photographs this shot was taken with my camera mounted on a sturdy tripod.   The aperture was a tiny f/22 which allowed me to have the chairs and mountains all in focus.  This meant I had a long shutter speed of 3.2 seconds.  I also used a wide angle 17mm lens to be able to take it all in and emphasize the chairs.

After a hearty breakfast we took off and hiked the six miles to Grinnell Glacier.  Seeing a glacier up close is a special experience.  It's unfortunate that all the glaciers in Glacier National Park may be gone as early as 2030. You can see the glacier in the center of the photo just to the right of Grinnell Point.  It took us all day to hike to the glacier and back.  For some reason it takes us 4 times as long to get anywhere when I have my camera with me.  There must be some correlation there.

The photo of the Joy Boat on the back of the 2013 calendar was taken on our way back to the hotel that afternoon.

I am enjoying reliving the times when the calendar photos were taken.  I hope you are enjoying the photos and maybe getting something out of the stories and descriptions.

Sunday, November 24, 2013

Calendar Chronicles - November 2013

According to the American Heritage® Dictionary of the English Language a chronicle is

1. an extended account in prose or verse of historical events, sometimes including legendary material, presented in chronological order and without authorial interpretation or comment.

2. A detailed narrative record or report.

 Now that I am in the process of distributing my 2014 calendars I thought it might be fun to revisit each photo each month, give some details about how I took the photo, the place or subject and any stories that might go along with each.   I'm going to try and do this at the beginning of each month.  

Although it's now November 24, I'm going to start out with the November 2013 photo.  Here goes.

One day the trumpet will sound for His coming.  One day the skies with His glories will shine"  Glorious Day by Casting Crowns
Sunrise From Sun Point
Glacier National Park, Montana

This was taken on September 5, 2012 while on a vacation to Glacier National Park.   This day was extra special to June and I because 30 years ago to the day we were married in Aulander North Carolina.  We were blessed with a beautiful sunrise to celebrate our first 30 years together.  We spent the rest of our anniversary hiking to waterfalls, taking boat rides across beautiful mountain lakes, and enjoying Huckleberry Pie and Ice Cream.

Sun Point is a point of land sticking out into Lake Saint Mary just off the Going To The Sun Road.  A short 0.7 mile trail from the parking lot brought us to this point where we were the only people there to witness the sunrise.  When we got there the sun was not yet up but it was light enough to find our way to this high point above the lake looking east across the lake.   We were both excited about the possibility of a spectacular sunrise, however the excitement started to fade as we waited.  It was very cold and very windy up there.  Both of us had jumped out of the car too quickly and left our warmest clothes behind.  We were getting colder and colder waiting on the light to appear.   I had my photography to take my mind off the cold but June really wanted to go back down to the car and get some warmer clothes.  Because there were no other people around and there was a good chance of running into a bear I convinced her to stay with me.  How many wives would spend their 30th freezing to death before the sun came up.  I'm so blessed!

This photo is one of a 94 I took that morning before getting back to the car and cranking up the heat.   Yes, 94!   With the bright sunrise and dark mountains it was difficult to get a good exposure.  I was shooting multiple exposures using a feature called bracketing where the camera would take multiple shots under and over the exposure the camera calculated was correct.   That automatically gives me three times the number of images.   This photo was created by combining three exposures - 0.125, 0.3, and 0.6 seconds with an aperture of f/22, ISO 100 and a fairly wide focal length of 28mm.  Even with the bracketed exposures the mountains and gnarled tree branches appear almost black.

What I like about this photo is the cool cloud wisps that mirror the tree branches and the rich color contrast between the blue sky and orange clouds.   

I thought the lyrics from the Casting Crowns song really fit with this sunrise.  I can just imagine God coming on the clouds in a blaze of glory just like this.  What a great day!

A larger version of this photo is available on my gallery site by clicking here.   All photos are available as prints in a variety of sizes and material.

Wednesday, November 13, 2013

Don't Be A Liquid Crystal Display Chimp

Did you know that LCD stands for Liquid Crystal Display?   It's that little display screen on the back of your camera that shows you a miniature version of the shot you just made, plus a lot of useful information. It can also give you some misleading information and you may not want to trust everything it is telling you.

Do you know what chimping is?  According to the source of all Internet knowledge (Wikipedia)

Chimping is a colloquial term used in digital photography to describe the habit of checking every photo on the camera display (LCD) immediately after capture.

Regina Chimping
I do it and I'm sure most of you do as well.  We can't wait to see that prize winning photo we just took.   For me something often happens to the photo between the vision in my mind and what shows up on the back of the camera.

What are you looking at when you look at the back of the screen?  There can be a lot of useful information there for you depending on your camera display settings..   


Back of a Canon 5D Mark II
The display on the back of each camera is different.  The picture above is my Canon 5D Mark II.  I've set the display to show the RGB histogram (red, green and blue mountains), shutter speed (1/3 sec), f-stop (f/14), exposure compensation (+2/3), shooting mode (Av), white balance (AWB), file format (RAW), color space (Adobe RGB) and a few other pieces of information about the photo.  Most of this information is things you set on the camera before taking the picture and you don't need to chimp these.   The histogram tells you about the tonality of the picture you just took and if it is over or under exposed.   Pay attention to the histogram.  Other than checking the composition or focus you can pretty much ignore the picture display.

Most cameras automatically adjust the brightness of the LCD display to improve the readability in different light conditions.  Under some conditions it will appear bright and in other conditions it will be dark.   This does not tell you if the photo is properly exposed and you should not trust it when checking the exposure.

The most important piece of information on the screen is the histogram.  It will tell you if you photo is properly exposed.  You want the histogram to fall in the center of the graph and not bunched up against the left or right side.   The left side represents the dark areas of the photo and the right is the bright areas.  In this example the blue of the sky is almost too bright as shown by the spike on the right side of the blue channel.   I had a choice to make here.  I could have dropped the exposure to move the histogram more to the left, making some areas of the image too dark.  I have chosen this exposure to get as close to the right side as I can without over exposing.  This is called exposing to the right and is a good practice to follow.  More on that in a later post.

There is lots of great information available on histograms so I'm not going to try and explain something that others have already done a better job than I can.  You can check out

Understanding Histograms by Darren Rowse

 How To Read and Use Histograms by Darlene Hildebrandt
 
Camera Histograms: Tones and Contrast
Darlene Hildebrandt

It's OK to chimp as long as you pay attention to the histogram and don't trust the little image.

Sunday, November 3, 2013

Fixing lens problems when importing to Lightroom

If your lens is busted then Lightroom is not going to be able to help you out.  However, if your lens takes photos that are distorted, dark around the edges or have the deadly chromatic aberration then Lightroom can help.

No lens is perfect and they will all introduce varying levels of distortion to your images.  There are four kinds of lens correction Lightroom can do for you:
  • Barrel Distortion - the photo has a "bulging" effect, especially in the center
  • Pincushion Distortion - a squeezing of the center that distorts images in an inward sense.
  • Lens Vignetting - darkening of the sides and especially corners.
  • Chromatic Aberration - fringes of color along edges of dark and bright parts of the image
Lightroom comes with a database of lenses that include settings for correcting these problems automatically.  Because your camera embeds information about the camera and lens in the image file, Lightroom automatically knows what lens you were using when you took the shot and can apply the automatic corrections for that lens profile.

Lens Correction Panel in Lightroom 5.2

Here is an example of automatic correction of the shot with my 24-105mm Canon lens.


Before Lens Correction

After Lens Correction
It's not easy to see the difference without flipping back and forth (click on an image and you can then flip between them using arrow keys).  In the first version there is some barrel distortion that you can see by looking at the edge of the roof for the back corner of this store.  See how it curves up in the center?   This distortion is taken out in the bottom version and the room is straight.

The top version also has some lens vignetting that you can see shows up as darker areas of the sky in the corners.

Before
After 

Above is an example of Chromatic Aberration.  In the before version you can see a blue fringe at the edge of this bird's wing. In the second version I have clicked Remove Chromatic Aberration in the Lens Corrections Panel and the blue fringe goes away.   The CA will be worse when there is a strong sharp line between the light and dark sections, when the lens aperture is small, and with a lower quality lens.  If you do a Google search for Chromatic Aberration Examples you can see some better examples.


These are all nice features, but you don't want to have to turn them on for each image you are editing in Lightroom.  I have created a preset with Enable Lens Corrections and Remove Chromatic Aberration checked.  I then use that present when importing my photos.

Now when I import photos Lightroom will determine the lens and apply the appropriate lens corrections for me.   Give this a shot next time you are editing in Lightroom and let me know what you think.

I'm always looking for new blog ideas.  Have a question?  What to see some kind of example?  What do you want to see on this blog?   Just drop me a note to r.siggins@charter.net and let me know.

Friday, October 25, 2013

Skies

It's been a busy few weeks.   I haven't blogged in weeks and have barely done anything with my fall photographs and we had our first snow flakes today! Time is passing by quickly but June and I have found time to get out and enjoy God's creation in gold, yellow, and red before the leaves are all gone.

We took one day and drove up to Burke's Garden, Virginia.  It's a favorite place for landscape photographers but we had never been.  Burke's Garden is a bowl valley completely surrounded by Clinch Mountain.  The valley is reported to be the highest in Virginia at around 3,000 feet above sea level.  This elevation brings fall to Burke's Garden before many other places in our area.  

The day we picked turned out the be cloudy and overcast.  When we got into the valley the clouds had come down far enough to cover the surrounding mountains and even creep into the valley.   Overcast days can be great for some photographs but challenging for others.  One of the most valuable lessons for an outdoor photographer is to know what to shoot under different lighting conditions.   A cloudy overcast day produces fantastic soft light, obscuring shadows and eliminating bright spots.  It can also make colors more vibrant. 

In this first shot you can see how the clouds were hanging very low over the mountains.  The clouds thinned a little allowing just enough sunlight through to highlight the trees in this shot.  Including the sky in this shot puts it in perspective and tells more about the place and conditions.

In this shot of a road lined by beautiful trees in fall spender you can see how the soft indirect light allows the color to pop without being washed out by bright light.  The sky does not add to this photo but there was no way to get this shot without including some of the sky.

Most of the time you want to avoid including the sky in the composition if it is bland and uninteresting.  Below is the same shot with different crops.


In the second version I cropped out that bland sky.  I also cropped out the grassy foreground because I didn't think it added anything to the image.  If something doesn't add to the image then think about cropping it out.

The next weekend we took a side trip to Cataloochee Valley on the way to meet friends for the weekend.  At times we had the same overcast conditions but later in the day the clouds started to break up and create some different conditions.

With some interesting clouds in the sky I had some different compositional opportunities.  In this photo of an old barn the blue sky and clouds added to the photo.  The clouds are cool and the blue is a nice contrast with the fall colors.   To make this shot I had to use a graduated neutral density filter to compensate for the sky being much brighter than the rest of the image.   I don't use these filters on every trip but when I need them they make the difference between an impossible shot and something worth sharing.

Of course these bright conditions made other photographs very challenging.  I had to wait a while for the sun to go behind a cloud before I could get a picture of leaves in that little stream.  

The secret to getting good photos outdoors is to understand your light conditions.  Unlike the studio, you take what God gives you and make the best of it.


Sunday, September 8, 2013

It's Time For You To Pick Photos For My 2014 Calendar

Each year I make a calendar with some of my favorite photos from the past 12 months.  I then sell these calendars to raise money for Hope Haven Ministries in Kingsport.  Sales have increased each year and I'm excited to see how we do this year.

These are 12 month wall calendars that are 17 inches tall x 11 inches wide when opened.  Each page includes one of my best landscape or nature photographs from the past 12 months plus a relevant scripture or quote.

Anyone who intends to buy one (or more!) of these calendars can help pick the photos that will grace the pages.  This is a fun way for you to be involved and can tell your friends - "I picked that one!"

Here's how it works.   I have done the hard part of going through all my photos from October 2012 through August 2013 and narrowed the list of candidates down to 30.
One of my picks

  • One goes on the back cover
  • Four are my picks (I get to choose my favorites)
  • That leaves 9 to be chosen out of the remaining 25.

Here's how the very unscientific voting process works.
  1. Go to http://www.thesiggins.com/SpecialProjects/2014-Calendar
  2. Click on any of the photos to zoom in.
  3. You can then move forward or backward using the left and right arrow keys.
  4. Scroll through the photos, paying attention to the photo names at the bottom left.  Remember the vertical waterfall photo goes on the back and the last four are my picks.  Don't pick those.
  5. Pick your favorite 9 and send me an email to r.siggins@charter.net with the names of your picks.  This is the name that displays at the bottom left of the photo.
  6. Let your friends, neighbors, family, and random strangers on the street know about the calendars.  Spread the word.
I will tally the votes and announce the winners on Sunday September  22.

The calendars will be available around Thanksgiving and they make great Christmas gifts.   They are only $15 each.  The best part is the money stays here in Kingsport and goes to Hope Haven Ministries.

Wednesday, September 4, 2013

Keeping My Photography On The Level

According to The Free Dictionary on the web (which must be 100% correct because it's on the internet), the phrase "on the level" means honest; dependably open and fair.  In the case of my photography as in life I'm interested in staying on the level.

I have a problem keeping my camera level when I'm in the field.   When I get home I look at my pictures and they are obviously not level.  My water looks like it's running out the left or right side of my photo.  For what ever reason when I'm looking through the view finder I think I'm level, but in fact I'm far from it.  I need some help keeping my photography level.

The best tool I have is a hot shoe bubble level.  This inexpensive little device works just like a carpenter's level.   There are two or three bubbles inside a plastic cube that attaches to your camera hot shoe.  This first one is available from Adorama for only $5.95 with free shipping.   You attach it to your hot shoe, put your camera on a tripod, and adjust the camera until the bubble is between the lines.   If you have your camera on it's side shooting a portrait orientation, then you turn the bubble to attach on one of the other sides.  Pretty straight forward and easy to use.
I also have a triple bubble level, which eliminates the need to reorient the level when switching from landscape to portrait orientation.  A little bulkier and $24.95 at Adorama.

I recommend having one of these in your camera bag and using it when ever it's important to have your camera level.

My Canon 7D has a digital level built in.  I can turn it on and tell if my camera is level by looking at the LCD display on the back or even in the viewfinder.  Having it displayed in the viewfinder is very handy when you're shooting hand held.

Here's a case where having the camera level is essential.

Oregon Sea Stack Sunset
Teach me to do your will, for you are my God; may your good Spirit lead me on level ground.
Psalm 143:10

Sunday, September 1, 2013

Photography Under Adverse Conditions

I've hiked some good distances to remote places under adverse conditions for the opportunity to photograph some pretty awesome sights.  I've taken photos in rain, snow, freezing conditions, standing in a cold mountain stream, and on the side of mountains in winds that would blow my tripod over if I didn't hold it down.  Each of these conditions brings different challenges from keeping the camera dry to not getting blown off the side of the mountain.   Recently I ran into new conditions that presented a new challenge to me.

I almost always shoot with my camera on a tripod.   As long as my subject is not moving, using a tripod gives me the sharpest photos possible.  It allows me to take long exposures without having to worry about camera shake. 

On a recent trip to Nashville I went to the Serious Steel: Art Deco Automobile exhibit in the Center for Visual Arts with my friends Kent Ervin and Pete Culotta.  When we bought our tickets the lady and the counter said "No Tripods or Camera Bags Allowed".   I turned my forbidden gear over to the concierge, got my claim check and went in with just my Canon 5D Mark ii and a 17-40mm, f/4.0 non-stabilized lens.  This was going to be interesting.

The first challenge we ran into when we went in to the exhibit was the crowds.  It was difficult to get shots of the cars without people in the frame.  Even when they weren't in the picture their reflections were in the ultra shiny paint and chrome.  This took some patience and creative positioning.  It amazed us how long people could stand in one place.

The second challenge was the low light.  I found if I set the ISO to between 3200 and 5000 I could get speeds fast enough to get a decent shot hand holding the camera.  My slowest speed was 1/15 second!

I had a couple things going for me.  First the Canon 5D Mark ii does pretty well at low light and high ISO levels of 3200 and up.  Second, using a wide angle lens I could get away with  little camera shake that would have ruined photos at 25mm or higher. 

We ended up walking through twice and I got a handful of shots that I was happy with.

17mm, 1/15 sec, ISO 3200, f/5.0

17mm, 1/60 sec, ISO 3200, f/4.0

17mm, 1/125 sec, ISO 3200, f/4.5

33mm, 1/60 sec, ISO 5000, f/5.6

32mm, 1/80 sec, ISO 5000, f/5.6

40mm, 1/60 sec, ISO 5000, f/5.6
I used Nik Define 2.0 software to remove the digital noise that introduced to these photos due to the high ISO settings.   It's my go to tool for cutting through that digital static and does a great job.

All in all not a bad day.  After picking up our gear we were off to the next destination with a little more light and a few less rules.

Sunday, August 25, 2013

How to get both motion stopping and bluring shutter speeds in one image

If you've looked at my online photo gallery, especially the Waterfalls section, you know I enjoy photographing moving water.  My favorite technique is to use a slow shutter speed to make the flowing water appear silky and smooth.  Unfortunately, sometimes other elements in my photo that I want sharp are also moving.  This is especially challenging at the bottom of waterfalls because the falls themselves can produce a nice steady breeze that keeps the foliage in constant motion. 

I have recently started using a technique that keeps elements sharp that I want sharp and blurs the parts I want blurred.  This technique involves taking two exposures at different shutter speeds and blending them into one photo using photo editing software.  This is more advanced editing than I typically do on a photo but it can produce beautiful results.

Here's a recent example where I used this technique.

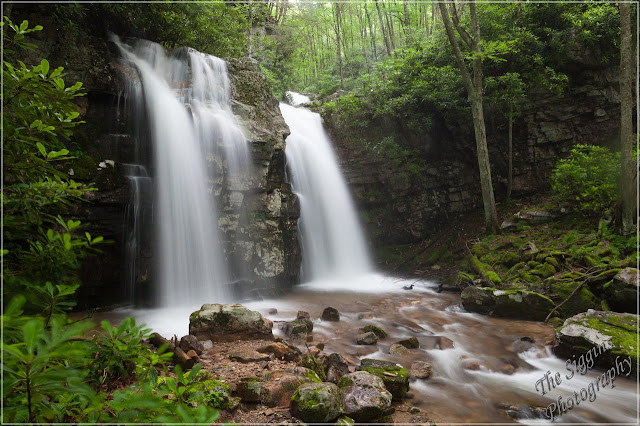
1.6 sec, f/20, 24mm, ISO 800
As you can see in this first photo the long 1.6 second exposure produced the pleasing blurred water effect I was wanting but the rhododendron leaves on the left were moving and blurred.  Most of the leaves around the base of the falls were moving but the movement of those that were further from the camera were not as noticeable.  I could have solved this problem by stepping to the right so the moving rhododendrons were not in my photo, however I wanted to include them because they framed the falls and also added a sense of depth to the photo.

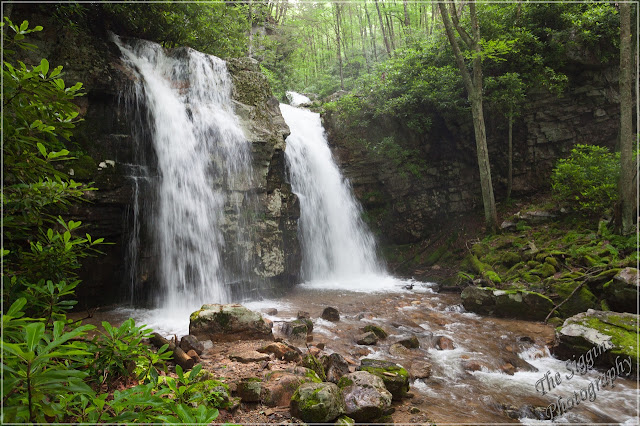
1/30 sec, f/4, 24mm, ISO 1600
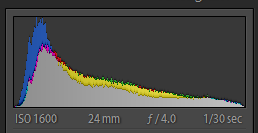
Without moving the camera I changed the settings to get a shutter speed that was fast enough to keep the rhododendron leaves sharp.  Because it was pretty dark under tree canopy I had to bump up my ISO to 1600 and open up my lens aperture to f/4 to get this speed.  Because I am going to blend these two photos together when I get home the tonality (brightness) of the two exposures need to be as close as possible.   If one photo was much brighter than the other it would look unnatural when blended.   I managed the tonality by shooting in Aperture Priority (Av) mode and letting the camera set the shutter speed accordingly.  I could have done the same thing by setting the shutter speed in Shutter Priority (Tv) mode and letting the camera adjust the aperture.  I verified the tonality of the two exposures were close by comparing the histogram for each on the back of my camera.

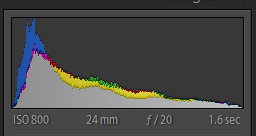
Histogram for first exposure

Histogram for second exposure
A histogram is a simple graph that displays where all of the tonality or brightness levels contained in the image  are found, from the darkest on the left to the brightest on the right.  You can see the two histograms above are not exactly the same but they are about as close as they can be in an environment where the lighting conditions are constantly changing.  Another important thing to remember is to take your two shots as close together as possible to minimize changing conditions.  If the sun had come out from behind the clouds between the first and second exposure then the tonality might have been very different, which would make blending later more challenging.

To use this technique you also need to make sure the white balance is the same between the two photos.   You can do this by not using auto white balance and setting the white balance on the camera or shooting in RAW mode and setting the white balance using photo editing software.  Since I pretty much shoot RAW all the time I didn't worry about setting the white balance on the camera.

When I download the photos into Adobe Lightroom I have two photos that are almost identical except for the shutter speed.  I need to take parts of each photo and blend them together into a new photo.  I used Photoshop Elements version 11 to do this.  You can use Photoshop for this, but I prefer Elements because it does everything I need and is only $65 versus over $600 for Photoshop CS6.

The blending technique using layers in Photoshop Elements is a bit advanced and more than I can cover here.  There are many free resources online that explain how to use layers.  Here are two video tutorials that are helpful:
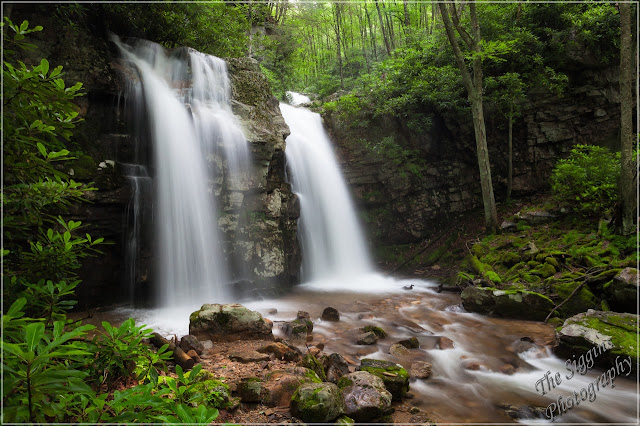
In Photoshop Elements I created two layers from the two exposures and used the layer mask tool to reveal the rhododendron leaves from the second photo while preserving the rest of the photo. Instead of using a gradient tool like in the tutorial, I used the black paint brush over the leaves.  I was careful to not paint over the water, which would have revealed the water from the second photo, which I didn't want.

These two photos were pretty easy to blend together using layer masks because there was good separation between the leaves and the water.   If the water had been behind the leaves the layer mask would have been tedious and time consuming to create.   This is something to remember when composing the shot.

I saved the blended photo as a new file then used Lightroom to adjust the contrast, clarity, saturation, sharpness, and add a vignette. 
New Blended Photo
Once you had done this a couple times you will find it's pretty easy, as long as you think about blending when taking the photos.  Four things to remember -
  • No camera movement between shots - camera on a tripod.
  • Tonality of the two images as close as possible - shoot quickly.
  • Two images must have the same white balance.
  • Compose to minimize visual overlap of the elements to be blended.
Please let me know in the comment box below if you find these tutorials helpful and if there are others you would like to see here.  Feel free to share on facebook, Google+, etc.