Wednesday, May 24, 2017

Landscape Photography Tips - When to get the best light.

Last Thursday I did a little program on Landscape Photography for the Eastman Camera Club.   We had a good turn out, but some people were not able to make it.   I've been asked for copies of my slides and I saw a few people taking pictures of the slides, which is a fine way to take notes.  Rather than sharing my entire presentation without notes, I'm going to give some tips from that program here. This is the first of what I think will be a few posts over the next week or two.


The program was divided into the following five sections from most to least important:
  1. Light
  2. Subject
  3. Composition
  4. Techniques
  5. Gear
Note that gear is listed last.  In my opinion, a high-quality professional camera, lens, and accessories in the hands of someone who doesn't understand the first four points may be a waste of money.  A skilled photographer can make quality photos with a variety of gear.  Some professionals even make and sell photos with their cell phone!  Don't get me wrong - quality camera gear is important, but it is more important to focus on the first four points.

All you really have to have to make great landscape photos is:
  • A camera or lens that lets you shoot wide angles.   I like something that starts around 17mm on a full frame camera or 13mm on a cropped sensor camera.
  • A camera or lens that lets you zoom in and isolate a subject.  A lens that lets you zoom out to somewhere between 200mm and 300mm (full frame equivalent) will meet most of your needs.
  • A tripod.  See my earlier post on tripods.
You will find lenses with focal lengths between the wide angle and telephoto useful. There are a number of other accessories that are useful, but not required.  I'll post about those another day. To quote Forest Gump - That's all I'm going to say about that! (for now).

In my experience, light is the most important factor that goes into making great landscape photos. Unlike photographers who work primarily indoors, a landscape photographer can't control the light. What we can control is when and where we make our photos.

  • Time of day and direction of sunlight
  • Season
  • Cloudy or clear skies
  • Wind
Each of these four factors impact the quality of landscape photos.

Best Time of Day
Golden Hour

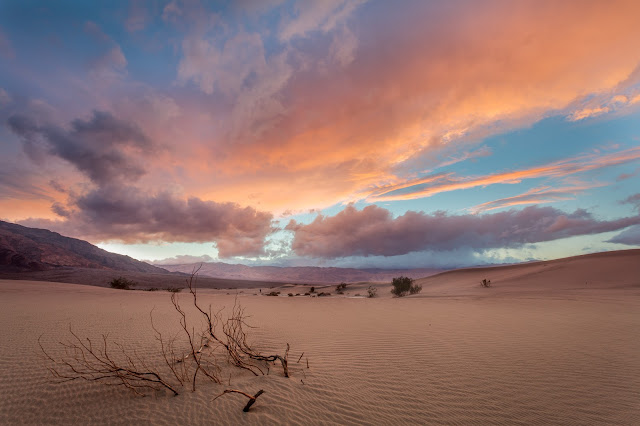
The best time of day for landscape photography is the golden hour - the hours after sunrise and before sunset.   At this time of day, the sunlight will be soft, warm and low.  Add some clouds and the golden hour can also be very dramatic. In the photo above, the sun was behind me and lighting up the clouds with a warm orange color. The orange clouds also provided some nice color contrast with the blue sky. This warm cloud color reflected down on the sand, making it appear warmer.  The low angle of the sunlight also emphasized the ripples in the sand adding an interesting foreground element.

Now imagine if you will what this photo would have looked like around mid-day. The sun would have been high overhead and the ripples in the sand would have been almost impossible to see in the photo. Here's a photo made nearby in the early afternoon.
Mid-day
Because the angle of the sunlight is high it's difficult to discern the layers in the dunes and mountains. This makes the photo appear flat and less interesting.  The color does not have that warm pleasing look like the previous photo. The second photo does have a desolate feel to it.  If your shooting a cover for "A Horse With No Name" this may be exactly the right photo to tell that story.

Below is a great example of how the quality of the mid-day and late afternoon sunlight can make all the difference in a photo. The photo on the left was taken at mid-day when the sun was shining down on a creek in a small canyon in Glacier National Park. The light is direct and harsh and the highlights are too bright. The second photo was taken a few hours later on the same day. The light in the second photo was indirect, soft and the tonality is balanced. A few hours makes the difference between a photo destined for the bit bucket and a keeper.  


Besides the golden hour light, there is another reason to shoot around sunrise and sunset. Those are the times when the wind is typically the calmest. If you want to make a photo with a mirror like reflection in a water surface or no movement in vegetation you should try to be there around sunrise. The early morning winds will usually be calmer than those around sunset.
Early Morning Reflections
Don't pack up and leave after the sun sets.  Just before the morning golden hour and after the evening golden hour is what's called the blue hour when the sun is significantly below the horizon.  During the blue hour, the sky will take on a beautiful blue shade.

Blue Hour
As landscape photographers, we can't control the light, but we can control when we make our photographs.  This may involve getting up hours before sunrise and staying out hours after sunset. The middle of the day is reserved for taking naps!

The material in my presentation to the Eastman Camera Club and this post come from my Basic Photography Class.  The class is four two-hour sessions plus a local field trip to practice.  I will be scheduling another class later this year after summer vacation times.  If you would like to be notified when the class is scheduled, send a note to rcsiggins@gmail.com.

Saturday, May 13, 2017

Exploring Our Backyard - Phipps Bend

If you've read my blog before you might remember that I am participating in a photography challenge to take at least one photo each week that meets a weekly challenge.  This week's challenge is to make a photo in your own back yard.  I did that, taking a photo of some potted plants.  On Thursday I took the challenge a little further and expanded my "back yard" to Hawkins County Tennessee and the Phipps Bend Wildlife Preserve.

Those who have lived in this area since the late seventies and early eighties will remember Phipps Bend as the site of a TVA nuclear power plant that was never completed.  The project was 40% complete when it was abandoned in 1981, leaving the skeleton of cooling tower base and a few buildings.
Abandoned Cooling Tower Base
Since then, the Phipps Bend Industrial Park has grown up next to the TVA site and the Tennessee Valley Authority (TVA) has also created a wildlife preserve between the old site and the Holston River.  A 3-mile out and back hiking trail/gravel road snakes along parallel to the Phipps Bend in the Holston River.  This easy level hike passes by beautiful ponds, wetlands, wide grassy fields, and the river.  We were there to see and hopefully photograph some wild birds.

What we found was a beautiful area full of wildlife, flowers, and yes, some colorful birds.
Yellow Flag "Batman"  Iris

Oxeye Daisy
 With the exception of one hiker and two equestrians on horseback, we didn't see any other people.  We did see more than a dozen white-tailed deer in the tall grass and one large snapping turtle on the trail.
Can you see me?

Indigo Bunting

Orchard Oriole 
These are just a few of the photos I made on this trip.  My bird photography skills need some work and we have plans to go back next week to try again.  I am more happy with some of the other photos from this trip.  I am trying something new to share these photos.  I have made a 2:40 slide show that shows my 27 favorites from that day that tell a story.  I hope this works and you enjoy the show.


Thursday, May 4, 2017

A Fun Little Experiment With Lady Slippers

That catchy little title is meant to get your attention. No, I'm not wearing June's house slippers. This experiment involves photographing the Lady Slipper flower on Buffalo Mountain in Johnson City, Tennessee.

June and I went hiking on the Lady Slipper Loop Trail with our friends Dina and Peter. We had great conditions for close-up flower photography.  It was late in the afternoon, the skies were overcast, and there was no breeze at all. Best of all, these rare wild orchids were abundant along the trail. Thanks to Dina and Peter for guiding us right to the flowers.

This time I brought along my flash and two remote triggers. I don't normally bring these along on hikes but I wanted to try a little experiment with the flash and flowers.  I placed one remote trigger on my Fuji camera and the other on my old Canon flash.  I was using both camera and flash in manual mode so it didn't matter that I was mixing brands. Using the remotes allowed me to hold the flash and point it at the flowers from any direction or distance.  I also used a Rogue Flash Bender on my flash to soften the light.

Here are two examples from my little experiment.

No flash, 1/40 sec, f/2.4

With flash, 1/250 sec, f/2.4
The two photos illustrate how the flash can emphasize the flower while letting the background go dark. The faster shutter speed in the second shot made anything lit only by the ambient light darker. I tried to position the flash to light the flowers without lighting the background.

The problem with this technique is the light from the flash can create harsh shadows on the subject, in this case, the flowers. Here's a series of shots that show what happens when the flash is in different positions.


If you click the first image then use the keyboard arrow keys you can flip through each one to easily see the differences.

The camera and flash settings were the same in each photo. Notice the shadows?  There are bright and dark spots in each photo due to the different position of the flash. I want to have more even light to make a more pleasing flower photo.   

Here's the really cool part of the experiment.  Remember I said there was no breeze?  Because the camera was on a tripod and the flower was not moving I was able to blend these five shots into one using the HDR tool in Adobe Lightroom.

Blended Image
I used the Lightroom HDR tool because it tends to create a more realistic result. In this case, the shadows and bright spots are smoothed out to a more pleasing image.  The problem is, it also made the background brighter, which I didn't want.  I used one of the darker original images and manually blended it's background into the image using Photoshop.  Turning the image a little made the stem come from one corner and the petal point to the opposite corner for a better composition.


Final Result
This all sounds much more complicated than it really was.  It's actually pretty easy with some basic Lightroom and Photoshop skills.

I learned how to manually control remote flashes while working on my real estate photography skills. It's interesting how skills learned in one area help in a completely different application. There are good reasons to learn new photography skills, even in areas that might not be you favorite.