Showing posts with label composition. Show all posts

Friday, March 20, 2020

More Time On My Hands = More Photo Tips

We are all living under conditions that are extremely different from just a few weeks ago. Half the sessions in my Photography Class were canceled, and places I frequent on a regular basis, such as the gym, are closed.  I'm spending more time walking but today it's raining so I'm spending my day indoors.  That means I have time to invest in things I've been neglecting, such as blogging, updating my website, and editing photos in my archive.

I feel bad that I wasn't able to finish my last photography class.  I promised to finish it when things return to normal, but I'm not sure when that will be.  So instead, I'm going to share much of what is in my class here in my blog.  Here's the first installment...
Bluebird on a yard decoration
Yesterday was the first day of spring.  Flowers are coming up and the birds are busy.  Lately, we have noticed a pair of Bluebirds in our front yard each morning.  Today I opened the window and got my camera and long zoom lens out to see if I could get a shot or two.  They didn't cooperate as much as I hoped, but they did give me material for today's photo tip.

When composing a photo it is important to pay attention to the background.  Watch out for things that will take away some of the beauty of the photo.  In this case, our neighbor's camper was in the background behind the male Bluebird.

Bluebird With Camper

I was shooting at a wider aperture (f/5.6) and zoomed in to 400mm, which blurred the background a little.  You can still see the white of the camper.  It looks unnatural and not exactly what I wanted. 

By getting a little lower I was able to shoot over the camper and include the green yard instead.  All I had to do was do a few deep knee bends.


No Camper!
This is a simple little example to illustrate the tip:

  1. Check the background when composing your shot
  2. If there is something that will distract from your photo try to remove it by moving to a different spot, either side to side or up and down. 
  3. This tip applies to all styles of photography.
  4. Now, make this a habit by shooting as much as possible.
Outdoor nature and wildlife photography can be fun and is a great way to destress.  Look for opportunities to make some photos, while staying "socially distant".

Wednesday, February 20, 2019

Slow down and wait for it

On a recent trip to Death Valley National Park, I was out wandering the Mesquite Flats Sand Dunes early one morning.  I was looking for lines and shapes in the dunes that might make interesting compositions.  It was just over an hour past sunrise and the sun was still low in the sky, giving some nice side light.  It was also overcast and the sunlight was constantly changing.

I made the first shot below while the sun was between clouds.  I had hiked all over the dunes looking for a composition like this with a leading line, ripples in the sand, and no footprints.  The low side light produced some nice dramatic shadows in the sand, which was also one of the elements I was looking for. 
First Shot
 About 30 seconds later the sun went behind a cloud and without moving the camera I got a different photo.
Second Shot 
I actually like the second shot better.  There was enough indirect sunlight to make the ripples in the sand and the shape of the dunes stand out, without the high contrast shadows.  What looks good is subjective and you make like the first one better. The thing about art is there is no right answer.

Sometimes we shoot like we are in a hurry.  Set up, make the shot, move on to the next one.  It pays to slow down and wait for different lighting.  You don't know what you will get.

Thursday, April 19, 2018

Don't Be Satisfied With The First

Many landscape photographers, including myself, have a bad habit of shooting the first obvious composition.  That's fine, but the problem comes when we stop there and don't take the time to look for other different less-obvious compositions.

1/4 sec, f/22, ISO 200, 41mm (cropped sensor)
Here's an example from a recent trip to Charleston Falls Preserve in Ohio.  The falls are billed as a miniature Niagra Falls because of the rock strata.  When we were there the water flow was low and the falls were nothing like Niagra, miniature or not.  There is a nice footbridge that crosses the creek below the falls.  This bridge is the obvious place to shoot from and I made all these photos from that bridge.  The best thing I can say about this first photo is it accurately depicts the falls.  It's what I call a documentary photo - accurate, but uninteresting.

The nice footbridge was also a barrier to getting to where I would like to have shot the falls - standing in the water about 20 feet from the base of the falls.  I could have positioned my camera low near the surface of the water and used the flowing water as a nice leading line up to the falls.  The day was cold, rainy and muddy - not worth climbing over the railing.

When the water falls vertically, a portrait (tall) aspect composition will often work best when shooting waterfalls.  That's how I shot the first example.  It shows the entire falls and the pool below.   Another option is to zoom in to capture some of the details in the scene.   In the second photo, I stood closer and used a horizontal crop to emphasize the three places where the water hits the rocks.

1/3 sec, f/11, ISO 200, 28mm
There is still a lot more rocks than water in the second photo.  I think the water hitting the rocks is the much more interesting than the rocks.   By zooming in even more I can emphasize the white water on the rocks. I also put a polarizer filter on my lens for this third photo.  The polarizer cut some of the glare off the wet rocks.
1/4 sec, f/11, ISO 200 66mm
My favorite part of this third photo is the flowing white water contrasting with the hard dark rocks.  The splashing water throws up a mist where it hits the rocks making it appear to glow.  Personally, I think this is a better composition than either of the first two.

When a photo is about contrast and shapes it can be a good candidate for black and white.  When you take away the color it can draw the viewers attention to other parts of the photo.  In this case that is the misty glowing water, the shapes or the water and rocks, and the contrast between the white water and the dark rocks.
The third photo converted to B&W
All of these photos were taken from the short footbridge.  By moving to different positions on the bridge and trying different compositions I was able to find multiple compositions I would have missed if I had stopped with the first.  When you arrive at a photo location, take time to look around.  You might try leaving your tripod and walking around with just your camera looking for interesting shots.  You can always go back for the tripod when you find a composition you like.  Just don't be satisfied with the first.

Sunday, December 10, 2017

Slow Down

"Slow down, you move too fast
You got to make the morning last
Just kicking down the cobblestones
Looking for fun and feelin' groovy
Ba da da da da da da, feelin' groovy"


A great folk song that was released in 1966.  I think this could be a great theme song for something we all need to do -- slow down.

My First Real Camera
I got my first "real" camera in 1976 as a high school graduation present.  It was a Yashika Tele-Electro SLR.  It was a pretty advanced camera at that time.  I used it to take photos through college, but a college student budget limited how many photos I took.  When you live on a shoestring you think about each exposure you make on that roll of film.  I probably didn't make much more than 1,000 photos with that camera.

Fast forward to today. I sometimes take over 1,000 shots in a single day. It's really easy to do. With high capacity memory cards, I can keep making shot after shot without being concerned with the cost of each. Once I pay for the camera gear and memory cards, the only real cost is the time it takes to go through all those photos once I get them on my computer.  

As photographers, we have borrowed a phrase from gun owners - Spray and Pray. Spray and pray is a derisive term for firing an automatic firearm in long bursts, without making an effort to line up each shot or burst of shots. This is especially prevalent amongst those without the benefit of proper training. If we take lots of shots with guns or cameras we try to rely on the odds that a few will be good enough.

The Gudak App
Today I ran across an article about a new digital smartphone app that is catching on in some parts of the world. The app mimics old film cameras. It even looks like a Kodak disposable film camera. A virtual roll of film has 24 frames and once you finish that roll you have to wait 3 days to get those photos "developed". You also have to wait several hours before you can load up a new virtual roll of 24 exposures. People who use this app can't "spray and pray".


Inside Administration Building at Univ. of Notre Dame

When I made the photo above I had to slow down and take my time to line up the shot. No runnin and gunnin here. I had to take my time and think about this shot. I doubt I'll ever be back to try this shot again so this was a once in a lifetime chance.

I do recommend to my photography students that they make several photos of a subject. They should move around to make several different compositions. They should also make multiple shots at different exposures so that they can pick the best exposure later. This is not the same as Spray and Pray but requires thought, planning and time.

Another important reason to slow down is so we don't miss the photo opportunities right by us. I found this photo of the lily pads and leaves while walking around Bays Mountain Park in Kingsport.  I was there for fall color and hoping to see one of the resident beavers in that area of the lake. If I hadn't taken the time to look around I could have easily missed this shot.
Lily Pads and Leaves

The Christmas season seems designed to make us go fast and do more. It's hard to slow down. It requires some effort. Let's all slow down, look around, and see what God has placed right in front of us.

Sunday, July 16, 2017

Working A Scene

One of my favorite waterfalls can be found in Western North Carolina near Rosman. It's not in a National Park, National Forest or even a State Park. In fact, it's not on public lands at all.  It is in the back yard of a private residence! The owners are nice enough to allow, and even encourage, visitors to their own private waterfall on Shoal Creek.

After parking behind the house and walking about 200 yards the trail climbs a very short distance and then descends a set of stairs to the base of the falls. This is the first view of the falls taken next to the small pool below the 60-foot falls.

1/2 sec at f/16

I've been here twice and neither time was there a lot of water flowing over the falls. I think this level of water is just about perfect. It allows individuals streams to separate when falling over the rocky bluff. There is a lot of interesting details and patterns in these falls. While you can easily see the entire waterfall from this vantage point, there is much more to see and photograph.

Landscape photographers need to move around and "work the scene".  Avoid the temptation to place your tripod in the first place you find.  Move closer or farther back.  Use your zoom lens, which can give a different view from moving closer.  Get lower.  If possible, get higher and shoot down. We didn't stay long enough because standing in water with thunder storms near by is not a good way to live long and prosper.

1/2 sec at f/16

Hoping across the rocks to the center of the stream gives you a slightly different perspective with the rocks in the foreground. The first and second shots include the lush green foliage and thick moss on the sides of the waterfall. It was an overcast day and the soft indirect light really made these greens pop.
1.8 sec at f/16

The pool below the falls is not very interesting and does not add much to the composition. Wading through the pool I got closer to the falls and made the shot above, cropping out most of the pool and the gray skies. You'll notice I also cropped off the top of the falls. I did this to emphasize the shapes and patterns in the lower falls, which I found to be very interesting.

2.0 sec at f/16

I think the triangular shape of the bottom of the falls with the water flowing down the stair step to makes an interesting composition. I was able to include just enough of the water flowing in from the left and the greens in the upper right.  

Tall waterfalls like this typically work best as vertical portrait orientation shots. However, the horizontal ledges in the falls made an interesting landscape orientation composition when I zoomed in closer.

0.9 sec at f/16
I zoomed in closer to emphasize the hard geometric lines and shapes of the rocks and the soft flowing water. I always like green plants or moss showing through behind a waterfall.  
4.3 sec at f/16
All these photos were shot at ISO 200 and f/16. The shutter speed varied due to the changing light conditions. By the time I made this last photo the skies had turned dark from the returning thunderstorms. It was time to head for the safety of the car again.

Making Photos With Flowing Water

To make photos with the soft flowing water you should start with a shutter speed of 1/2 second and vary it to get different effects. You might need to adjust your exposure compensation or use manual mode to not let the white water become over exposed in the long exposures. Of course, your camera must be steady through the long exposure so a tripod is pretty much essential to keep the rocks solid and sharp. If you place your tripod in a stream be aware that the water will introduce some movement and potentially blur your long exposure photos. I  place my hand on the tripod and press down during the shot to control as much of the movement as possible.

The other thing I find to be essential for these shots is a polarizer filter. This will reduce the glare off the wet rocks and foliage.  Be sure to turn the filter to adjust how much glare you want to remove.

Finally, if you have read this far you probably want to know where these falls are so you can visit them yourself.  These are Eastatoe Falls near Roseman North Carolina.

Directions to Eastatoe Falls:

  1. From Rosman NC, drive south on U.S. 178 for approximately 3.4 miles to a private drive on the right.
  2. There is a sign for Mountain Meadow here, and the driveway leads back to a house, and what used to be a craftshop on the left.
  3. The home owners have made a small parking area behind the house labeled with "Park Here" signs. The trail leads across the lawn into the woods and to the falls.
Please be courteous and respectful when visiting these falls. There are many beautiful falls on private property, but very few of them are accessible to the public because the land owners do not allow access.  


Sunday, May 3, 2015

Simplicity is the ultimate sophistication.

I should be out in the yard working today but instead I'm working through some photos I took over a month ago.  I'll get out soon, but I want to share these two photos.

Both photos were taken at Anna Ruby Falls in North Georgia.  They were taken a few minutes apart on the same day.  Here's the first one.


Anna Ruby Falls

This is the classic shot taken at a wide 17mm focal length.  If you Google Anna Ruby Falls you will find dozens of very similar photos of the falls.   I took this to show that Anna Ruby Falls is actually twin waterfalls created by two separate streams- Curtis Creek and York Creek.  It was a bright sunny day, and I had to take three shots at different exposures and combine them using HDR software to balance out the super bright and very dark areas.

I really don't care for this photo.  There are too many rocks, logs and other stuff within the frame.  Too much to look is a distraction and doesn't give the viewer a single place to look.  When I look at it,  my eyes wander around the photo looking at everything but not focusing on any one thing.  It's not a pleasing photo.


Simplicity is the ultimate sophistication. ~Leonardo da Vinci
Here's the second photo taken from almost the same spot.  This time I shot at 200mm allowing me to zoom in and isolate down to a small tree and a section of the falls behind it.  Because I didn't have to worry about the dark areas, I was able to expose on the dark side, keeping the bright spots of the waterfall from being too bright and losing all detail in the water. The light on that morning was bright and harsh, but on that section of the falls it was beautiful.  I also slowed the shutter speed down to 1/4 second, giving the water a nice silky blurred look.

This second photo is much simpler, and in my opinion, more pleasing to look at.  The tree in front of the falls gives the photo a feeling of depth that it wouldn't have if it was just the falls.  There are only two things in this photo - the tree and the falls.

Simplification in my photography is something I want to keep working on.  It's also called minimalist photography.  Here's a good article that explains that better.  Give it a try and see if your photos aren't better.


Sunday, November 23, 2014

Go Wide!

The college football season is rapidly approaching the end of the regular season and the beginning of the bowls.   Going wide is something we'll hear when talking about football wideouts and wide receivers. Maybe we'll hear it this Saturday in the Florida - Florida State game, but I'm afraid the passing will favor the Seminoles this year.

We can also go wide in photography.   A wide angle lens is typically in the 24mm - 36mm range with ultra-wide having shorter focal lengths and standard or normal lenses having longer focal lengths.  The are called wide angle because the angle of view through the lens takes in so much more.  A 28mm lens has a 75 degree angle of view, while a 135 mm has only an 18 degree view.


The typical way to use a wide angle is to capture a big wide landscape scene.

Shaker Village

Reel Foot Lake 
Both the Shaker Villiage and Reel Foot Lake photos were taken at 17mm.   They take in a lot of the scene from the far left to the far right.   This is a perfect use for a wide angle lens, but not the only use.

When you place objects close to a wide angle lens their size is magnified relative to objects that are further away, like in this photo of the Cable Mill in Cades Cove.
Cable Mill @ 24mm
What if you turned your camera and took a portrait (taller) orientation shot?   Same effect - things that are close appear much bigger.

22mm
In the photo to the left the white flower is the obvious subject.  It is bright and big, demanding attention.   The purple flowers in the background are hardly noticeable, but they do add some depth to the photo.

I've found this is a fun way to get close up shots but include the environment around the subject in the photo.   Wide angle lenses also tend to have a much deeper depth of field, making it easier to keep the close subject and far background in focus.
21mm


17mm


I've used this technique with flowers to draw people's attention to the flower.  You can use the same technique on other subjects, but beware.  If you use a wide angle lens to photograph a person up close you can get a photo with a large nose or ears.  Not too flattering.

Next time you're out try turning your camera into the portrait orientation and going wide!

Monday, November 17, 2014

Stop, Look and Listen

I may not remember much about growing up, but I do remember - "Stop, Look, Listen!"   We were taught to do this before even thinking about crossing a road.  Look to the left and to the right, and listen for approaching vehicles. It was so ingrained in the minds of our generation that it The Stylistics released a soul song by that title in 1971, followed up by Marvin Gaye and Diana Ross in 1974.

It's a good think to remember in photography as well.   Those of us who are nature or landscape photographers can easily fall into the trap of getting to a place and shooting the first thing that looks good to us, then moving on. I call this the shoot and go approach.  It's easy to do, but we miss the great shots by not stopping and looking around.   The first shot we make is most often not the best one.  There are always other angles, other compositions, and other subjects in an area.  Each one can tell a different story.

Here's two examples.   The first shot shows two  Adirondack Chairs under a tree. What' kind of story does this tell?  The leaves n the gree and the grass are still green, but there are brown leaves on the ground under the tree.  It's early fall.  The chairs are inviting under the shade.   Just imagine yourself with your favorite person you enjoy being with sitting in those chairs on a cool fall day listening to birds and watching horses run in the near by pasture.  Sound like a good place to be?   


A photo is more interesting to the viewer if they can imagine themselves in the photo.  It creates a sense of connection.   Can you imagine yourself there?

This was just outside the room where we were staying at Shaker Village in Kentucky.  It was an obvious photo for me, but not the only shot.   Notice the two leaves on the chair on the right?  There was a photo in there as well.


Taken at the same place and the same time of day, this second photo tells a completely different story.  The subject is no longer the chair, lawn, or trees.  You can't even see those things in this composition.  The subject is the dried leaf stuck in the slats.  The first photo had a lot of green and only a little yellow or brown, this photo is almost entirely brown.  To me it is a story of the end of life for the leaf.   Same place, different story.

I could have stayed in a 20 foot circle for an hour taking different pictures of leaves, grass, chairs, and tree trunks.   What possibilities do you see in these photos?

Here's a suggestion for avoiding the shoot and go approach and slowing down to look for photos beyond the obvious.  When you get to a place just stand or sit for a while and take it all in.  Walk around a little and enjoy what God has made.   Don't even try to make a photo until after you have had time to stop, look and listen.   You'll find many more photographic opportunities right in front of you.
  

Tuesday, November 4, 2014

The Importance of a Good Education

"An investment in knowledge pays the best interest."

- Benjamin Franklin

Last night I attended a photography seminar by one of the premier landscape photographers in the world today.   For the paltry sum of $7 (normally $25 but I found this great coupon) I got 2+ hours of instruction in Composition, Technique & Impact by Art Wolfe from the comfort of my den on my big screen TV.   This is by far one of the best investments I have made in my photography.

Preparing
Hot Air Balloon Ride 2014


Lemons
I always encourage people to invest in education as the best way to improve their photographs.   No lens or camera will make as big a difference as time spent with a quality instructor, taking an online course or participating in a photography group.  I've been in several photography workshops and sat through many webinars on photography.  I really enjoyed last night's session with Art Wolfe.  He spent the first hour or so talking about some techniques he uses to create compelling compositions.  The entire time he was showing his own photos as examples of each technique.  Just seeing his photos was worth the price.   The second half was a critique session.  Participants were able to submit some of their photos ahead of time and Art picked several to discuss.   With most of them he spent a minute or so showing what could be done with some creative cropping, exposure adjustments, and color balancing.   I found myself saying "wow, that really made a big difference".   In the last 20 minutes he answered a few questions that had been submitted online.

This was the first time Art did a live Webinar.  His next one is on  light, color and how to get more emotional impact out of your photographs.  Hop on over to http://www.photographywebinars.com/ and sign up to get notified when it is scheduled.   

Do you want to learn more about Adobe Lightroom?  Kent Ervin and I are planning to do a Lightroom class this winter in Kingsport, TN.  More information will be available in the next month or two.

Tuesday, April 22, 2014

The Importance of A Good Background Check

OK, I'm not saying call the FBI and have them check out the background of your friends.   I am suggesting that when you are composing your shot you need to be aware of the background.   Unless your subject fills the frame, the background could take up a larger portion of the photographic real estate than the subject.   It's important to make sure the background adds to the photo and does not take away from it.

When you're composing the shot think
  • Does the background contain a lot of clutter that can be distracting?
  • Does an object in the background intersect with the subject?
  • Does the color of the background make the subject stand out or blend in and get lost?

Here's a few examples to illustrate what I'm saying

Cluttered distracting background

Less clutter = better image
The two photos are of the same Great White Heron taken a second or two apart.  In the first the tree branches and twigs give a cluttered feel. The bright water behind the bird draws the viewers attention, which is not where I want them to look.  The leaves in the second are more uniform and less distracting.

Cooper with an arrow through his head
OK, he doesn't have an arrow through his head but the cord running from the large wheel to the smaller one appears to go through his head. You may have to click on the image to see if full size to appreciate what I'm saying.  It would have been better if I had held the camera higher or moves a little to one side or the other and avoid this intersection.

Finally, look for backgrounds where the dominant color is complementary to the dominant color of the subject.  This will make the subject stand out in the frame.

Butterfly blends with the background

This butterfly seems to jump right off the screen.
The off white butterfly kind of gets lost in the first image. You can't help but look at the orange one in the second image.

Next time you're composing a shot take a second and do a background check.   You may be able to improve your image.

Saturday, December 28, 2013

Evolution of a Composition

I haven't been out shooting much lately.  Winter in East Tennessee does not provide many opportunities for beautiful landscapes.  The colors are grey or muted brown.   It does not snow often and when it does I'm usually at work. 

Today was different.  I checked the weather forecast last night and saw that they were calling for 30% cloud cover at dawn.   You have to have some clouds to get a good colorful sunrise, but not so much that the sky becomes overcast.  Thirty percent sounded pretty good to me so I set the alarm. 

It was worth it!  Here's what June and I witnessed this morning.


Pretty special, huh?  

Afterwards we drove around a bit looking for other opportunities and found ourselves at the shore of Patrick Henry Lake.  I was hoping the sunrise would light up the fog on the lake but it didn't happen.  At June's suggestion I shot this.

 
I always listen to June's suggestions.   My photography is better when she is with me. 

The photo above is cropped and a little tone adjustments were added.    The colors are too blah but the contrast between the bare trees on the left and the fog is interesting.   When there is little color but interesting contrasts it's a good idea to convert to black and white and see how it comes out.

I think this is more interesting than the color version, but the real interesting part of this shot is the branch sticking out of the fog on the left side.   This was shot at 200mm.  I really needed to zoom in closer to isolate that section.  I could have gotten my 300 and 1.4 teleconverter to more than double to focal length but I was too lazy to walk back to the car. 

I decided to crop the photo to isolate what I thought was the interesting part.  The problem is this reduced my 21 megapixel original down to a 1.9 megapixel photo.  OK for a small version on facebook, but too small for anything else. 

I got a copy of Perfect Resize for Christmas.  Using that software I was able to enlarge it back to 16 megapixels, more than big enough for most anything I want to do with it.


This composition evolved from the original as shot, to a wide crop, to a black and white, to an extreme crop black and white.   I like the last one, but each one is different and conveys a different mood.

This has been a pretty good day for shooting.

Sunday, July 14, 2013

Check Your Background

Don't worry, I'm not talking about a background check where your skeletons are dug up and shared with your perspective employer.   I'm talking about the background in your photo compositions.

When composing a shot it's easy to focus all your attention on the subject and let your mind tune out the distracting elements in the composition.    Unfortunately, those distracting elements will be very noticeable when you get home and bring the photo up on a computer.   Those things you never noticed can ruin a photo.

Here's a recent example.  My dad grows Orchids as a hobby.  While visiting this last week I took a few minutes to go into the yard to see what I could find to shoot.  This bloom was particularly pretty, but a good spot for an Orchid to grow is a bad spot to photograph it.  There was a wooden fence and the bright wall of a neighbor's house behind it as you can see here.


I was shooting with a 300mm telephoto lens that I stopped down to f/4 to minimize the depth of field and blur the background as much as possible.  In this case the flower and the fence were too close together to blur the fence enough.   The solution was to get low and shoot up at the flower.  By doing this I was able to take the fence out of the picture and just have the neighbor's house in the background.  The house was much brighter than the flower so I exposed for the flower, which made the wall appear to be solid white, which is a pretty nice background in this case.

I think the second shot is a more pleasing composition.  Anyone looking at it will look at the flower and not be distracted by the background.

The background is not the only thing to watch out for when composing your shot.  Watch of objects that stick into the photo from the bottom, top or sides that can be distracting.  In the shot below the railing for the bridge I was standing on was included in the lower left corner. 


In the last example a cut log is showing up in the bottom of the photo.   It was actually the remains of an old bridge but does not seem to fit in the forest scene and should be eliminated.  Sometimes you can eliminate a distracting element by picking it up and moving it.  Other times, you have to move yourself and recompose to eliminate the distractions


The best thing to do when composing is to slow down and look.  Move around and see what other compositions you can come up with. Finally, watch out for the background and other things that can distract from the main subject.


Tuesday, July 2, 2013

Oh, the Places You'll Go!


You have brains in your head. You have feet in your shoes. You can steer yourself any direction you choose. You're on your own. And you know what you know. And YOU are the one who'll decide where to go...”
Dr. Seuss, Oh, the Places You'll Go!
 
The sage wisdom of Dr. Seuss can be applied to outdoor photographers.   We will go places and do things that may seem absurd to most people.  We go in directions that normal people would just shake their heads in wonder if we really "have brains in our head". While on vacation, June and I will get up an hour or two before sunrise, stay out until well after sunset and go hard all day long.   When doing that in the Pacific Northwest in June sunrise is before 5 AM and sunset is after 9 PM, which makes for a very long day.  Between those hours an outdoor photographer will spend hours in one spot sometimes photographing the same subject and other times just sitting and waiting for the light to change.  These extended times in one place can be separated by a mad dash to get to the next spot at just the right time.  On an easy day we might go back to the hotel and sleep for a couple hours in the middle of the day.  After a couple days of this we might take our nap just about anywhere like my friend Chuck Barnes.
Chuck Recharging
 
 
I am blessed to have a wife who is willing to put up with my craziness.  Not everyone is as lucky as I am.
 
When we get to the places we have decided to go that day we may do things that make people wonder what made us "decide where to go".  One example of our craziness is what I consider the best way to photograph a waterfall -- standing in the creek or river below the falls, often with the camera a few inches off the surface of the water.  Sometimes this water is spring snow melt, making it not too many degrees above freezing.   By getting to places at the right time and getting into the best place for a shot we can come away with interesting compositions, such as this one of Bridal Veil Falls in the Columbia River Gorge.

Bridal Veil Falls

 I took this at the end of the day when we were both pretty tired but the light was good for shooting waterfalls so off we went.

Shooting Munra Falls
Earlier in the afternoon we had seen this guy taking photos at Munra Falls.  We ran into him at Bridal Veil Falls as well.  He was younger and had more energy than I had left and was climbing over boulders and through the stream to get the best shot.

I'm hoping to hike to some falls in Virginia  this Thursday morning with a photographer friend.   If we're lucky, it will be foggy and raining.  The best conditions for taking photos of waterfalls, streams and forests.   Oh the places we will go!


Saturday, May 11, 2013

Trying New Things

Last weekend I splurged on myself and bought a new lens.  I found a good deal on a refurbished Canon 300mm f/4 L telephoto.   This is the same model I rented when I went to Reelfoot Lake back in February.  I really liked that lens and have become tired of carrying around my heavy Sigma 80-400 zoom.  This is the lens I plan on taking with me when looking for wildlife shots.

Today was the first chance I had to try it out.  I went out exploring the yard planning to use it to get some bird shots.  I filled the feeders and waited.  While I was waiting I noticed our recent rainstorms had knocked the dogwood flowers down and there were several on a shrub in the back yard.  What the heck, I had my camera and 300 lens so I decided to see what I could get.   Now this is not how I would have taken this shot if I had planned it.  I would have had my tripod, macro lens, and cable release to get as sharp a picture as possible.   Being too lazy to go back in the house I shot the flower petals handheld about 9 feet away with a 300mm lens.


1/400 second, f/5.6, ISO 640 using Canon 7D

I'm pretty excited about the way this came out.  The best part is I tried something new.  

I've traveled great distances to many interesting places to photograph.  I've attended workshops and learned a great deal at each one.  One thing I have learned is you don't have to go to a workshop or travel to exotic places to improve your photography.  One of the best exercises is to limit yourself to a small area and only one lens.  It forces you to use your eye to look for interesting subjects and compositions right under your nose and to think differently when composing a shot.  It makes you move past the obvious and easy shots.   As with anything else, the only way to improve is to practice.  

It's starting to look like rain again.  I may be back out taking this shot again shortly with rain drops of the leaves and petal.

Sunday, May 5, 2013

Are you an iconic photographer?

One of the first trips June and I took with my first DSLR (a Canon Digital Rebel XTi, which I still have)  was to the Canadian Rockies in Alberta.  We've been to a lot of different places since then but the Canadian Rockies is still my favorite place to visit.  I remember taking a lot of photographs, including this one of Spirit Island on Maligne Lake.
It's not really an island, but if you position yourself correctly and compose the shot just right it can appear to be an island.   This is one of those shots everyone takes.  To get the shot you either have to hike for a couple days or take a boat tour.  The boat drops you off right next to the island and gives you just enough time to walk to a spot to get "the shot" before it's time to get back in the boat and head back to the other end of the lake.

Spirit Island is what I call an Iconic Photograph - the image everyone who has been there has taken and you can find hundreds or thousands almost identical copies on the internet.  Try this - go to google.com and type "spirit island maligne lake" in the search box.  When the list of results comes up click images and see what you get.   On one trip to Zion National Park I found myself standing shoulder to shoulder with dozens of other photographers to take an Iconic Picture of The Watchman from the Canyon Junction Bridge.  Even National Geographic photographers give in to temptation and take iconic photos, such as Mesa Arch in Canyonlands National Park at sunrise.  Every place has them and they are not to be missed.  When planning a trip that I may only get to take once I prepare my hit list of iconic photos I want to take while I'm there.   I'm in the final stages of planning a trip to Washington State and Oregon and have created  quite a list of iconic photo spots to hit.

While I will take the Iconic Photos, lately I've become more interested in finding something unique and different and less interested in the images made by hundreds or thousands of photographers before me.  I try to find subjects and compositions that I won't see on other people's websites, facebook, etc.   Here's a quote from one of my favorite photographer/authors:.

"The more I study photographs from the past century -
the incredibly short lifespan of our art so far - the more
convinced I am that everything’s been photographed,
that our challenge now is to manipulate light, lines,
and moments in the frame in a way that expresses our
unique view of those so oft-photographed subjects. "
- David duChemin - Photograph Issue 2

I don't know if everything has been photographed, but it's getting harder and harder to create unique photographs.  Here's some photos I took in 2012 and some suggestions on avoiding the iconic photography rut.


Even when you are at one of those iconic spots, open your mind to different angles or subjects.  On this morning I was in the Smoky Mountains at one of the best places to photograph the sunrise.  When the sunrise didn't happen I had fun taking long exposure photos of cars going by on the road.  Not what I went for but a different take on a familiar location.


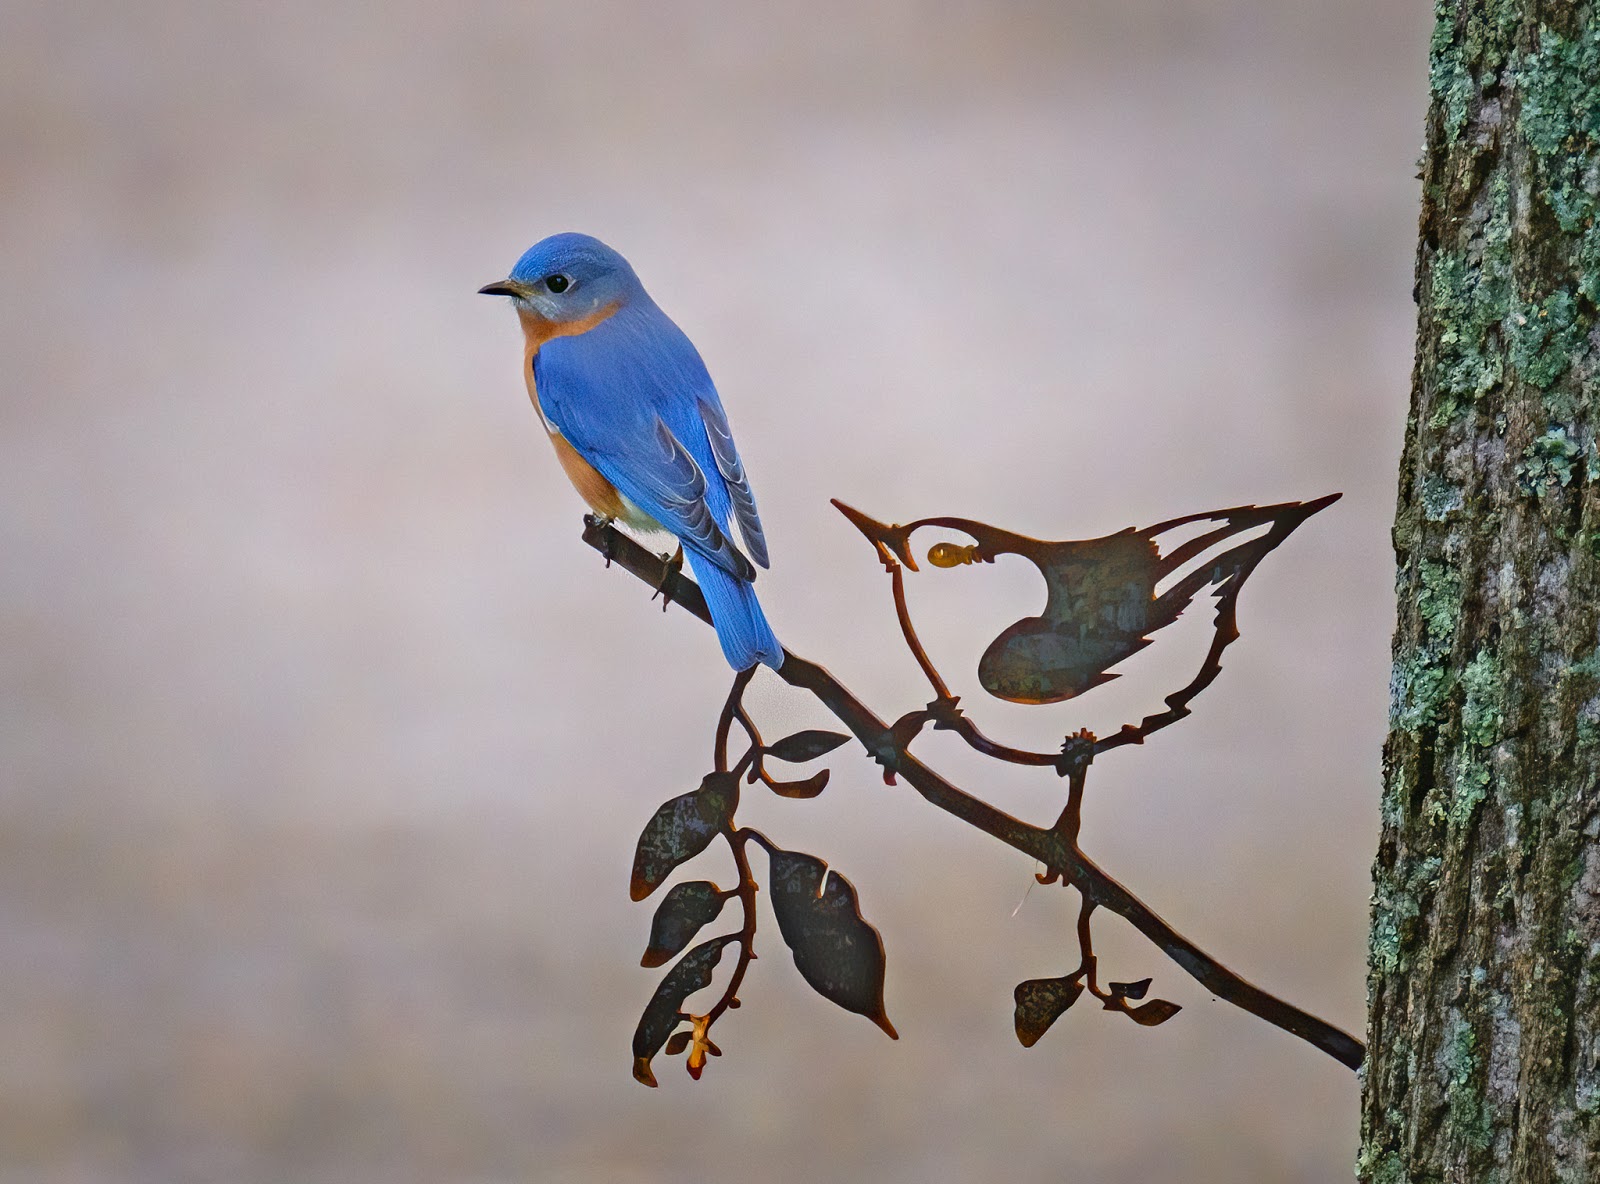
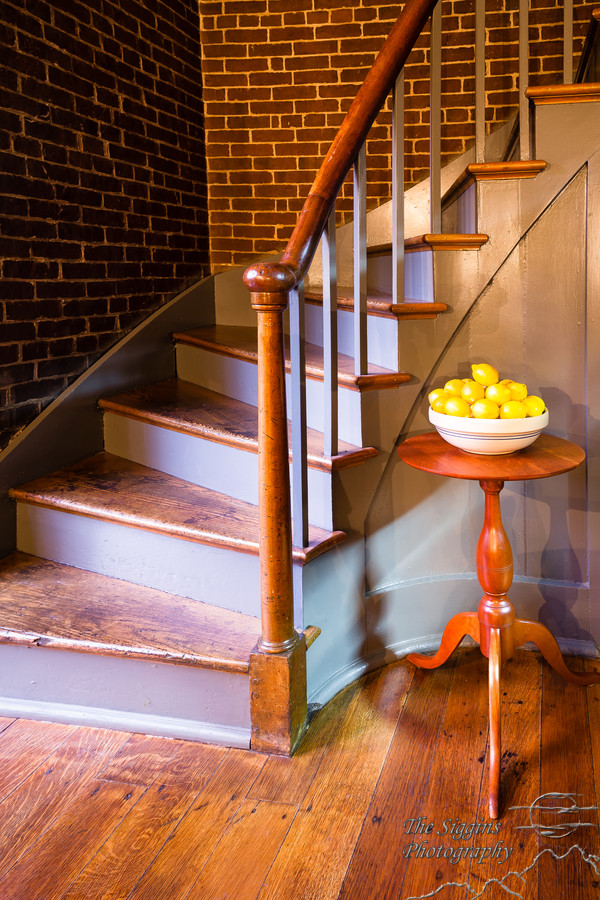
Slow down and look for something or someone outside of the main action.  In this case I was taking photos at a Revolutionary War Reenactment and discovered this man resting on a bench outside one of the cabins.   An interesting expression on his face and that red vest and green hat are a great combination of contrasting colors.

Walk a ways off the beaten path.   I was at Roan Mountain with a group of friends for sunrise photographs.  Afterward we walked down the road just a little way and found this just off the road.  People were driving and walking by about 15 feet away and never looking down where we were getting this image.


Look for small details with interesting shapes, lines and colors.  This is a section of McDonald Creek in Glacier National Park.   Although hundreds of people take photos here every day, I bet you won't see this one anywhere else.  It tells a story of how the rocks have been worn smooth and the curve carved by the blue glacier fed river.  Here's another of small details in the same river.


Look beyond the obvious.   I was on the Blue Ridge Parkway for the fall colors.  When I took this the sky was blue and the colors brilliant, but I found the the lake with leaves on the surface and a reflection of trees to be more interesting.  I think I got some strange looks when I was taking pictures looking down when the obvious iconic picture was up.

These are just some examples and suggestions.  You might want to read this article on Lightstalking - Travel Photography - A Different Point of View.

There are interesting subjects all around us.  If you look you will find all God's creations are interesting and worthy of being photographed.  All we have to do is open our minds, slow down, get off the beaten path, look for the details and look beyond the obvious.