Sunday, March 14, 2021

New Option For Enlarging Digital Images

Rarely do I need to enlarge a digital photo.  My camera creates a 26 megapixel images that is 6240x4160 pixels. This is big enough to make a 20 inches by 30 inches. But, sometimes I have to crop an image down and end up with a much lower resolution photo.   Printing these cropped photos can create a print that is blurry or have blocky pixels.

In the past, I have used the Resize feature that comes as part of my On1 Photo RAW software to enlarge my images.  It has always done what I thought was a decent job. Recently I saw an article on a new feature in Adobe Photoshop called "Super Resolution" which claims to use Artificial Intelligence technology do double the dimensions of an image.  The author was pretty impressed so I decided to give it a try myself.

I did a couple tests comparing the result from On1 Photo RAW and Adobe Photoshop.  The best example is this photo of a Puffin taken in 2019 using a Fuji X-T3 and a XF18-135mm zoom lens at f/5.6 and ISO 400.

Unedited RAW Image

For the comparison I doubled the dimensions of the image to 12480x8320 using each program.  I then ran the result through the Topaz Denoise AI, which cleaned up some graininess and sharpened the photo a little.  I then saved each version as a full resolution TIFF file for comparison.

Click on the side-by-side comparison to zoom in.


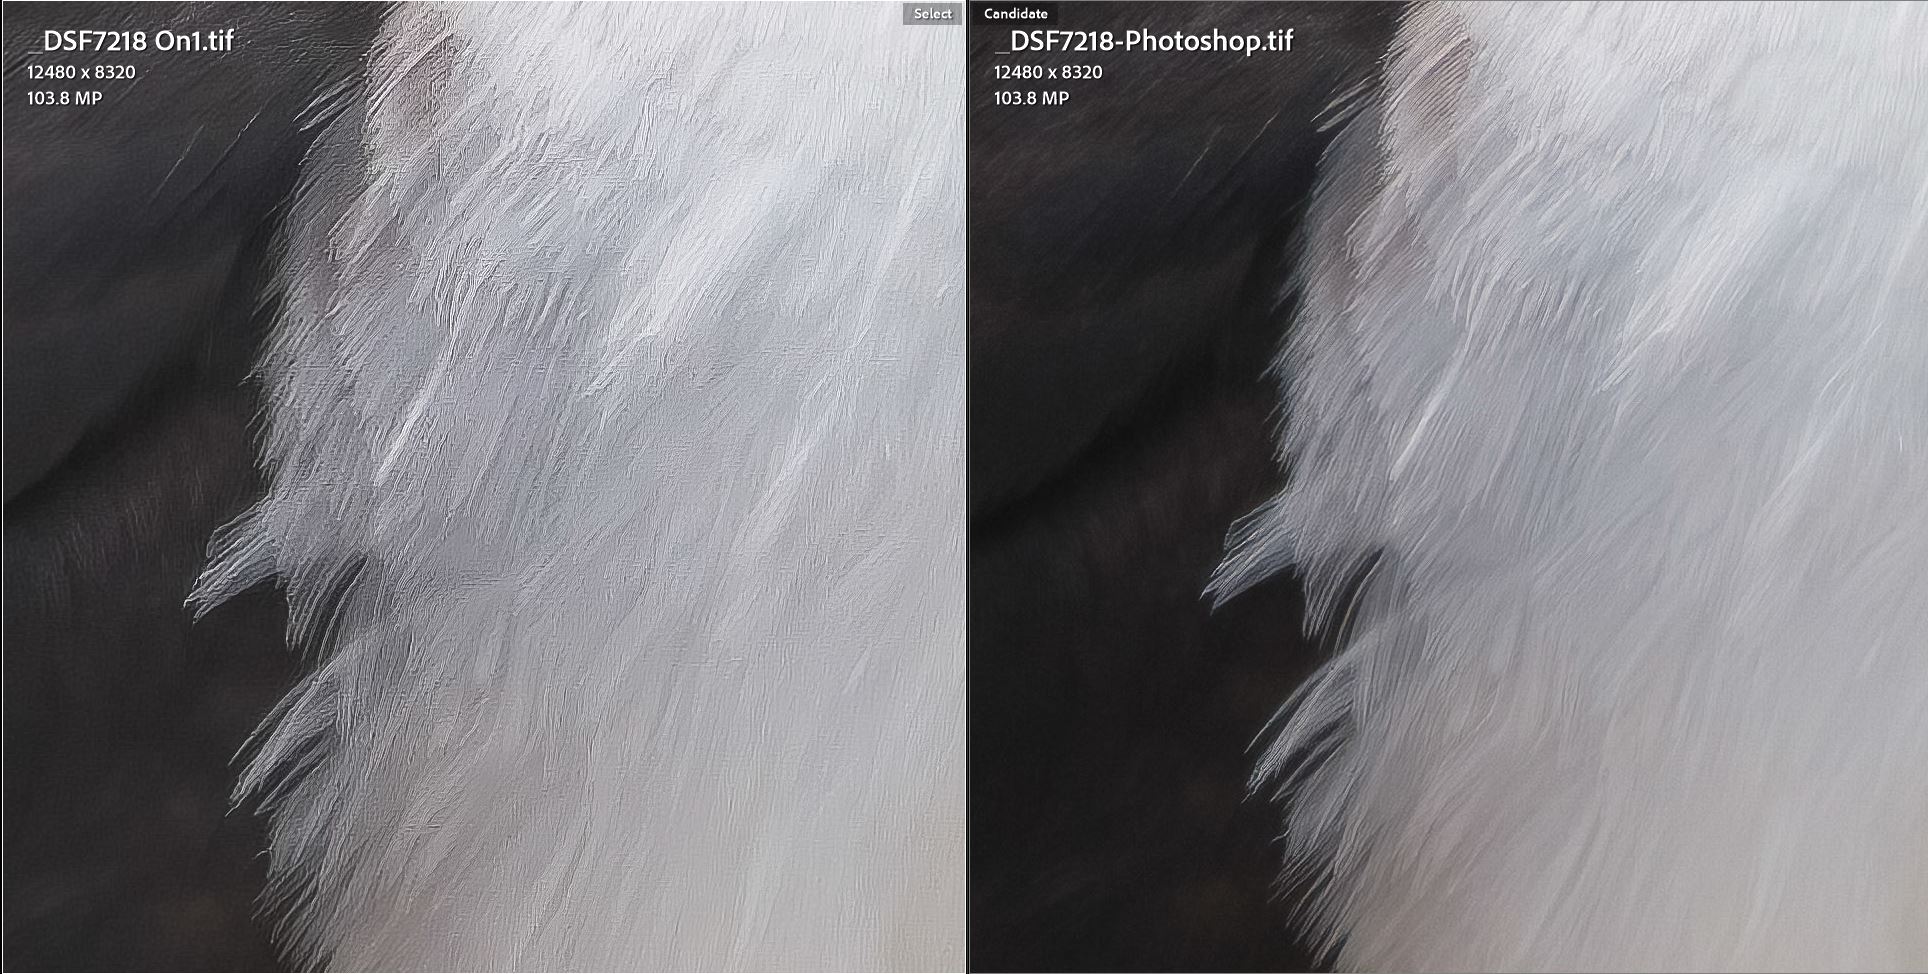
The On1 versions on the left exhibit the "wormy" effect that can be created by Fuji cameras.  The Photoshop versions on the right don't have this problem and appears to be a much better image when viewed at 100%.  Because the Topaz Denoise AI software does a great job at removing the wormy noise from Fuji RAW files I decided to repeat my test running Denoise AI before enlarging.


Even when zoomed in to 100%, it's hard to spot the difference between the On1 Resize and the Photoshop images.  I've only done the comparison on a couple images.  There may be cases where one program or the other will work better depending on the image.  

The Photoshop Super Resolution tool only doubles the dimensions of the image.  The On1 Photo RAW Resize tool allows you much more control to create an enlargement to your desired dimensions.

Perhaps the best application for enlarging an image is when you have had to crop down because you just couldn't zoom in enough.  The example below was cropped down to 2920x1947 or 5.6 megapixels.  I used Photoshop to enlarge it to 22.7 megapixels.  I could make a reasonable quality print of this at 26x17 inches.

Photoshop Super Resolution or On1 Resize are tools I won't use very often, but when I need them I can pull them out and possibly solve a resolution issue.

Tuesday, October 13, 2020

A Day In The Fog

Back on July 4, 2012, June and I hiked up to the Mount Cammerer Fire Tower in the Smoky Mountains.  It was a beautiful day and I got one of my favorite photos from the Fire Tower that day.

You can click on any photo to get a larger view.

View from Mt. Cammerer Fire Tower in 2012

Our daughter Holly joined us yesterday to hike back up to the fire tower, hoping for another epic view.  The weather forecast was for partly cloudy and only a 20% chance of rain.  What we got was 8 hours hiking in fog and rain with no epic views.

The view on October 12, 2020

While fog is not great if you are looking for that mountain top view, it is great for photos in the forest. The cloud cover and fog make the light very even and soft with no really bright spots. I took advantage of several "photography breaks" on the 5 1/2 miles up. Here are some of my favorites.

At the beginning it was misting rain and overcast, but no fog.  The trail was often covered with leaves.  Sometimes is was solid yellow and other times solid red, depending on the type of trees.

Cosby Creek

The fog got thicker as we continued the climb into the clouds.  These are the conditions I really enjoy.  The fog makes everything mysterious and beautiful.


This is not far from the top.  The fog was not as thick and we could see further down the trail.

Proof we made it!

The fire tower is at an elevation of 5,054 feet, about 3,000 feet above where we started.  It was built by the Civilian Conservation Corp (CCC) in the 1930s. The men who built the lookout drilled and blocked the stone by hand from a quarry about a hundred yards downhill from the tower. Some of these stones weighed as much as 600 pounds!  The architectural style used for the lookout was called "western" because it didn't require a raised structure to see above the trees.

After a short lunch inside the lookout we headed back down the trail.  About half way down we saw something we hadn't seen all day.  The sun broke through the clouds and we could see other mountain ridges in the distance.  The rain had stopped and things were warming back up. Not long after, the clouds closed in again.

It was a long day.  We are already talking about doing it again when the forecast is for no clouds.

Thursday, August 6, 2020

Creative Use of Shutter Speed and Long-Exposures

There are a couple camera settings that can be creatively manipulated to make your photos more interesting.  The lens aperture (the opening that lets light in) controls how much of the scene is in focus or the Depth of Field (DOF). The shutter speed (how long the lens is open letting light in) controls how moving subjects are captured.  Playing around with the shutter speed when photographing lakes, ocean shores, etc. can be fun and produce some very different looks.

To illustrate I have taken the same photo and different shutter speeds.  Take a look at these two.
f/7.1, ISO 3200, 1/17 second
f/22, ISO 160, 14 seconds

The first photo had a shutter speed of 1/17 of a second, which captured the light chop on the surface.  The second photo had a long shutter speed of 14 seconds and turned that light chop into a milky surface.  Everything else in the photo was not moving and looks pretty much the same.

Here's another example.
f/8, ISO 1250, 1/55 second
f/22, ISO 160, 1 second


You may have noticed that the ISO and aperture are also different in each photo.  I changed these settings to get the shutter speed I wanted.  The lower the ISO number, the longer the shutter speed to get the same exposure.  The higher the f-stop number, the longer the shutter speed.  If I want t long shutter speed I will start by setting the ISO as low as it can go (160 on my camera).  I will then change the aperture until I have a shutter speed I think will give the effect I'm wanting.  Because the aperture controls the DOF, I will make sure it is such that I have the DOF I want.

It's hard to see in the example above but the clouds in the 1-second exposure are slightly blurred because they are moving. When the shutter speed is very long and the clouds are moving across the sky you can blur them as well in your photo.

f/20, ISO 200, 120 seconds

f/22, ISO 200, 120 seconds

In both photos, you can see the clouds were moving from left to right.  You can make a very dramatic photo if you can position yourself so that the clouds are moving toward your camera.

Anything that is not moving in these long exposure photos will be captured sharp with no motion blur.  Sometimes even water is still enough that the reflections are crystal clear.
f
/22, ISO 250, 7 seconds

Long exposure photography can be a lot of fun.  Grab your camera, put it on the tripod, and give it a try.  Then let me know how it comes out.

Sunday, August 2, 2020

Breaking Out The Creative Juices


June and I have been in a dry spell where we didn't get out to photograph much at all beyond what can be found in our yard.  Last night we tossed the cameras and tripods in the car and headed to the mountains to see what we could find to photograph around sunset.  It was a great evening where the juices started to flow again.

When we drove through Johnson City and the way to Unicoi the temperature was 88 degrees.  By the time we reached Beauty Spot on Unaka Mountain, the temps had dropped to 73!  Much nicer!!  When we arrived we discovered more cars than I had ever seen up there.  There were many people enjoying the cool mountain air and spectacular mountain views.  Most appeared to be college-age and I think we were the oldest by about 30+ years.  No worries.  We picked our spot and waited for the show to begin.

June's Sunset Photo
When we think about sunsets we hope for a beautiful scene like June's photo above.  I'm proud of her photo.  It was the first one I posted after getting home around 10:30.  But there are many ways to photograph a sunset.

One way to change it up is to shoot wider.
Wide-angle 14mm (21mm full-frame equivalent)

Maybe use that same wide-angle lens to emphasize the foreground while including the sunset in the background.

Maybe swapping out the lens for a telephoto zoom to include just part of the sunset.

46mm (69mm)

66mm (100mm)

104mm (156mm)

By swapping to a longer telephoto zoom lens I can zoom in on just parts of the sunset.
177mm (266mm)


400mm (600mm)

400mm (600mm)

Too often we shoot from the same spot using the same lens and the same focal length.  Don't let this habit squash your creativity. These photos are just an example of how changing the lens and focal length can result in vastly different photos of the same subject. 


Thursday, July 23, 2020

Why I Use Exposure Compensation

Most of the time modern digital cameras will do a pretty good job adjusting the shutter speed, aperture, and/or ISO to get a well-exposed photograph.  Other times the photo comes out too dark or too bright and can't be saved.  Why does this happen and what can be done to get a better exposure?

Digital camera light meters work by evaluating light reflected off objects in the frame.  Depending on if you are in aperture priority, shutter priority, or manual, the camera will attempt to adjust one or more settings to make the overall exposure close to a standard middle gray (also known as 18% gray).

If most of the things in the frame are very dark, the camera will attempt to brighten up the exposure. If the subjects are mostly bright it will darken the exposure so the overall scene is close to 18% gray.  As smart as modern cameras are, they can't tell what parts of the scene are important.  While the overall scene may be properly exposed, the important subject may be too dark or too bright.

Default exposure - 1/1000 sec., f/6.4, ISO 160

In the photo above, the bright sky behind the Bluebird caused the Bluebird to come out dark.   There are a few things that can be done to fix this problem.  I could (1) set my camera to spot metering so I only measured the brightness of the bird, (2) move so the background is not so bright, or (3) use Exposure Compensation to adjust the exposure.

In most cases, I don't change the metering mode when photographing wildlife. Switching metering modes on most cameras is cumbersome.  The bird would be gone by the time I made the changes.  

Exposure Compensation allows me to override the exposure settings that were determined by the camera, in order to darken or brighten images before they are captured. On my Fuji X-T1, X-T2, and X-T3 cameras there is a dial on the top of the camera that I can turn to quickly and easily adjust the exposure compensation. Unfortunately, exposure compensation is not as easy to change on all cameras.  You will need to learn how to change it on your camera.

Using the Bluebird as an example, I adjusted the exposure compensation to make the photo 1 2/3 stops (EV) brighter and took the photo again.

+1 2/3 EV exposure - 1/1000 sec., f/6.4, ISO 320

When photographing birds I have my shutter speed and aperture fixed and let the camera adjust the ISO.  When I told the camera to make the photo 1 2/3 stops brighter it did so by doubling the ISO. You can see the second photo is noticeably brighter than the first.

How the camera makes the adjustments depends on what mode you are using
  • Aperture Priority - the camera will leave the aperture where you set it and adjust the shutter speed.
  • Shutter Priority - the camera will leave the shutter speed where you set it and adjust the aperture.
  • Manual with Auto ISO - the camera will only adjust the ISO.  This is the mode I was using.
  • Exposure compensation may not be available if you are using Auto mode.
Being mirrorless cameras, my Fuji's show me the adjusted exposure and live histogram in the viewfinder as I am composing the shot.  With DSLR cameras you may have to make a shot, check out the exposure, adjust and shoot again. An alternative is to use exposure bracketing to automatically take 3 or more shots at different exposure compensation settings.

There is another alternative that can help get the right exposure.  The problem in this example is that sky is too bright compared to the bird.  Sometimes we can maneuver ourselves to change the background to something closer to the brightness of the subject.
1/1000 sec., f/6.4, ISO 1250

In this third shot, I moved so that there were trees behind the bird instead of the sky.  I didn't have to make any adjustments to the exposure.  Most of the time it's not practical to move but it does a great job when I can.

I hope these three examples and explanation gives you a feel for how Exposure Compensation works.  I suggest you figure out how to use it on your camera and give it a try.

Monday, April 20, 2020

Breaking the Macro Habit

When I think about making photos of flowers a Macro lens usually is what I have in mind.  A Macro
Trillium photo taken with an 80mm Macro lens
is designed to make very sharp photos while focusing up close.  When using a Macro lens and the camera on a tripod, a photographer can make some awesome photos of flowers.

Using a Macro lens for flowers might just be a habit to break.  Today I started with my 80mm Fuji Macro and added an extension tube that allowed me to be able to focus even closer.  After wandering around the yard for a while I decided to put the Macro up and get my favorite fun little lens - the Fuji 35mm f/2. 

The 35mm focal length is equivalent to a 53mm on a full-frame camera.  That means, the 35mm is my "normal lens". A scene viewed through a normal lens appears to have the same perspective as the way your eye sees it.  This is a very small lens, making it fun to carry around.  It also has a minimal focal distance of less than 14 inches.  It has a bigger depth of field, making it easier to get sharp photos without a tripod. It's a fun way to break the mold and try something new.

Here are some photos I took today using that normal lens.  They are all hand-held.  Some are cropped.  All were using the Fuji Velvia film simulation which gives them vibrant colors.

f/2.8
 The dogwood photo includes some of the background, making the pink flowers stand out.
f/3.6

f/2.8

Crop of the previous photo

f/2.8
The point of this illustration is to say we shouldn't let our photographic gear constrain our creativity.  Use a wild angle for a close-up, use a big zoom for a landscape, try using a Macro lens for portraits.  Let's use our "safer at home" time to be creative.

Monday, March 30, 2020

"How do you know that?" Characteristics of light in photography

The depth of field (what's in focus) in this photo is pretty small.  About all you can read is the one line - "How do you know that?" 

I don't consider myself an expert photographer but I do enjoy sharing what I have learned, often the hard way, over the years.  Most things I've learned from experience and that's how I "know that." One of the best ways to share what I've learned is by example, which I try to do when blogging.

Being at home more has led me to experiment photographing things around the house.  In this case, an old non-fiction book and a pair of antique eyeglasses my dad gave to me.  They belonged to a relative but no one remembers who.  I'm not great at still life photography.  I do better at making photos of things that have been arranged for me, like wildflowers and mountains than things that I have to arrange.  However, we grow by working on things we are not good at.

The very first topic in my photography class is what I consider the most important.  It is not camera settings, the latest gear, or posing beautiful subjects.  I consider light the most important element in photography.  The right light can make a photo but even the most beautiful subjects can be poor photos in the wrong light.  Photographers love to talk about good light and bad light.  Light is not good or bad, but different kinds of light work better in different situations.

Light has three characteristics

  1. Direction
  2. Color
  3. Hard (direct) or soft (diffused)
Color Under LED Lights
I want to show you a little example of hard vs. soft light using a couple examples of photos I made with the book sitting on our kitchen table.  Above the table is a hanging lamp with 5 LED bulbs.  To the right is a set of French Doors that lead out to a covered deck area.  Those two light sources have different characteristics.


The lens aperture and focal length in these two photos are the same. The LED lights made the paper very yellow when using the auto white balance setting.  I corrected the white balance (light color) in each photo to be as realistic as possible. 


Direct Overhead Light


Indirect Side Light


Notice the shadows in the first photo.  They come from the overhead lights.  In the second photo what shadows can be seen are faint and soft.  The overhead lights also made the tabletop brighter.  The indirect light from the right made the book in the background brighter.

Indirect Light
Direct Overhead Light

In the second example, you can see how the direction of the light creates different shadows.  The photo with the indirect light coming from the right created a shadow in the crease of the book.  The direct light also overpowered the indirect light and minimized the reflections from the door in the lens.  The indirect light highlighted the brass hinge and the color of the eyeglass arms.

“There are no rules for good photographs, there are only good photographs.”
–Ansel Adams

Neither photo is right or wrong, just different.  As the photographer, it is up to us to use the light in our composition to emphasize what we want and de-emphasize what we don't want.  

Before making your next photo think about the light.  Where is it coming from?  Is it creating hard shadows?  Is it warm and pleasing or blue and cold?  How can you use that light to make a better photo?